
Last Updated: November 4, 2026
Quick Summary
Beginner friendly jewelry making starts with three pliers, one flush cutter, and a bead board, which is enough to make bracelets, earrings, and simple necklaces. Practice simple projects in order, like a stretch bracelet and drop earrings, before moving to wire wrapping. Crimping is the foundation of most strung jewelry, so learn it cleanly first.
- Three pliers cover almost every beginner task: round nose, chain nose, and flush cutters.
- Make the same simple piece five times to learn tension and build skill.
- Thread a crimp bead, then the clasp, then back through the crimp before squeezing.
- Open jump rings side to side with two pliers, never pull them apart.
- Practice filing, sanding, and hammering on scrap copper before touching sterling silver.
Table of Contents
- Essential Tools and Supplies for Jewelry Making at Home
- Easy Jewelry-Making Ideas for Beginners
- Basic Wire Working Techniques: Stringing, Crimping, and Clasp Attachment
- Metal Jewelry Making for Beginners: Simple Metalsmithing Skills
- How to Make Handmade Jewelry Look Professional
- Safety Precautions and Troubleshooting Common Failures
- Choosing Your First Jewelry-Making Kit from Craft Living Artistry
- Frequently Asked Questions
Essential Tools and Supplies for Jewelry Making at Home
You do not need a full studio to start. Beginner friendly jewelry making techniques work best with a small, focused set of tools, and most people buy far too much before their first piece.
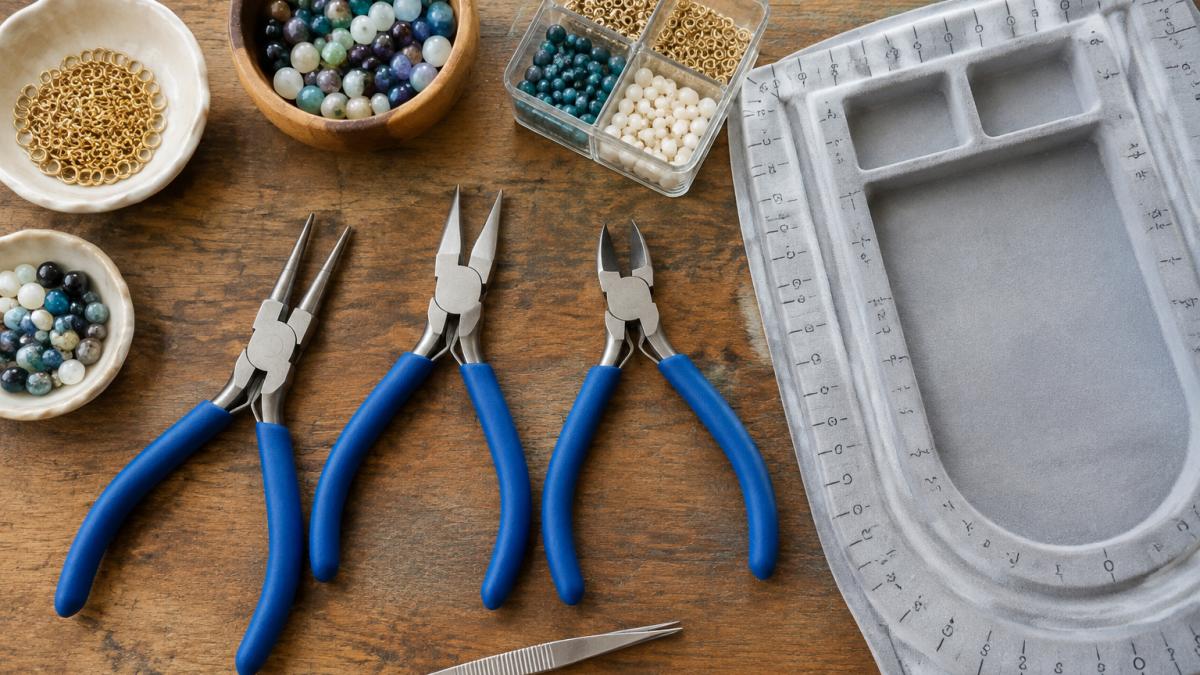
Start with three pliers, one cutter, and a bead board. That is enough to make bracelets, earrings, and simple necklaces.
The Core Pliers Set and Cutters You Actually Need
Three pliers cover almost every beginner task:
- Round nose pliers bend wire into loops and curves
- Chain nose pliers grip flat and reach into tight spots
- Flush cutters trim wire cleanly without sharp burrs
A common mistake is buying a cheap multi-tool instead. Buy these three separately for a better fit. Unsure whether you need cutters or pliers first? This comparison of jewelry pliers vs wire cutters for beginners breaks down which tool does what.
Setting Up a Small, Workable Home Workspace
A workable bench needs very little: a flat surface, good light, and a tray with a lip so beads do not roll onto the floor.
- Use a bead board to lay out patterns before stringing
- Keep a small dish for each finding type
- Add a clamp-on lamp with daylight bulbs
A bead board is a useful purchase for beginners. It holds your design in order while you work.
Easy Jewelry-Making Ideas for Beginners
The fastest way to build skill is to make the same simple piece five times. Repetition teaches tension, which separates neat work from messy work.
Try these easy jewelry-making ideas for beginners in order:
- A stretch bracelet on elastic cord
- A beaded chain necklace with a clasp
- Simple drop earrings on headpins
- A wire-wrapped pendant
- A charm bracelet with jump rings
Each project adds one new skill. Do not jump to wire wrapping before you can crimp cleanly.
Basic Wire Working Techniques: Stringing, Crimping, and Clasp Attachment
Crimping is the foundation of most strung jewelry. A crimp is a small metal tube or bead that secures beading wire to a clasp. Done right, it holds for years.
Here is the sequence:
- Thread a crimp bead, then the clasp, then back through the crimp
- Pull the wire snug, leaving a small loop
- Squash the crimp with chain nose pliers
- Trim the tail with flush cutters
For clasp attachment, always test the join before you finish the other end. Pull firmly. If it slips now, it will slip on a customer later.
Understanding Findings: Jump Rings, Headpins, and Eyepins
Findings are the small metal components that connect everything: jump rings, headpins, eyepins, crimps, and clasps.
- Jump rings link components; open them side to side, never pull them apart
- Headpins have a flat stop at one end for beads
- Eyepins have a loop at one end for hanging
Opening a jump ring the wrong way weakens the metal. Twist sideways with two pliers and it stays strong. When you reach the crimping stage, this guide to crimp beads vs tubes explains which style suits your project.
Metal Jewelry Making for Beginners: Simple Metalsmithing Skills
Metal jewelry making for beginners starts with soft wire and hand tools, not a torch. Annealing, soldering, and heat texturing can wait until you can file, sand, and hammer consistently.
The Starter Metalsmithing Tool Set
You can begin with five items that cost far less than a full silversmithing setup:
- Steel bench block, a small hardened steel plate for hammering and flattening wire
- Chasing hammer, lightweight, with one flat face that planishes and one rounded face that textures
- Jeweler’s file set, at minimum a half-round and a flat file in fine cut for smoothing cut ends and edges
Soldering introduces heat, flux, and fire safety before you have the hand control to keep a seam aligned. Learn cold connections first.
Four Skills to Practice Before You Touch Sterling Silver
Work through these in order on copper or brass scrap:
- Filing rough wire ends smooth. Cut wire leaves a burr. Draw the file in one direction along the end until it feels smooth to a fingertip. Do not saw back and forth, that rounds the end instead of flattening it.
- Sanding with graduated grits. Move from coarser to finer paper, cleaning the piece between grits so loose abrasive does not scratch. Skipping a grit leaves scratches polishing cannot remove.
- Hammering on a bench block for texture. Use the rounded face of the chasing hammer with light, overlapping strikes. Heavy blows flatten and work-harden the wire, making it brittle.
- Polishing with a soft cloth and compound. Rub compound into the cloth, not the piece, and buff in one direction. A clean cloth removes residue; a dirty one smears it back on.
Watch out: hammering work-hardens metal. If a wire becomes stiff and springy, it is work-hardened and more likely to crack. Anneal it with heat or set it aside and switch to a fresh piece.
Copper First, Silver Later
Practice on scrap copper before you touch sterling silver. Copper behaves similarly under a file and hammer and is generally less expensive than silver. Brass is a common middle step between copper and silver. Once your filing, sanding, and hammering are consistent on copper, the same motions transfer to silver with only a small adjustment for the softer metal.
Safety for Hand-Tool Metalsmithing
Even without a torch, metalsmithing produces hazards:
- Wear safety glasses when filing, sanding, or hammering, metal fragments fly
- Clamp the bench block or hold it firmly; a loose block can shift and send a hammer strike into your hand
- Keep files clean with a file card; clogged teeth skip and scratch
If you later move to soldering, add ventilation, a fire-safe surface, and eye protection rated for the work. That is a separate skill set, not a beginner requirement.
How to Make Handmade Jewelry Look Professional
Professional-looking jewelry comes down to three habits: clean cuts, consistent loops, and a proper finish. If your pieces still look amateurish, this guide on why your jewelry projects look cheap offers concrete fixes to make your work look polished. What most guides miss is that matching metal tones and testing every join matters more than technique. Mixing silver and gold-tone findings makes careful work look assembled rather than designed, and an untested clasp will fail on a customer even if the piece looks perfect on the bench.
The Finishing Sequence That Separates Neat Work from Messy Work
Work through these steps on every piece before you call it done:
- Trim every wire tail flush. Use flush cutters with the flat side toward the work so the cut is square, not angled. An angled cut leaves a sharp point that catches on clothing and skin.
- File and smooth every cut end. A few strokes with a fine jeweler’s file removes the burr. Run a fingertip over the end, if it catches, keep filing.
- Sand in graduated grits where the metal shows. Start around 400 and move to 600 and 1000, cleaning between grits so loose abrasive does not scratch.
- Polish with a soft cloth and compound. Buff in one direction, then switch to a clean cloth to remove residue. A dirty cloth smears compound back onto the piece.
- Test every join before finishing the other end. Pull firmly on the clasp and crimp. If it slips now, it will slip later.
Consistent Loops: The Marker Trick
Inconsistent loop sizes are the most visible beginner tell. Make loops the same size every time by wrapping wire around the same barrel of your round nose pliers and marking that spot with a permanent marker. Line the wire up to the mark on every loop. Three or four practice loops on scrap wire dial in the muscle memory before you touch a finished piece.
Match Metal Tones and Findings
Use consistent findings in the same metal tone throughout a piece. Silver-tone jump rings with a gold-tone clasp read as a mistake, not a design choice. Buy findings in matched packs so you are not digging through a mixed jar. If you are working with sterling silver wire, use sterling findings; if you are working with gold-filled wire, use gold-filled findings.
Why Your Jewelry Broke: A Troubleshooting Checklist
Beginners often quit when a piece fails. Failures are normal, and most trace to a short list of causes:
| Problem | Likely Cause | Fix |
|---|---|---|
| Loose crimp | Wrong crimp size or weak squeeze | Cut off, re-crimp with a fresh crimp |
| Bent wire | Too much force on a small gauge | Straighten gently or replace the wire |
| Broken clasp | Thin gauge or sharp jump ring edge | Switch to a heavier clasp and smooth the ring |
| Kinked beading wire | Wire twisted during stringing | Restring; never reuse kinked wire |
| Discolored skin | Plated findings wearing through | Switch to sterling, gold-filled, or stainless |
| Jump ring opened and slipped | Ring pulled apart instead of twisted | Open side to side with two pliers |
Watch out: reusing a squashed crimp always fails. Crimps are single-use, so keep a small bowl of spares on the bench. The same goes for kinked beading wire, once it kinks, the internal structure is compromised and it will break at the kink.
Photograph and Price Before You Sell
If you plan to sell beginner pieces, two habits protect your reputation. First, photograph on a neutral background in daylight, a white foam board and a windowsill beat any phone flash. Second, price by materials plus time, not by what feels fair. Track your materials cost per piece and add a rate for your time as a starting point for pricing.
Safety Precautions and Troubleshooting Common Failures
Most beginner injuries come from two things: flying wire snippets and eye strain. Both are easy to prevent.
Protective Gear and Safe Work Habits
- Wear safety glasses when cutting wire
- Cut toward a tray, not toward your body
- Keep small beads away from young children and pets
Fixing Loose Crimps, Bent Wires, and Broken Clasps
| Problem | Likely Cause | Fix |
|---|---|---|
| Loose crimp | Wrong crimp size or weak squeeze | Cut off, re-crimp with a fresh crimp |
| Bent wire | Too much force on a small gauge | Straighten gently or replace the wire |
| Broken clasp | Thin gauge or sharp jump ring edge | Switch to a heavier clasp and smooth the ring |
| Kinked beading wire | Wire twisted during stringing | Restring; never reuse kinked wire |
Watch out: reusing a squashed crimp always fails. Crimps are single-use, so keep a small bowl of spares on the bench.
Choosing Your First Jewelry-Making Kit from Craft Living Artistry
A kit removes the guesswork. Instead of buying six separate items and hoping they match, you get pliers, cutters, wire, findings, and beads chosen to work together.
At Craft Living Artistry, we curate kits, cords, beads, and maker tools so everything you need arrives in one place. To compare options before you commit, our roundup of the best beginner jewelry making kits lays them side by side. You can also browse our full jewelry making supplies list for beginners to build your bench piece by piece.
Start with one kit, one project, and one evening. The skills compound faster than you expect.
Frequently Asked Questions
What tools do beginners need to make jewelry?
Start with three pliers: round nose pliers for loops, chain nose pliers for gripping, and flush cutters for trimming wire. Add a bead board to keep components organized, plus a few basic findings like jump rings, headpins, and clasps. A crimping tool and beading wire cover most stringing projects. You do not need a full metalsmithing setup to begin. A jewelry making kit can bundle these essentials so you avoid buying duplicates or missing pieces.
What are some easy jewelry-making ideas for beginners?
Start with beaded bracelets on elastic cord, simple drop earrings using headpins and jump rings, and layered chain necklaces with a single charm. These projects teach wire wrapping, crimping, and clasp attachment without requiring soldering. Memory wire bracelets are another quick win because they need no clasp at all. Each project takes under an hour and uses a small set of findings, so you build skills before investing in advanced tools.
How can beginners make handmade jewelry look professional?
Three habits make the biggest difference. First, cut wire ends flush and file them smooth so nothing snags. Second, make consistent loops with round nose pliers rather than bending wire by hand. Third, choose matching metal findings in sterling silver or a single base metal instead of mixing tones. Polishing the finished piece with a soft cloth removes fingerprints and tarnish. Symmetry and clean finishes read as craftsmanship, even on simple designs.
Can you make jewelry at home with basic supplies?
Yes. A small table, good lighting, a bead board, and a basic pliers set cover most beginner projects. Keep a divided storage box for beads and findings so you can find components quickly. Work on a bench block or cutting mat to protect your surface. Ventilation matters if you later try soldering or metal stamping. Start with stringing and wire work, then add tools as your projects grow.
Ready to make your first piece? Craft Living Artistry stocks curated kits with matched pliers, findings, and beads, plus cords and maker tools for every project. Browse the collection, pick a starter kit, and get your bench set up this week.





0 Comments