
Table of Contents
- How to Fix 3D Printing Layer Issues: A Step-by-Step Guide
- What You’ll Need Before You Start
- Step 1: Diagnose the Layer Issue
- Step 2: 3D Printer Layer Shifting Fix
- Step 3: Fixing 3D Printing First Layer Adhesion Problems
- Step 4: Calibrate Flow, Temperature, and Speed
- Choosing the Best Filament for High Quality Prints
- Advanced Fixes: Slicer Settings and Environmental Factors
- Frequently Asked Questions
Last Updated: October 2, 2026
How to Fix 3D Printing Layer Issues: A Step-by-Step Guide
Layer problems rarely mean your printer is broken, one variable drifted out of tolerance, and the print is telling you which one. This guide from Craft Living Artistry walks through how to fix 3D printing layer issues in the order that saves time: diagnose first, then adjust mechanics, then tune flow and temperature.
What You’ll Need Before You Start
Gather your tools before you touch the machine.
- Digital calipers for measuring filament diameter and wall thickness
- Feeler gauge or a sheet of paper for bed leveling
- Metric hex key set matching your printer’s hardware
- Small brush for cleaning the hotend and nozzle
- Flush cutters and a nozzle cleaning needle
- Your slicer open with a known-good print profile
- A calibration model such as a temperature tower and a flow test cube
Log every change you make. One adjustment at a time is the difference between solving a defect and chasing it for a week.
Step 1: Diagnose the Layer Issue
Diagnosis means matching the visible defect to its likely cause before changing a single setting.
Examine the failed print under bright light, checking walls, corners, and the first ten layers separately.
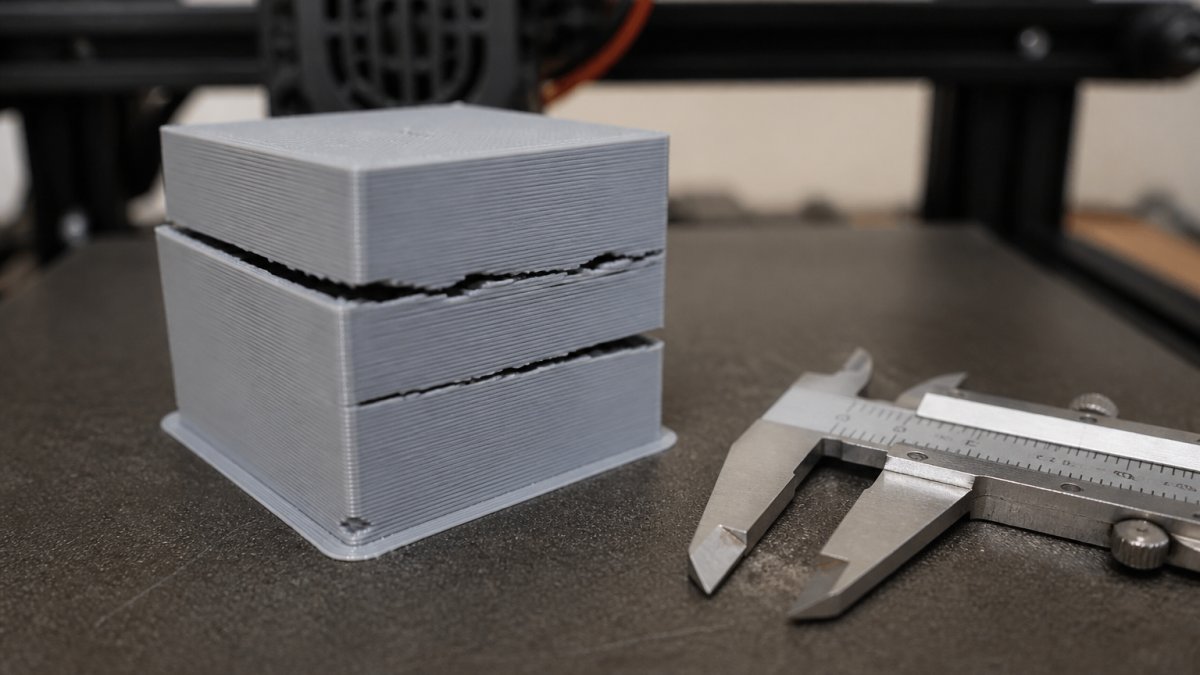
Visual Diagnostic Gallery: Match the Defect to the Cause
Use this table to translate what you see into what to check first.
| What You See | Most Likely Cause | First Fix |
|---|---|---|
| Layers offset sideways | Loose belt or pulley | Tighten belt tension |
| Gaps in walls, thin extrusion | Under-extrusion, low flow rate | Calibrate flow rate |
| First layer won’t stick | Bed leveling or Z-offset | Re-level and set Z-offset |
| Rough, blobby surface | Extruder temperature too high | Run a temperature tower |
| Corners bulging, ringing | Acceleration or jerk too high | Lower acceleration in slicer |
| Layer separation, cracks | Low nozzle temp or cooling too fast | Raise temp, slow cooling fan |
| Random zits and blobs | Moisture in filament | Dry the filament |
Photograph every failed print next to a ruler before you throw it away. After three or four failures, the photos reveal a pattern your memory won’t, especially when the defect only shows up on one side of the bed.
Step 2: 3D Printer Layer Shifting Fix
A 3D printer layer shifting fix almost always comes down to mechanical looseness: the print head or bed moved when it shouldn’t have.
Check belt tension first. Pluck the belt like a guitar string: it should give a low, firm tone, not a floppy thrum. A loose belt lets the carriage lag during direction changes.
Tightening Belts and Pulleys
Tighten the belt with the frame tensioner, then check the drive pulley set screws. A pulley spinning freely on its motor shaft causes intermittent shifts that look random. Mark the shaft and pulley with a paint pen, run a short print, and check whether the marks moved.
Mechanical Backlash and Gantry Alignment
Backlash is lost motion: the carriage moves a little before the belt engages. Push the carriage by hand with the steppers disabled and feel for a dead zone at each direction change. On gantry printers, check that both Z lead screws turn together and the gantry sits square.
Overtightening a belt is a real failure mode. A belt stretched past its limit loads the stepper motor bearings and can cause skipped steps that look exactly like a loose belt. Tighten until firm, not until it hums.
Step 3: Fixing 3D Printing First Layer Adhesion Problems
Most 3D printing first layer adhesion problems trace back to the nozzle-to-plate gap.
Clean the build plate with warm water and dish soap, then dry it. Finger oils are the most common cause of a first layer that sticks in the middle and peels at the edges.
Bed Leveling and Z-Offset Calibration
Level the bed at all four corners, then re-check the center, many beds have a slight dip or crown. Set Z-offset with a feeler gauge, then fine-tune it live during the skirt or brim of a test print. The first layer should look like a smooth, slightly squashed ribbon with no gaps.
Build Plate Surface and Temperature
Match the surface to the filament: smooth surfaces grip well when clean and warm, while textured surfaces forgive small Z-offset errors. Raise bed temperature if corners lift, and add a brim for parts with a small footprint.
| Symptom | Likely Cause | Adjustment |
|---|---|---|
| First layer lines have gaps | Nozzle too far from bed | Lower Z-offset |
| First layer is transparent or thin | Nozzle too close | Raise Z-offset |
| Corners lift after 20 layers | Bed temp too low, drafts | Raise bed temp, enclose |
| Sticks in center, peels at edge | Uneven bed | Re-level, check for warp |
Step 4: Calibrate Flow, Temperature, and Speed
Once the mechanics are sound, remaining defects are almost always calibration. Under-extrusion, temperature, and speed interact, so change one at a time.
Under-Extrusion and Flow Rate Calibration
Under-extrusion shows up as gaps between wall lines and weak, brittle parts. Print a single-wall calibration cube, measure the wall with calipers, and adjust the extrusion multiplier until it matches your slicer’s expected line width. Also check filament diameter at three points along the spool, varying thickness prints inconsistently no matter how well you calibrate.
Extruder Temperature and PID Auto-Tuning
Temperature swings cause inconsistent extrusion and rough surfaces. Run a PID auto-tune on the hotend and heated bed, then print a temperature tower to find the sweet spot for that spool: most filaments print cleanly across about 10 degrees Celsius.
Adjusting Print Speed and Acceleration Settings
Speed problems show up as ringing, ghosting, and corner bulges. Lower acceleration and jerk before overall print speed, because acceleration causes the shaking.
Mechanics first, calibration second. A perfectly tuned flow rate won’t save a print from a loose belt, and no belt tension will fix a nozzle that’s too far from the bed.
Choosing the Best Filament for High Quality Prints
The best filament for high quality prints has a tight diameter tolerance, low moisture content, and a temperature range matching your hotend.
Diameter consistency is the single most important spec. Filament that varies beyond a small tolerance produces visible banding no matter how well the printer is calibrated, because the extruder pushes a different volume of plastic with every rotation.
Moisture: The Layer Defect Most Guides Skip
Most troubleshooting lists stop at hardware, but moisture in filament is one of the most common causes of layer inconsistencies that survive every mechanical fix.
A simple test: extrude a short strand into open air and listen. Steady crackling or visible steam means the spool needs drying.
Drying parameters vary by material. A common pattern is:
| Material | Typical Dry Temp | Typical Dry Time |
|---|---|---|
| PLA | 40-45 C | 4-6 hours |
| PETG | 60-65 C | 4-6 hours |
| TPU | 45-50 C | 6-8 hours |
| Nylon | 70-80 C | 8-12 hours |
Use a dedicated filament dryer or a food dehydrator with a known temperature range.
Environmental Factors That Cause Layer Inconsistency
Room humidity matters as much as spool humidity. In a damp climate, a spool left on the printer overnight can absorb enough moisture to affect the next morning’s print.
Ambient temperature swings cause a second class of layer defects. A printer near a window, exterior door, or AC vent cools one side of the part faster than the other, producing layer separation, warping, and asymmetric surface finish.
Log the room’s relative humidity alongside your print settings. A common pattern is that the same spool prints cleanly at 30% relative humidity and shows zits at 60%. Once you see the correlation, you can dry proactively instead of troubleshooting after every failed print.
For everyday prints, PLA is the most forgiving and easiest to dial in. PETG tolerates more heat and impact but strings more. Match the material to the job, buy from a supplier that publishes a diameter tolerance, and treat storage as part of the print process.
Advanced Fixes: Slicer Settings and Environmental Factors
When the basics are dialed in and defects persist, the cause is usually in the slicer profile or the room.
Jerk and Acceleration: The Physics Behind Ringing and Corner Bulges
Most guides stop at “slow down.” That works, but it costs print time. Understanding the mechanism lets you fix the defect without slowing the whole print.
Acceleration is how fast the toolhead changes velocity, measured in mm/s squared.
A practical order of operations:
- Lower jerk first. It has the largest effect on corner artifacts and the smallest effect on total print time.
- Then lower acceleration in steps. Reduce by roughly a quarter at a time and reprint a small test model with sharp corners.
- Only lower overall print speed if the defect persists. Speed is the blunt instrument; acceleration and jerk are the scalpel.
If your firmware supports input shaping (resonance compensation on many modern boards), run the calibration routine.
Retraction: Stringing Versus Jams
Retraction pulls filament back during travel moves to prevent oozing. Too little leaves stringing; too much pulls molten plastic into the hotend’s cold zone, where it cools, sticks, and eventually jams.
Tune retraction with a multi-tower test model. Start with a short distance, increase in small steps, and stop as soon as stringing disappears, going further doesn’t improve the print and increases jam risk.
Environmental Control
A printer near a window or AC vent fails on one side of the bed and not the other, because uneven cooling makes the part contract at different rates. Enclosing the printer, or moving it away from drafts, often resolves layer separation and warping no slicer setting fixes.
Post-Processing Recovery: Salvaging a Print With Minor Layer Issues
Most guides explain how to fix the printer but not how to salvage a print with minor layer issues.
- Surface roughness and light ringing: Sand progressively with 220, 400, then 800 grit, then apply a filler primer to fill the fine ripples and give a uniform base for paint.
- Small gaps and zits: Use a matching-color filler or a thin bead of CA glue followed by sanding. For functional parts, a light sanding is usually enough.
- Layer separation on a cosmetic part: A heat gun passed quickly over the surface can reflow the top layers and blend the seam. Keep the nozzle moving and do not linger, or the part will sag.
- Warped corners on a functional part: If the part is not dimensionally critical, sand the warp flat. If it is, reprint with a brim and an enclosure rather than trying to force the part back into shape.
Not recoverable: layer shifts that break dimensional accuracy, cracks through a load-bearing feature, and delamination past the surface. For those, reprint after fixing the root cause.
Tune jerk and acceleration before you touch overall print speed, dry your filament before you blame the slicer, and salvage cosmetic defects with sanding and filler rather than reprinting. The printer is usually fine; the profile and the room are what drift.
Frequently Asked Questions
What are the most common causes of 3D print layer shifting?
Layer shifting usually comes from a loose belt, a pulley set screw that has backed out, or the print head catching on a curled edge. Check belt tension first: pluck it like a guitar string and tighten until it gives a low, firm note. Then confirm the set screws on the stepper motor pulleys are snug. If those check out, lower print speed and jerk settings in your slicer, since fast direction changes can overwhelm the motor.
How does filament quality affect 3D printing layer consistency?
Filament diameter tolerance matters more than most people expect. A spool that varies by 0.05 mm from the stated 1.75 mm will over-extrude in some spots and under-extrude in others, producing banding and weak layers. Moisture is the other factor: wet filament pops and steams at the nozzle, leaving gaps and rough surfaces. Store spools in a sealed container with desiccant, and dry them before a long print.
Can you print a 0.2 mm layer height with a 0.4 mm nozzle?
Yes. A 0.4 mm nozzle handles layer heights from roughly 0.08 mm to 0.28 mm, so 0.2 mm sits comfortably in range. The general rule is to stay between 25% and 75% of the nozzle diameter. Going below 0.08 mm risks clogging and inconsistent extrusion, while going above 0.28 mm leaves layers that do not bond well. If you want finer detail, switch to a 0.2 mm nozzle rather than pushing a 0.4 mm one past its limits.
What should I check if my 3D printer is skipping layers?
Skipped layers, where a band of the print is missing or sunken, usually trace back to a partial nozzle clog or inconsistent extrusion. Start by doing a cold pull to clear debris from the hotend, then run a flow rate calibration to confirm your extrusion multiplier is accurate. Also check that your filament spool spins freely, since drag on the spool can starve the extruder and cause intermittent gaps.



0 Comments