
Table of Contents
- Why Missing Pieces Happen and How to Spot Them Early
- Craft Kit Inventory Checklist: What to Do Before You Start
- How to Organize Craft Supplies to Prevent Loss During Assembly
- What to Do If a Craft Kit Is Missing Parts
- DIY Repairs: Creating Replacement Parts for Missing Components
- Preventing Loss During Shipping and Unboxing
- Digital Inventory Management for Craft Kits
- Conclusion
- Frequently Asked Questions
Last Updated: September 27, 2026
Why Missing Pieces Happen and How to Spot Them Early
Opening a craft kit to find a gap where a piece should be is one of the most frustrating moments in any project. Avoiding missing pieces in craft kits starts with understanding why they go missing in the first place.
Most losses trace back to a few common causes:
- Packing errors at the factory. Small parts get skipped during assembly.
- Shipping damage. A torn bag or crushed box lets pieces escape.
- Unboxing scatter. Tiny beads or cutouts roll off the table unnoticed.
- Handling during assembly. Pieces get misplaced mid-project.
Craft Kit Inventory Checklist: What to Do Before You Start
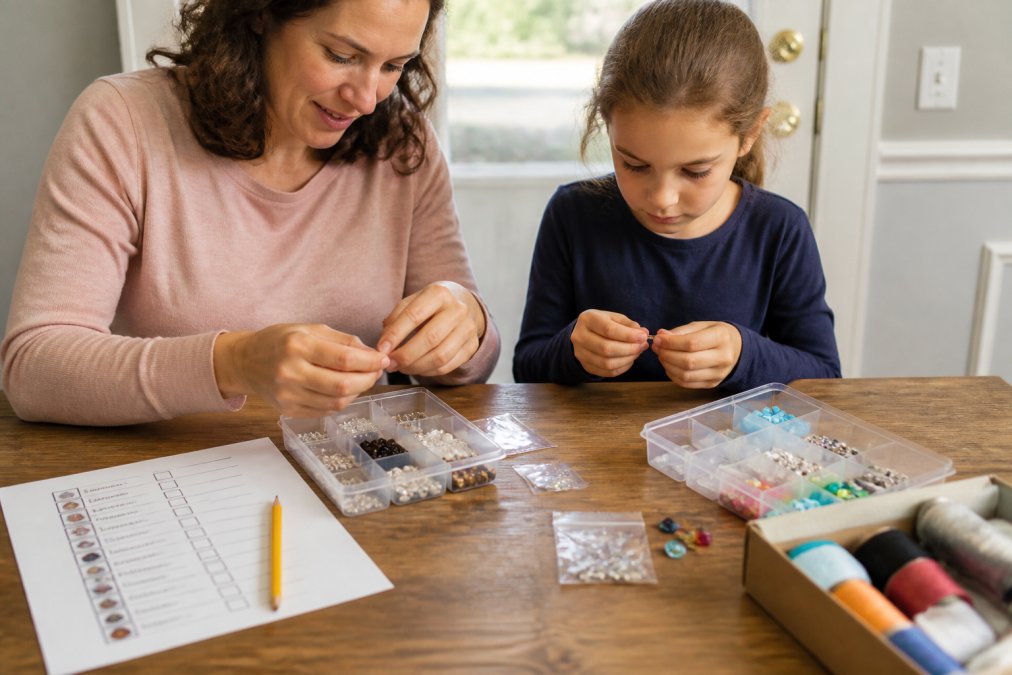
A craft kit inventory checklist is a simple count-and-compare routine you run before touching any glue or paint. It takes about ten minutes and prevents most mid-project surprises. The goal is to confirm every component is present while you can still fix the problem.
Step 1: Unbox and Sort
Empty the entire kit onto a clean, flat surface. Sort pieces into groups by type: beads, cords, cutout pieces, adhesives, and tools. Use small bowls or trays so nothing rolls away. Work in bright light, since tiny components hide against dark tabletops.
Step 2: Compare Against the Kit Manifest
Most kits include a manifest or parts list. Read it line by line and check off each item as you confirm it. Mark quantities, not just presence. If the list says twelve beads, count all twelve. Note anything missing or damaged on paper before you begin.
Photograph your sorted layout before you start assembling. If a piece goes missing later, the photo shows exactly what you had and helps when you contact the maker.
How to Organize Craft Supplies to Prevent Loss During Assembly
Knowing how to organize craft supplies is the difference between a smooth build and a scavenger hunt. A dedicated workspace keeps small parts contained and visible. The setup matters more than the size of the space.
Workspace Organization and Clutter Management
Clutter is the enemy of small components. Follow these habits:
- Keep one project on the table at a time.
- Use shallow trays with raised edges for loose pieces.
- Store spare parts in labeled zip bags immediately.
- Return tools to the same spot after each use.
- Sweep the floor and table after every session.
Working over carpet is a common mistake. Dropped beads and cutout pieces vanish into fibers and rarely turn up. Use a hard floor or lay down a light-colored mat so fallen parts stay visible.
What to Do If a Craft Kit Is Missing Parts
If a craft kit is missing parts, don’t panic and don’t start improvising yet. First, recheck your sort. Pieces stick inside packaging folds, hide under the tray, or cling to the inside of a sealed bag by static. Once you’re certain something is gone, work through the options in order, cheapest and fastest first.
Contacting the Manufacturer
Reach out to the kit manufacturer first. Most makers keep spare parts on hand and will ship a replacement at no cost, especially within the first 30 days. Have your proof of purchase, the kit name, the part number, and a photo of your manifest ready before you write. A clear photo of the gap in your sorted layout speeds things up more than a paragraph of description.
Checking the Retailer
Some retailers handle replacements directly rather than routing you to the maker. If you bought from a large craft chain or an online marketplace, check the return and replacement policy before contacting the manufacturer, a retailer replacement may be faster, and some policies cover opened kits with missing parts. Keep the original packaging until the issue is resolved, since some retailers require it.
Third-Party Replacement Marketplaces
When the maker can’t help, discontinued kits, vintage kits, or makers that have closed, third-party replacement marketplaces fill the gap. These sites connect crafters who sell, trade, or part out individual components from kits they’ve already opened or abandoned. Search by kit name, part type, or manufacturer. This route works especially well for older kits where the original maker no longer stocks spares.
A few practical notes for buying through these marketplaces:
- Confirm the part number, not just the kit name. Makers often reuse kit names across editions with different components.
- Ask for a photo of the actual part before buying, not a stock image.
- Check seller feedback the same way you would for any online purchase.
- Buy spares when you find them. If a seller has multiple components from the same kit, picking up extras now saves a second search later.
Crafting Communities
Fellow makers are an underrated source. Dedicated forums, subreddits, and local crafting groups often have members with partial kits and spare parts. Post a clear photo of the missing piece alongside the kit name and part number. Many crafters keep a bin of orphaned components and are happy to mail one for the cost of postage.
Before you buy a replacement, photograph the empty slot in your sorted layout next to a ruler. That single image answers most of the questions a seller or maker will ask about size and shape.
- Contact the maker: fastest and usually free for current kits.
- Check the retailer: some handle replacements directly and may cover opened kits.
- Try marketplaces: best for discontinued, vintage, or orphaned kits.
- Ask crafting communities: fellow makers often have spares and will share for postage.
DIY Repairs: Creating Replacement Parts for Missing Components
Sometimes a replacement isn’t available, so you make one. Creating replacement parts is a practical skill for any serious crafter, and the method depends entirely on the material. A part that fits but flexes differently can fail under stress, so match the material whenever you can.
Cardboard and Paperboard Components
These are the easiest to reproduce. Trace the shape from the kit template onto matching stock, cut slightly outside the line, then trim to fit. Match the caliper (thickness) of the original, a piece cut from cereal-box stock will bow where the kit used 1.5 mm chipboard. Score fold lines with a dull blade before bending so the paper fibers don’t crack.
Wood Components
For laser-cut plywood or balsa pieces, match both the thickness and the grain direction. A replacement cut across the grain will snap along the same line the original was designed to resist. Use the kit’s own cutout sheet as a template where possible: lay it over your stock, clamp both layers, and cut through the existing hole.
Plastic and Resin Components
Injection-molded parts are the hardest to replicate because of draft angles and internal ribs. For flat or simple shapes, sheet styrene in 0.5 mm to 2 mm thicknesses cuts with a hobby knife and bonds with solvent cement. For shaped or hollow parts, mold making and casting open more options: a silicone mold captures the original shape, and two-part resin produces a replica.
3D-Printed Components
If the kit ships with a digital file, a scaled replica printed from that file matches the original. Scaling matters: print a test piece first to confirm the size, because a 2 percent error compounds across a multi-part assembly. Match the print orientation to the original where the file allows it, since layer lines run perpendicular to strength.
Matching Finish and Color
A replacement that fits but reads as a different color will pull the eye in a finished piece. For painted parts, color-match under daylight rather than indoor lighting, and apply the same number of coats as the original. For bare wood, test your stain on a scrap of the same stock before touching the replacement.
Match the original in shape, thickness, material, and finish. A part that fits but flexes, bows, or reads as a different color can fail under stress or stand out in the finished piece.
Preventing Loss During Shipping and Unboxing
Loss often happens before you ever start building. Preventing loss during shipping and unboxing protects every component. A little care at the door saves a lot of frustration later.
When a package arrives:
- Inspect the box for tears or dents before opening.
- Open over a tray, not over the floor.
- Keep all bags sealed until you begin the inventory check.
- Save the packaging until your project is done.
Digital Inventory Management for Craft Kits
Digital inventory management turns a paper checklist into a searchable record. For anyone with a shelf of kits, it prevents duplicate buys and lost parts. A simple spreadsheet or note app does the job.
Track each kit with these fields:
| Field | What to Record | Why It Helps |
|---|---|---|
| Kit name | Full title and maker | Quick lookup |
| Part list | Every component and count | Spot gaps fast |
| Status | Sealed, open, or complete | Avoid re-buying |
| Spare parts | Extras on hand | Fill future gaps |
| Photo | Sorted layout image | Proof for claims |
Conclusion
Missing pieces will happen, but they never have to end a project. A quick inventory check, a tidy workspace, and a simple digital record keep small parts accounted for from unboxing to the final step. When something does go missing, you have clear paths to a fix.
Frequently Asked Questions
What is the best way to inventory a new craft kit?
Unbox the kit on a clean, well-lit surface and sort all components by type. Compare each item against the kit’s manifest or instruction sheet, checking quantities. Use a tray or small bins to keep pieces separated. If your kit includes a craft kit inventory checklist, mark off each item as you verify it. This takes 10-15 minutes but catches missing pieces before you start crafting.
What should I do if I discover a missing piece in a new kit?
First, double-check your workspace and packaging materials; pieces often hide in folded instructions or static bags. If the piece is truly absent, contact the kit manufacturer or retailer with your order number and a photo of the missing item. Many brands offer free replacements. For discontinued kits, search third-party marketplaces for spare parts or consider a DIY substitute using materials you already own.
How can I prevent losing small craft components during a project?
Organize your workspace with labeled trays or small bins for each component type. Work over a mat with raised edges to catch rolling pieces. Keep the kit box and bags for storing unused parts. After each session, return all pieces to their designated spots. This simple routine reduces the chance of losing a critical piece mid-project and makes it easier to resume later.
Are missing pieces common in craft kits?
Missing pieces can happen, but they are not the norm for quality kits. Manufacturing errors, packaging mistakes, or shipping mishaps can cause components to be left out. Choosing kits from reputable brands and doing a quick inventory check upon arrival helps you catch issues early. If you find a missing piece, most manufacturers will replace it quickly, so you can get back to crafting.



0 Comments