
Table of Contents
- Choosing Your Jewelry Making Style and First Project
- Essential Jewelry Making Tools for Beginners
- Materials, Findings, and Supplies You’ll Need
- Setting Up Your Workspace and Studio
- Jewelry Making Techniques for Hobbyists
- Jewelry Making Safety Tips for Home Studios
- Your First Beginner Project: Simple Beaded Bracelet
- Best Beginner Jewelry Making Kits 2026
- Frequently Asked Questions
Last Updated: October 5, 2026
Choosing Your Jewelry Making Style and First Project
Starting a jewelry making hobby means deciding what type of pieces speak to you. The most popular styles for beginners are beading, wire wrapping, and simple stringing. Each offers different rewards and requires different skills.
Beading lets you create colorful bracelets and necklaces by threading beads onto cord or wire. Wire wrapping involves bending and shaping metal wire to hold stones or create decorative patterns. Stringing is the simplest approach, you thread beads directly onto elastic or thread without tools.
Your first project should match your interests and budget. Many beginners start with a beaded bracelet because it requires minimal tools and delivers fast results. If you love metal work, wire wrapping might call to you instead. The key is picking something you’ll actually enjoy making, not what sounds impressive.
Consider these questions before choosing:
- Do you prefer working with colorful materials or metals?
- How much time can you dedicate to learning new techniques?
- What finished pieces would you wear or gift?
Your answer shapes everything that follows. If you love bright colors and quick wins, beading is your path. If you’re drawn to delicate metalwork, wire wrapping deserves your focus.
Essential Jewelry Making Tools for Beginners
You don’t need an expensive toolkit to start a jewelry making hobby. A few quality tools do the job better than a drawer full of cheap ones.
The core tools every beginner needs are:
- Round-nose pliers – bend wire into loops and curves
- Flat-nose pliers – hold and straighten wire
- Wire cutters – cut wire cleanly without crushing it
- Beading needles – thread beads onto delicate cord
- Scissors – cut cord and thread
If you’re doing beading work, add a bead board to organize beads before stringing. A bead board has grooves that hold beads in place while you design your layout. This prevents beads from rolling everywhere and helps you visualize your finished piece.
For wire wrapping, invest in a wire gauge tool so you pick the right thickness for your project. Thicker wire is stronger but harder to bend. Thinner wire bends easily but breaks under stress.
Many beginners worry about tool quality. The truth is simple: mid-range tools work fine while you’re learning. Upgrade to professional-grade pliers once you know you’ll stick with the hobby. Starting with a curated beginner toolkit saves time researching individual tools, everything you need arrives together, tested and ready to use.
Materials, Findings, and Supplies You’ll Need
Materials are where your jewelry making hobby comes to life. Beads, wire, cord, and metal findings form the foundation of every piece you create.
Beads come in endless varieties. Glass beads are affordable and colorful. Gemstone beads cost more but feel premium. Wooden beads offer warmth and texture. For your first projects, start with glass or acrylic beads in colors you love.
Metal findings are the connectors that hold pieces together. Common findings include:
- Clasps – fasten bracelets and necklaces
- Jump rings – connect components without soldering
- Spacer beads – separate larger beads and add visual interest
- Crimp tubes – secure beads on wire
Wire comes in different gauges (thicknesses) and metals. Copper wire is affordable and forgiving. Sterling silver wire costs more but looks professional. Aluminum wire is lightweight and easy to bend.
Cord and thread choices depend on your project. Elastic cord works for simple bracelets. Beading thread is thin and strong for intricate designs. Leather cord adds texture and durability.
The best approach is buying materials as you start each project, not stockpiling everything at once. This keeps costs low and prevents waste. We offer focused selections of materials so you’re not overwhelmed by infinite options, just the supplies that work well together.
Setting Up Your Workspace and Studio
Your workspace doesn’t need to be fancy, but it needs to be organized. A cluttered desk leads to lost beads and frustration.
Start with a flat, clean surface at least 2 feet by 3 feet. A kitchen table works fine. Make sure the area has good lighting, natural light is best, but a desk lamp helps on cloudy days. You’ll be handling small objects, so you need to see clearly.
Organize your supplies in small containers. Clear plastic boxes let you see contents without opening them. Label everything so you find what you need fast. Group beads by color and size. Keep tools in one spot so they’re always within reach.
Keep a small trash container nearby for scraps and broken beads. Jewelry making creates tiny pieces that scatter easily. A dedicated trash spot keeps your workspace clean.
Safety matters in your studio. Store sharp tools like wire cutters away from the edge of your table. Keep materials off the floor where you might trip. If you’re soldering or using chemicals, ensure your space has good ventilation, open a window or work near a fan.
Many beginners work in a corner of their bedroom or living room. This is completely fine. The goal is a dedicated spot where your supplies stay set up between sessions. You’re more likely to practice regularly when setup takes 30 seconds, not 30 minutes.
Jewelry Making Techniques for Hobbyists
Learning core techniques opens up endless design possibilities. Start with these foundational skills before moving to advanced work.
Bead Stringing is the simplest technique. Thread beads onto cord or elastic in your chosen pattern. Tie off the ends securely. This technique teaches you how beads work together and builds your design eye. Most first projects use stringing.
Wire Wrapping involves bending wire around beads or stones to hold them in place. You create loops, spirals, and coils with your pliers. This technique looks elegant and requires more practice than stringing, but the results feel professional.
Crimp Bead Technique secures beads on wire using tiny metal tubes called crimps. You squeeze the crimp with pliers to lock beads in place. This creates durable bracelets and necklaces that won’t unravel.
Jump Ring Connections link components together without tools or soldering. You open a jump ring slightly, thread it through holes, and close it. This technique connects findings and creates chain-like structures.
Start with stringing to build confidence. Once you’re comfortable, try wire wrapping. Add crimping and jump rings as your skills grow. This progression keeps learning manageable and your success rate high.
Practice matters more than talent. Spend time on each technique before moving forward. Your hands need to learn the motions. Repeating simple projects builds muscle memory and confidence.
Jewelry Making Safety Tips for Home Studios
Safety prevents injuries and protects your workspace. A few precautions make your jewelry making hobby safer and more enjoyable.
Eye Protection matters when cutting wire or working with small pieces. Wire can snap and fly toward your face. Wear safety glasses, especially when using wire cutters.
Hand Care is essential. Pliers can pinch skin if you’re not careful. Keep your hands clear of pinch points. Wear a thimble or finger guard if you’re pushing needles through tough materials.
Ventilation becomes important if you’re soldering or using chemical finishes. Open windows and use a fan to move air through your workspace. Fumes from some materials can build up in enclosed spaces.
Tool Maintenance prevents accidents. Keep cutting tools sharp, dull tools require more force and slip more easily. Store sharp tools in a safe place where you won’t accidentally grab them.
Fire Safety applies if you’re soldering. Keep a fire extinguisher nearby. Never leave a soldering iron unattended. Let tools cool completely before storing them.
Material Safety varies by what you use. Some people have metal allergies, test materials on your skin before wearing finished pieces. Certain dyes and finishes can stain skin.
Most jewelry making hobbies are very safe when you use common sense. Treat tools with respect, keep your workspace organized, and work in good light. These basics prevent nearly all injuries.
Your First Beginner Project: Simple Beaded Bracelet
Your first project should be simple, fast, and rewarding. A beaded bracelet checks all three boxes and teaches core skills you’ll use in every future piece.
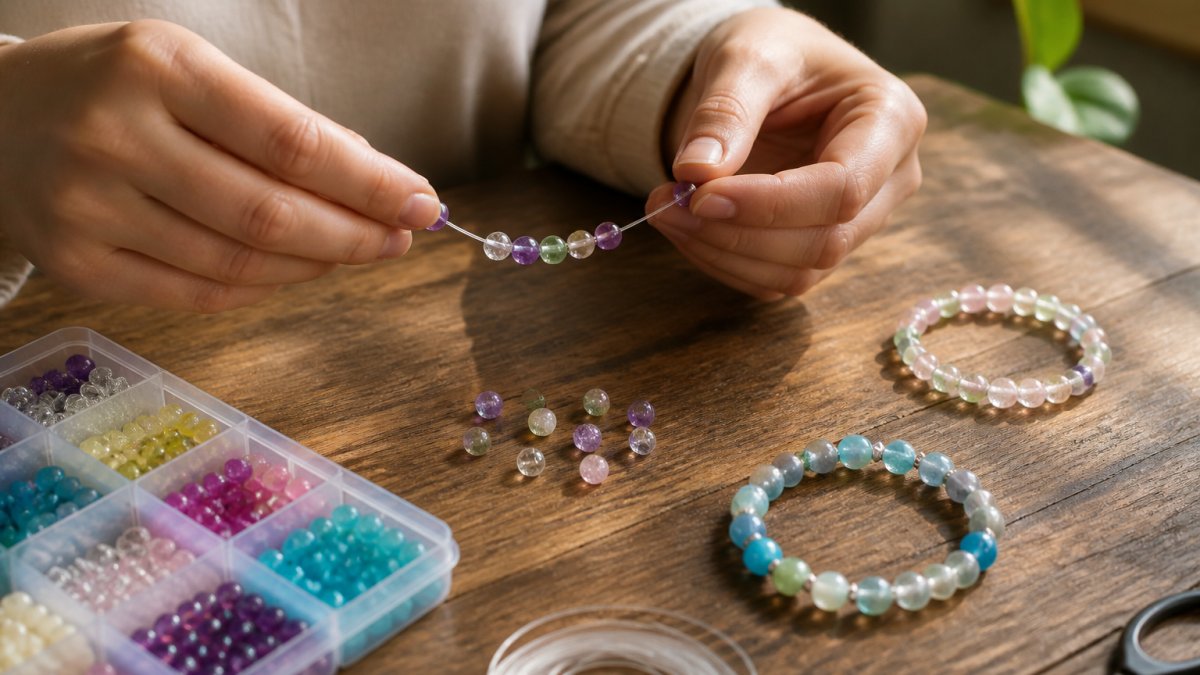
What You’ll Need:
- Elastic cord (0.8mm to 1mm thickness)
- 20-30 beads in colors you love (6-8mm size works well)
- Scissors
- Beads board (optional but helpful)
Time Required: 20-30 minutes
Step 1: Plan Your Design (5 minutes)
Lay out your beads on a bead board or clean table. Arrange them in an order you like. This is your design.
Step 2: Measure Your Wrist (2 minutes)
Wrap elastic cord around your wrist loosely. You should fit one finger under the cord comfortably. Mark where the cord meets itself with a pen. This is your bracelet length.
Step 3: Cut Your Cord (1 minute)
Cut the elastic cord to your measured length plus 2 inches. Use sharp scissors for a clean cut. Frayed cord is harder to thread.
Step 4: String Your Beads (15 minutes)
Thread the cord through your first bead. Pull it to the middle of the cord. Continue threading beads in your planned order. Work slowly and enjoy the process. Rushing causes mistakes.
Step 5: Tie Off Your Bracelet (3 minutes)
Bring both cord ends together. Tie a square knot by crossing the right cord over the left, then the left over the right. Pull tight. Tie a second knot for security.
Step 6: Wear and Enjoy (Immediate)
Your first piece is complete. Wear it proudly or gift it. This bracelet teaches you stringing, design thinking, and finishing. These skills apply to every jewelry making project you’ll make.
Best Beginner Jewelry Making Kits 2026
Beginner kits solve the problem of not knowing what to buy. A good kit includes everything you need without overwhelming choices.
A quality beginner jewelry making kit contains essential tools, diverse materials, and clear instructions. Look for kits that include round-nose pliers, flat-nose pliers, wire cutters, and a selection of beads and findings. The best kits organize materials in compartmented boxes so nothing gets lost.
We offer thoughtfully curated beginner kits that bring together tools and materials that work well together. Our kits remove the guesswork of picking individual items and ensure every component fits your skill level.
When choosing a kit, consider these factors:
- Tool Quality – mid-range pliers outperform budget alternatives
- Material Variety – enough beads and findings to complete multiple projects
- Instruction Clarity – step-by-step guides beat vague suggestions
- Organization – compartmented storage keeps supplies accessible
A good beginner kit costs less than buying tools separately and teaches you what you actually need before you invest in upgrades. Many people spend years with their first kit, creating dozens of pieces before wanting professional-grade tools.
Start with a kit, complete several projects, then decide if you want to expand your toolkit. This approach keeps costs reasonable and prevents waste on tools you’ll never use.
Starting a jewelry making hobby is simpler than you think. Pick a style that appeals to you, gather basic tools and materials, and create your first piece. The learning curve is gentle, the rewards are immediate, and the creative satisfaction is real.
Frequently Asked Questions
What are the essential tools for a beginner jewelry maker?
Start with round-nose pliers, flat-nose pliers, wire cutters, and beading needles. These core tools handle most beginner techniques like wire wrapping and bead stringing. Add a ruler, jewelry file, and work mat as you progress. Many beginners find starter kits bundle these essentials together, making it easier to get everything you need without guessing.
How much does it cost to start a jewelry making hobby?
Pricing depends on whether you buy individual tools or a curated starter kit, plus your choice of materials. Basic beading projects require minimal investment, while soldering or metalworking techniques demand specialized equipment. Visit our website to explore affordable beginner kits designed to give you everything needed for your first projects without overspending on tools you might not use immediately.
Can you be a self-taught jewelry maker?
Yes. Many hobbyists learn through online tutorials, step-by-step guides, and hands-on practice. Start with simple techniques like bead stringing and wire wrapping before moving to soldering or metalworking. The key is practicing one technique at a time, learning from mistakes, and gradually building your skill set. Beginner projects help you develop confidence and discover which jewelry-making styles you enjoy most.
How to start jewelry making for beginners?
Begin by choosing a simple technique like bead stringing or basic wire wrapping. Invest in essential tools and materials, set up a safe, organized workspace, and complete your first beginner project. Follow step-by-step instructions carefully, practice the same technique multiple times, and don’t rush into advanced methods. Many beginners benefit from starter kits that include pre-selected tools, materials, and project instructions designed specifically for those just beginning their jewelry-making hobby.




0 Comments