
Table of Contents
- Best Beginner Jewelry Making Kits 2026
- Essential Jewelry Making Tools for Beginners
- Budget-Friendly Supply Sourcing Strategies
- Setting Up Your Home Studio on a Tight Budget
- Profitable Beginner Jewelry Designs
- How to Sell Handmade Jewelry Online
- Packaging and Branding on a Budget
- Legal and Safety Requirements for Home Studios
- Frequently Asked Questions
Last Updated: September 4, 2026
Starting a new craft often feels like it requires a significant financial commitment before you even create your first piece. The good news is that learning how to start jewelry making on a budget is completely achievable with a strategic approach to tools, materials, and design. This guide from Craft Living Artistry breaks down the essential steps, showing you exactly where to invest your first dollars and where you can save, so you can build a hobby without the financial strain.
Most beginners make the same mistake: they buy a massive, expensive kit filled with tools they never use. The smarter path is to start with a focused set of quality essentials and add as your skills grow. Below, we’ll walk through the best beginner kits, the tools that matter, where to find affordable supplies, and how to turn your new skill into income.
Best Beginner Jewelry Making Kits 2026
For most newcomers, the best starting point is a curated kit that bundles the core tools and materials you need. These kits eliminate the guesswork and often cost less than buying items individually. Look for a kit that includes a basic pliers set, wire cutters, assorted beads, and findings like jump rings and clasps.
A quality kit should feel complete, with no missing pieces that stall your first project. When you choose a kit, it should also come with clear instructions or project ideas to guide you through your first few pieces. This is where a thoughtfully curated selection matters more than sheer volume. For those who want a high-quality, complete starting point, Craft Living Artistry offers a range of jewelry-making essentials designed to get you from unboxing to your first finished piece without frustration.
Essential Jewelry Making Tools for Beginners
You don’t need a professional studio to begin. In fact, a handful of hand tools will cover the vast majority of beginner projects. The non-negotiable starter set includes round nose pliers for creating loops, chain nose pliers for gripping and opening jump rings, and flush wire cutters for clean cuts.
What you need to start:
- Round nose pliers
- Chain nose pliers
- Flush wire cutters
- A bead mat to stop beads rolling away
Beyond tools, your first supply purchase should focus on versatile materials. Jewelry making on a budget means buying a few colors of beads you love, a spool of beadalon stringing wire, and a pack of mixed findings. This small inventory allows you to make dozens of designs. A common mistake is buying too many specialty components early on; stick to the basics until you understand your design style.
Budget-Friendly Supply Sourcing Strategies
The biggest cost in jewelry making is often materials, not tools. Smart sourcing is where you can save the most money.
Bulk Buying vs. Retail Purchasing
Buying in bulk is the single most effective way to lower your per-piece cost. While buying a small pack of 10 clasps at retail might seem convenient, purchasing a larger quantity of 100 clasps wholesale drastically reduces the unit price. This strategy is essential if you plan to sell your work, as it directly protects your profit margin.
However, bulk buying requires upfront capital. If your budget is very tight, consider splitting bulk orders with a crafting friend. This allows both of you to enjoy wholesale prices without the large initial outlay. For unique statement pieces, retail purchasing of individual, high-quality beads is still worthwhile, but for your foundational stock, always look to bulk.
Finding Second-Hand and Wholesale Materials
Before you buy anything new, check second-hand marketplaces and local thrift stores. Many people sell large collections of beads and findings for a fraction of their retail value. You can also upcycle old or broken jewelry you find at garage sales, taking it apart for the beads and clasps. This is a sustainable and incredibly cost-effective way to build a diverse inventory.
For new materials, register for wholesale accounts with online bead suppliers. You typically need to provide a business license or tax ID, but the discount is substantial. As your business grows, this becomes the standard way to source materials professionally.
Setting Up Your Home Studio on a Tight Budget
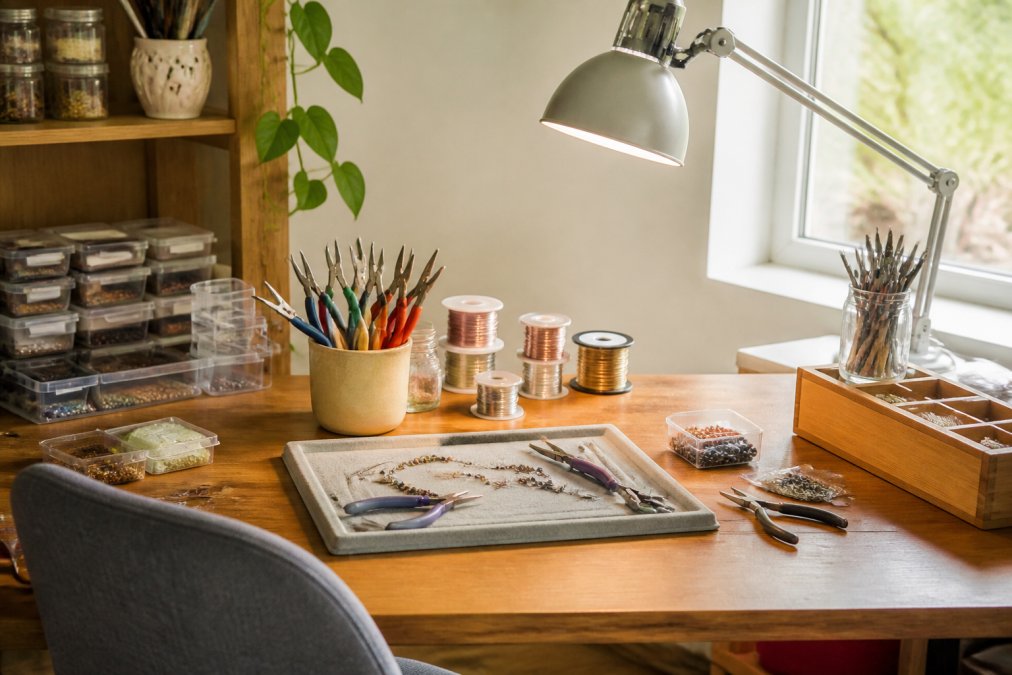
Your workspace doesn’t need a dedicated room. A small desk, corner of a dining table, or even a sturdy tray table in a corner of your living room works perfectly for starting out. The key requirements are good lighting, a flat stable surface, and adequate ventilation, especially if you plan to use adhesives, sealers, or work with certain metal components.
Essential Workspace Elements
Lighting: A daylight lamp (5000K color temperature) is a worthwhile investment to ensure your bead colors match in both natural and artificial light (cie.co.at). Poor lighting leads to color mismatches in finished pieces and customer complaints. A $20-$40 LED desk lamp with adjustable brightness pays for itself in avoided mistakes.
Work Surface: A dedicated mat or tray prevents beads from rolling away and protects your furniture. A bead mat (typically $5-$10) has a slight grip that keeps small components in place. Alternatively, a shallow tray or even a folded towel works in a pinch.
Storage and Organization: Invest in a multi-compartment storage box or drawer organizer for your beads and findings. Label each compartment clearly. This small step saves you hours of searching and prevents costly duplicate purchases when you can’t find a specific item. Clear plastic containers let you see inventory at a glance, which is essential for managing your stock without overspending.
Ventilation: If you work with epoxy, resin, sealers, or certain soldering techniques, ensure your workspace has adequate air circulation. Open a window or use a small fan to direct fumes away from your breathing zone. Poor ventilation can cause headaches and respiratory irritation during extended work sessions.
Safety Considerations for Home-Based Work
Before you set up, understand the basic safety hazards of jewelry making:
Metal Allergies and Skin Contact: Some wire, clasps, and findings contain nickel or other metals that trigger allergic reactions. Wear nitrile gloves when handling unknown metal components, especially if you have sensitive skin. Always test materials on yourself before selling to customers.
Sharp Tools and Wire: Flush cutters, pliers, and wire ends are sharp. Keep a small first-aid kit nearby and wear safety glasses if you work with wire that might spring back when cut. Store sharp tools in a designated container, not loose in a drawer.
Chemical Hazards: If you use adhesives, patinas, or metal polishes, read the safety data sheet (SDS) for each product. Many contain solvents that require ventilation. Never use these products in a sealed room without air circulation.
Fire Hazards: If you use a torch for soldering or annealing, keep a fire extinguisher rated for metal fires (Class D) nearby. Never work near curtains, papers, or flammable materials. A heat-resistant mat under your work area is essential.
Legal Requirements for Home-Based Jewelry Businesses
If you plan to sell your work, you need to understand your local legal obligations:
Business License or Permit: Most localities require a basic business license or home occupation permit, even for home-based operations. Contact your city or county clerk’s office to learn what’s required in your area. The cost is typically $50-$200 annually, and the process takes a few weeks. Operating without a license can result in fines.
Tax Identification Number: If you’re operating as a sole proprietor, you may need an Employer Identification Number (EIN) from the IRS, even if you have no employees. This is free and takes minutes to apply for online at irs.gov. An EIN separates your business finances from your personal finances and is required to open a business bank account (irs.gov).
Sales Tax: Depending on your state and where your customers are located, you may need to collect and remit sales tax. Research your state’s sales tax rules for handmade goods. Some states exempt certain materials or have thresholds (e.g., you only collect tax if you exceed $1,000 in annual sales).
Product Safety Compliance: If you sell jewelry that could be worn by children under 12, your materials must comply with the Consumer Product Safety Improvement Act (CPSIA). Specifically, lead content in metal components must not exceed 100 ppm (parts per million), and phthalates in coatings must not exceed 1,000 ppm (cpsc.gov). When sourcing materials, especially from overseas suppliers, request a Certificate of Compliance or test report. Reputable bead suppliers provide these documents. Selling non-compliant products can result in product recalls and legal liability.
Home Business Insurance: Standard homeowner’s insurance typically does not cover business activities. If you’re running a jewelry business from home, consider a small business liability policy (often $200-$500 annually) to protect against claims if a customer is injured by your product or if you accidentally damage someone else’s property.
Keeping Your Space Clean and Organized
A clean, organized space makes the craft more relaxing and enjoyable, and it protects your inventory. Dust and debris can damage beads and findings. Wipe down your work surface daily and store materials in sealed containers. This also prevents cross-contamination if you work with different metal types or finishes.
Profitable Beginner Jewelry Designs
Not all jewelry designs are created equal when it comes to profitability. The best designs for beginners are those that require minimal materials and time but have a high perceived value. Simple designs using quality beads and clean wirework often sell for more than complex-looking pieces made with cheap materials.
Wire Wrapping and Beading Fundamentals
Mastering two core techniques unlocks a world of profitable designs. The first is basic beading, which involves stringing beads onto wire or cord and finishing with a clasp. The second is wire wrapping, which uses your pliers to create loops and connections without soldering.
A simple design like a pair of earrings made with two beads, two headpins, and a pair of ear wires is incredibly cost-effective. The materials might cost well under a dollar, and the time to make them is under ten minutes. This is the foundation of a handmade business. Focus on perfecting your loops so they are consistently round and closed neatly; this attention to detail justifies a higher price point.
Pricing Calculators and Profit Margin Formulas
Pricing is where many makers fail. Underpricing your work devalues your time and makes it impossible to sustain the hobby. A simple formula is: (Materials + Labor) x 2 = Wholesale Price. Your retail price is typically double your wholesale price.
Let’s break down a basic formula for jewelry making on a budget:
- Materials Cost: The exact cost of beads, wire, and findings for that piece.
- Labor Cost: Decide on an hourly rate (e.g., $20 per hour) and multiply by the time it takes to make the piece.
- Overhead: A small percentage to cover tool wear, packaging, and marketing.
Your price must cover all these factors. As a beginner, your labor will be slower, making your pieces more expensive. This is normal. It encourages you to refine your techniques to become faster and more efficient, which naturally increases your profitability.
How to Sell Handmade Jewelry Online
Once you have a small inventory, online marketplaces are the most accessible sales channels. Platforms like Etsy allow you to set up a shop with minimal upfront costs. Your product photography is your most important marketing tool; take clear, well-lit photos against a neutral background to make your work stand out.
When you’re ready to start selling, consider these steps to build momentum:
- Start with a small, cohesive collection of 5-10 designs.
- Write clear, descriptive titles and tags that include specific materials.
- Offer a small introductory discount to generate your first few sales and reviews.
- Use social media to show your process; people love seeing how handmade items are created.
Packaging and Branding on a Budget
Professional packaging elevates the perceived value of your jewelry. You don’t need custom-printed boxes. A simple, elegant approach using craft paper, twine, and a thank-you card looks intentional and high-end for pennies per order.
Your branding is the story you tell. A consistent color scheme and a memorable shop name create a professional image. Include a small card with your shop name and social media handles in every order. This encourages repeat business and word-of-mouth referrals, which are the most cost-effective marketing you can get.
Legal and Safety Requirements for Home Studios
Many beginners overlook the legal side of running a handmade business. If you are selling your work, you need to understand your local business licensing requirements. Most localities require a basic business license or permit, even for home-based operations.
Safety is also a priority. Be aware that certain metal components, particularly some types of wire and clasps, can contain lead or nickel. If you are selling to the public, especially to children, you must ensure your materials comply with the Consumer Product Safety Improvement Act (CPSIA) guidelines for lead content. When sourcing from overseas, buy from reputable suppliers who can provide certification of compliance. This protects your customers and your business reputation.
Frequently Asked Questions
How much does it cost to start jewelry making on a budget?
Your initial investment depends on the techniques you choose and whether you buy a kit or assemble tools separately. A basic beginner kit with essential pliers, wire cutters, jump rings, and beads can be sourced affordably. Bulk buying and sourcing second-hand tools significantly reduces startup costs. Pricing depends on quantity, quality, and where you source materials, so check Craft Living Artistry’s website for current kit pricing and starter bundles.
What are the essential jewelry making tools for beginners?
Start with round nose pliers, chain nose pliers, wire cutters, and a beading mat. You’ll also need jump rings, lobster clasps, headpins, and beadalon stringing materials. These core tools let you create wire wrapping and beading projects. Many beginner kits bundle these essentials together, making it easier to acquire everything at once rather than buying individually.
What is the easiest jewelry to make for a beginner?
Wire wrapping and simple beading projects are the most beginner-friendly. Start with beaded bracelets using elastic cord or stringing wire, then progress to wire-wrapped pendants and jump ring assemblies. These techniques require minimal tools, produce professional-looking results quickly, and are highly profitable for handmade business sales, especially at craft fairs and online marketplaces.
How can I source affordable jewelry supplies?
Bulk buying raw materials like wire, beads, and findings reduces per-unit costs significantly. Check wholesale suppliers and second-hand craft stores for tools and leftover inventory. Compare retail purchasing against bulk options for your most-used items. Sustainable and upcycled jewelry sourcing, like repurposing vintage beads or reclaimed metals, cuts costs while creating unique designs that stand out online.
Starting jewelry making on a budget is about making smart choices, not sacrificing quality. By starting with a focused kit, mastering a few key techniques, and sourcing materials strategically, you can build a fulfilling and potentially profitable craft. Craft Living Artistry supports your journey by curating quality tools and supplies that make crafting accessible and enjoyable. Get started with Craft Living Artistry and bring your first design to life with confidence.
This article was written using GrandRanker




0 Comments