
Table of Contents
- Understanding Wire Gauge Numbers and the AWG System
- How to Use a Wire Gauge Tool for Accurate Measurements
- Jewelry Wire Hardness Guide: Dead Soft vs. Half Hard vs. Full Hard
- Choosing the Best Wire for Wire Wrapping Projects
- Matching Wire Gauge to Findings, Earwires, and Jump Rings
- Common Wire Selection Mistakes and How to Troubleshoot Them
- Frequently Asked Questions
Last Updated: September 14, 2026
Understanding Wire Gauge Numbers and the AWG System
Guessing at wire size ruins pieces. Jewelry wire gauge is a measurement system, understand it and you’ll stop wasting material on the wrong thickness.
Wire gauge is a standardized measurement of wire diameter, where higher numbers indicate thinner wire and lower numbers indicate thicker wire. (nist.gov) Jewelry making uses the American Wire Gauge (AWG), running from roughly 0000 to 40 and beyond, though most jewelry work happens between 10 and 34. The scale isn’t intuitive, beginners grab a 16-gauge spool thinking it’s finer than a 20-gauge one. It’s the opposite.
Why a Higher Gauge Number Means Thinner Wire
AWG was built for electrical wire, where consistent diameter mattered for conductivity. Each gauge step is a fixed geometric progression: an 18-gauge wire measures approximately 1.02 mm versus 0.81 mm for 20-gauge, a small difference that changes how the wire behaves in your hands (nist.gov).
A 28-gauge weaving wire feels thread-like; a 16-gauge structural wire holds shape without support. The number tells you diameter, not feel or performance, that’s where hardness and material come in.
How to Use a Wire Gauge Tool for Accurate Measurements
A wire gauge tool is a flat metal or plastic card with graduated slots along its edge. Slide your wire into successively smaller slots until it stops; the labeled slot tells you the gauge, about ten seconds once you know the technique.
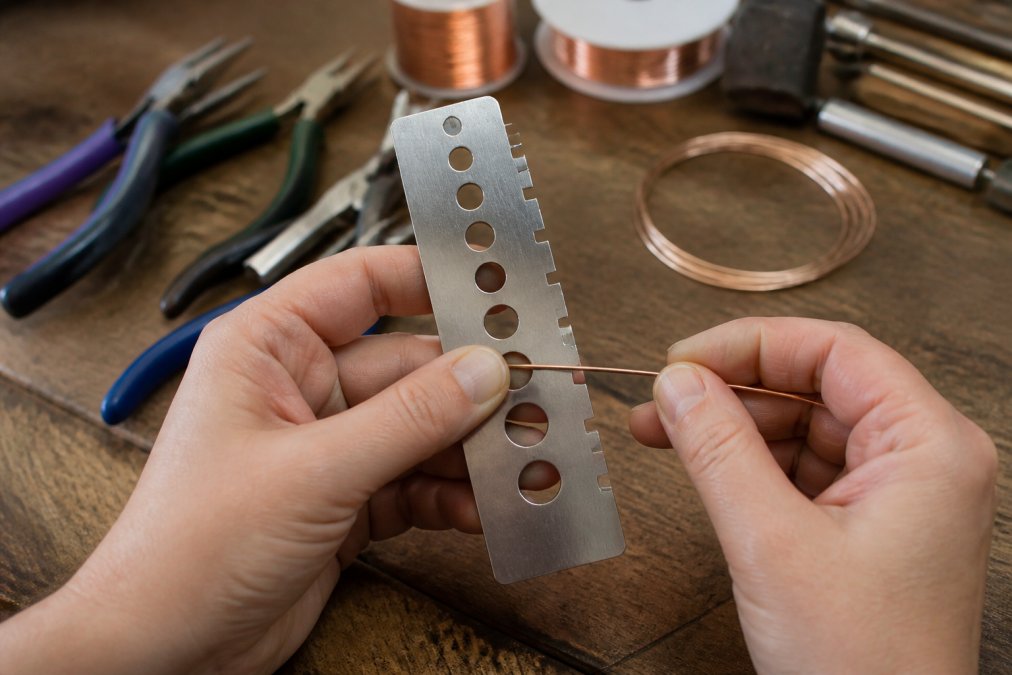
Step-by-Step: Measuring Round and Shaped Wire
- Select the right slot. Start with a slot clearly larger than your wire and work downward.
- Insert the wire cleanly. The wire should pass through without force. If it doesn’t fit, move up one slot.
- Find the stopping point. The slot where the wire stops without forcing is your gauge.
- Check for burrs. A flattened or nicked end reads incorrectly, snip a fresh end with flush cutters first.
- Measure shaped wire by its smallest dimension. Half-round and square wire are sized by their narrowest cross-section.
- Repeat twice. Coiled spool wire can be slightly out of round; two readings confirm accuracy.
Most gauge tools only measure up to 36 or 38. If you work with very fine weaving wire, use digital calipers instead and convert the millimeter reading with an AWG chart. A caliper reading of 0.25 mm is roughly 30-gauge.
Jewelry Wire Hardness Guide: Dead Soft vs. Half Hard vs. Full Hard
Hardness describes the wire’s temper, how much resistance it offers to bending. Three tempers cover nearly all jewelry work: dead soft, half hard, and full hard. Temper is a property of the metal, not the gauge: the same 20-gauge wire behaves differently in copper, sterling silver, or gold-filled. Most guides skip this, which is why two makers buy the “same” wire and get opposite results.
| Temper | Bendability | Shape Retention | Best For |
|---|---|---|---|
| Dead soft | Very easy | Low | Wire wrapping, weaving, coiling |
| Half hard | Moderate | Good | Earwires, jump rings, clasps |
| Full hard | Difficult | Excellent | Structural frames, prongs |
Dead soft wire bends with almost no resistance, ideal for wrapping and weaving where the wire must conform tightly. The trade-off: it dents easily, and finished pieces can lose shape under stress.
Half hard wire holds a curve once formed but still allows adjustments, making it the standard choice for findings and earwires.
Full hard wire resists bending and keeps shape under load, but it’s hard to work by hand and can snap if over-flexed. Reserve it for pieces needing rigidity.
How Work Hardening Changes Your Wire
Each time you flex metal, its internal crystal structure shifts and the wire stiffens, work hardening. A dead soft wire wrapped tightly around a mandrel several times will stiffen to something closer to half hard.
A wire that starts easy to shape can become brittle mid-project. If you need to rework a section, anneal it or start fresh rather than forcing a hardened piece.
How Temper Behaves Differently by Metal
Copper work-hardens quickly, dead soft copper can stiffen after a few bends, forgiving for practice but frustrating for complex wrapping that needs repositioning. It’s also the most affordable common jewelry metal, the sensible choice for learning how a gauge feels before committing to precious metal.
Sterling silver work-hardens more gradually than copper, giving a longer working window. That’s why sterling is the default for wire wrapping: dead soft sterling stays workable through a full wrap, then hardens into a shape that holds. Trade-offs are cost and tarnish, so finished pieces need a tarnish-resistant bag or a quick polish.
Gold-filled wire behaves closest to solid gold at the surface but has a base metal core and thin bonded gold layer. It work-hardens like sterling, but aggressive filing, over-flexing, or repeated annealing can expose the core. Shape it once and finish, don’t rework it.
Brass and nickel silver fall between copper and sterling in work-hardening rate. They’re stiffer than copper at the same gauge, useful for structural elements, harder on the hands for fine weaving.
A Practical Rule for Choosing Temper
Match temper to how many times you expect to bend the wire:
- One or two bends, then done (earwires, simple clasps): half hard.
- Many bends and repositioning (wire wrapping, weaving): dead soft.
- No bending, load-bearing (frames, prongs): full hard, or half hard if you need to adjust the fit.
If unsure, buy dead soft. You can work-harden soft wire by bending it, but you cannot soften full hard wire without annealing, and annealing gold-filled or plated wire risks damaging the surface layer.
When you switch metals, re-test your gauge choice on a scrap length before starting the real piece. A 22-gauge half hard copper earwire and a 22-gauge half hard sterling earwire feel different in the hand, and the sterling version will hold its curve longer.
Choosing the Best Wire for Wire Wrapping Projects
The best wire for wire wrapping is dead soft in a mid-range gauge, typically 20 to 26 for the frame and 28 to 30 for the weave. Dead soft hugs stone and bead contours without springing back, and finer weaving wire disappears into the pattern.
Here’s how gauge maps to common wrapping tasks:
- 18-20 gauge: heavy frames, bangles, structural outlines
- 21-24 gauge: main wrapping wire for medium stones
- 26-28 gauge: securing small beads, detailed lashing
- 30-34 gauge: fine weaving, bead crochet, Viking knit
A common mistake is choosing a wire too thick for the weave. A 26-gauge or heavier weaving wire looks bulky and fights tight turns; step down to 28-gauge and the pattern tightens immediately.
Material shifts the recommendation too. Copper and brass are affordable and easy to shape, suiting practice pieces and rustic designs. Sterling silver and gold-filled hold detail and resist tarnish, better for pieces meant to last; gold-filled has a bonded gold layer over a base metal core, behaving like precious metal at lower cost.
Matching Wire Gauge to Findings, Earwires, and Jump Rings
Findings must fit the wire, or the piece fails. A jump ring too thin for its load pulls open; an earwire too thick won’t pass comfortably through a pierced ear.
| Component | Recommended Gauge | Why |
|---|---|---|
| Earwires | 20-21 gauge | Comfortable through the ear, holds shape |
| Jump rings | 18-20 gauge | Withstands opening and closing |
| Clasps and connectors | 16-18 gauge | Handles repeated stress |
| Headpins and eyepins | 21-24 gauge | Fits standard bead holes |
Match your jump ring gauge to the wire it connects. A 20-gauge main wire pairs with an 18-gauge jump ring for a secure, proportionate join; a 24-gauge ring on 18-gauge wire creates a weak point that opens under tension.
For earwires, half hard temper is standard because it holds the curve that hooks over the ear. Dead soft earwires bend out of shape the first time they’re worn.
Skipping the temper check on earwires is one of the most common beginner errors. A dead soft earwire feels fine on the bench but flattens against the ear within a day of wear, and the customer notices immediately.
Common Wire Selection Mistakes and How to Troubleshoot Them
Most wire problems trace back to four root causes: wrong gauge, wrong temper, wrong material, or a tool mismatch. The table below maps symptoms to causes, but the fix only sticks if you understand why the failure happened.
| Problem | Likely Cause | Fix |
|---|---|---|
| Wire snaps while bending | Full hard or work-hardened | Switch to dead soft or half hard |
| Weave looks bulky | Weaving wire too thick | Step down 2 gauges |
| Piece loses shape | Dead soft used structurally | Move to half hard |
| Wire kinks instead of curving | Too thick for the bend radius | Use thinner gauge or a mandrel |
| Jump rings pull open | Gauge too thin for load | Increase ring gauge |
| Wire dents or shows tool marks | Too-soft temper for the tool | Switch to half hard or use nylon-jaw pliers |
| Earwire flattens against the ear | Dead soft temper | Use half hard |
Why Wire Snaps: The Work-Hardening Trap
Wire rarely snaps because it’s defective, it snaps because it’s been bent past its limit. Every flex shifts the metal toward brittleness, and once a section has been bent back and forth several times, it fails at the bend point regardless of gauge. The fix is fewer bends, not thicker wire: start with dead soft, or plan bends so each section is shaped once.
A related trap is buying full hard wire for a project that needs adjustment. Full hard wire has almost no working window; the first bend is the only bend. If the fit is wrong, the wire is scrap.
Why Weaves Look Bulky
Bulk in a weave is almost always a gauge problem, not a tension problem. A 26-gauge weaving wire around a 20-gauge frame adds visible thickness at every pass, reading chunky rather than delicate. Stepping down to 28-gauge tightens the pattern because the wire sits closer to the frame. If it still looks heavy, the issue is the frame gauge.
Why Pieces Lose Shape
Dead soft wire holds shape only as long as nothing pushes against it, a dead soft bangle ovals the first time it’s worn, and a dead soft earwire flattens against the ear. The fix is temper, not gauge: moving from dead soft to half hard at the same gauge solves most shape-retention problems without changing the look.
Why Wire Kinks Instead of Curving
Kinking happens when the bend radius is smaller than the wire can accommodate. A 16-gauge wire can’t make a tight loop without a mandrel; forcing it produces a kink that can’t be smoothed out. Use a thinner gauge for tight curves, or bend around a mandrel, dowel, or round nose pliers so the wire follows a supported curve.
Why Jump Rings Pull Open
A jump ring fails when the load exceeds what its gauge can hold. An 18-gauge ring is the practical minimum for a connection under tension; a 24-gauge ring joining 18-gauge wire is a weak point that opens under any real pull. Match the ring gauge to the wire it connects, and work-harden it by twisting it closed with two pliers rather than pinching it shut.
The Tool Side Matters as Much as the Wire
Flush cutters give clean ends that measure accurately; round nose pliers form loops without marring; chain nose pliers grip flat for tight bends. The wrong pliers on soft wire leave tool marks no polishing removes. Nylon-jaw pliers fix denting; a mandrel set fixes kinking on tight curves.
Do not anneal wire to fix a work-hardening problem unless you know the metal. Annealing sterling silver requires heating to a dull red and quenching, which is achievable at the bench ((Correction) Sterling annealing – Jewelry Discussion). Annealing gold-filled or plated wire can burn through the surface layer and ruin the wire. When in doubt, start a fresh length.
When a project fails, check temper before gauge. Nine times out of ten, the wire was the right thickness but the wrong hardness for the job, and the fix is a different temper, not a different spool.
Weight and cost follow gauge too: thicker wire uses more metal per inch, so a 16-gauge spool costs more than a 28-gauge spool of the same length and material. For practice, buy dead soft copper in a mid-range gauge and save precious metal for finished pieces. The most cost-effective setup is dead soft copper in 20-gauge for frames and 28-gauge for weaving, those two cover most beginner projects and let you learn temper behavior before spending on sterling or gold-filled.
Frequently Asked Questions
What gauge wire should I get for jewelry?
The right jewelry wire gauge depends on the project. For wire wrapping, 20-24 gauge is common because it balances flexibility and structure. For earwires, 20-22 gauge works well. For structural pieces like jump rings, 16-18 gauge provides strength. Beginners often start with 20 or 22 gauge dead soft wire because it bends easily and suits many techniques. Always check your pattern’s recommendation before buying.
What is the difference between dead soft, half-hard, and full-hard wire?
Wire hardness refers to metal temper. Dead soft wire bends easily and is ideal for wire wrapping and weaving. Half hard wire holds its shape better, making it good for earwires and clasps. Full hard wire is stiff and used for structural components like prong settings. A jewelry wire hardness guide helps you match temper to technique, but most beginners do well with dead soft and half hard options.
How do I measure jewelry wire gauge accurately?
Use a wire gauge tool, which has slots marked with AWG numbers. Insert the wire into the slots until it fits snugly without forcing. The slot number is your gauge. For shaped wire, measure the widest point. If you don’t have a tool, a digital caliper works: measure the diameter in millimeters, then convert using an AWG chart. Learning how to use a wire gauge tool takes only a minute.
Can I use the same wire gauge for wire wrapping and stringing?
No, wire wrapping and stringing require different gauges. Wire wrapping uses 20-28 gauge wire to wrap and secure stones. Stringing uses beading wire (like 7-strand or 19-strand) measured in diameters such as 0.015 or 0.024 inches, not AWG. For stringing, choose a diameter that fits through your beads twice. Keep separate spools for each technique to avoid confusion.





0 Comments