
Table of Contents
- Why Buying Individual Beads and Wire Wastes Your Time
- Jewelry Making Supply Kits: The All-in-One Shortcut
- Your Jewelry Making Essentials Checklist for Smarter Shopping
- How to Organize Jewelry Beads and Wire for Faster Projects
- Bulk Buying and Wholesale Accounts for Hobbyists
- Subscription Boxes and Curated Kits: Convenience Delivered
- Time-Saving Procurement Workflows for Jewelry Makers
- Frequently Asked Questions
Last Updated: September 21, 2026
Why Buying Individual Beads and Wire Wastes Your Time
Most jewelry makers lose hours every month sourcing jewelry making supplies piece by piece. This guide breaks down how to shop for jewelry making supplies more strategically, so you spend time creating instead of hunting down single components.
A single strand of beads rarely finishes a full design. You buy one, run short, order another, and wait. Multiply that by every color, size, and metal you need, and a simple project becomes a week of small purchases. Shipping costs stack up, minimums force overbuying, and creative momentum dies.
The real waste isn’t money, it’s attention. Buying components one at a time means dozens of micro-decisions: which gauge, finish, supplier, quantity. A single bulk purchase collapses all of that into one deliberate choice.
Buying individual beads and wire is inefficient because each component triggers its own purchase decision, shipping cost, and wait time. Consolidating into kits or bulk orders removes most of that overhead in one move.
Jewelry Making Supply Kits: The All-in-One Shortcut
Jewelry making supply kits bundle the components a project needs into one purchase. For beginners especially, a kit answers the hardest question before you start: what do I need?
A well-built kit typically includes:
- Coordinated bead strands in matching sizes
- Wire in the gauge suited to the project
- Findings such as clasps, jump rings, and ear wires
- Basic tools where the kit is designed for newcomers
The advantage isn’t just convenience, every part is chosen to work with the others. You skip the guesswork of whether a 26-gauge craft wire will hold a heavy stone, or whether your crimp beads match your cord.
Where kits fall short is flexibility: if you already own tools and have a specific design in mind, a full kit may include items you won’t use. Treat kits as a starting point and buy refills in bulk once you know your go-to components.
For parents buying for kids or adults trying a new hobby, kits also remove the risk of an incomplete first project. That first finished piece is what keeps people crafting.
Your Jewelry Making Essentials Checklist for Smarter Shopping
A written essentials checklist stops impulse buying and duplicate orders. List what each project type requires, then buy against that list instead of browsing.
Here’s a practical starter checklist you can adapt:
- Bead strands in your three most-used colors
- Craft wire in two gauges (one for structure, one for wrapping)
- Sterling silver or base-metal findings: clasps, jump rings, ear wires
- Crimp beads or tubes matched to your cord diameter
- Beading cord or thread in a neutral color
- Round-nose and flat-nose pliers
- Wire cutters rated for your wire gauge
- A bead storage system with labeled compartments
The checklist matters most at the wire stage. Wire gauge determines what a design can hold, and buying the wrong gauge is a common beginner mistake, grabbing the thinnest wire because it’s easiest to bend, then watching a finished bracelet lose its shape within days.
Match the gauge to the job: heavier wire for structure, finer for wrapping and delicate links. Once you know your two or three standard gauges, buy those in bulk instead of one spool at a time.
Photograph your finished supply drawer after each restock. When you reorder, you compare against the photo instead of your memory, which cuts duplicate purchases of items you already have.
How to Organize Jewelry Beads and Wire for Faster Projects
Good organization is a sourcing strategy, not just tidiness. When every bead and spool has a fixed home, you stop losing time to mid-project searching and can see at a glance what needs restocking.
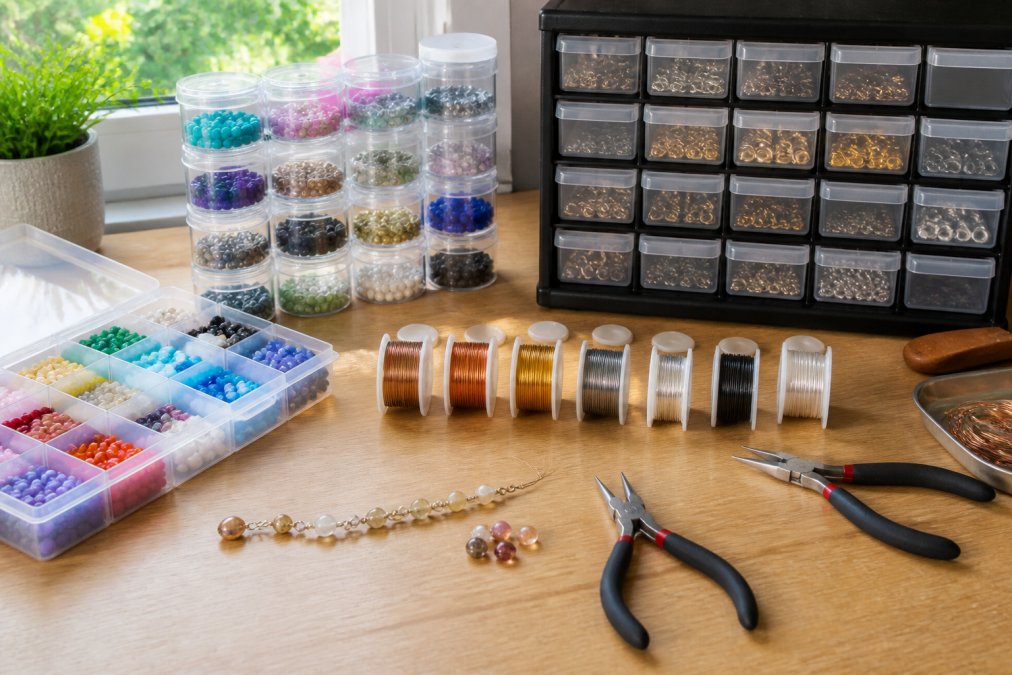
The system that works for most makers is simple:
- Sort beads by color family, not by project
- Store wire by gauge with the label facing out
- Keep findings in shallow divided trays so small parts stay visible
- Reserve one bin for “current project” components only
Label everything.
Bulk Buying and Wholesale Accounts for Hobbyists
What suppliers actually ask for
Most wholesale programs fall into three tiers:
- Open wholesale: Anyone who meets a minimum spend can buy at wholesale pricing. No paperwork. Common with smaller importers and Etsy-adjacent suppliers.
- Resale-certificate wholesale: You submit a state-issued resale certificate or seller’s permit, exempting you from sales tax on inventory you intend to resell. Requirements vary by state; your state’s revenue department issues the certificate, usually at no cost.
- Business-license wholesale: The supplier wants a registered business entity (LLC, sole proprietorship) plus a tax ID. Rare for bead and wire suppliers, common for large distributors.
The MOQ math that decides it
- Bead strands: MOQs often start around 10-25 strands per style
- Wire: often sold by the spool in packs of 3-10, or by the pound for base metals
- Findings: usually by the gross (144 pieces) or by the thousand
A practical rule set
- Buy wholesale only components you use in every project, clasps, jump rings, your two standard wire gauges, neutral cord
- Keep specialty, seasonal, and one-off items as single retail purchases
- Pool orders with a crafting friend to hit MOQs without overstocking one person’s studio
- Ask suppliers directly whether they accept a resale certificate in place of a business license, many do, and the answer isn’t always on the website
- Track cost-per-use, not cost-per-order. A $60 wholesale order that covers 40 projects beats four $20 retail orders that cover 10
The tax side
Joining a wholesale program to “save money” and then ordering more than you can store is a common trap. Oversized bulk orders create clutter, and unsorted stock slows every future project. Buy bulk only for proven, repeat-use components, and only after you’ve confirmed the MOQ fits your actual production rate.
For makers who sell occasionally, a wholesale account can be the difference between a hobby that pays for itself and one that drains a budget. For pure hobbyists, the open-wholesale tier and a shared order with a friend capture most of the savings without the paperwork.
Subscription Boxes and Curated Kits: Convenience Delivered
Subscription boxes and curated kits solve the sourcing problem by deciding for you. A curated kit arrives with coordinated materials, and a subscription delivers a fresh selection on a schedule, so you never plan a shopping trip at all.
| Sourcing Method | Best For | Time Cost | Flexibility |
|---|---|---|---|
| Individual purchases | One-off, specific designs | High | Highest |
| Curated kits | Beginners, gift-givers | Low | Medium |
| Bulk buying | Repeat-use components | Medium | High |
| Wholesale accounts | Frequent, high-volume makers | Medium | High |
| Subscription boxes | Steady hobbyists, discovery | Lowest | Lowest |
Time-Saving Procurement Workflows for Jewelry Makers
Procurement is the part of jewelry making nobody talks about, yet it’s where the biggest time savings hide. The fix isn’t a vague habit, it’s a repeatable system with a trigger, a list, and a cadence. Here’s one for a solo maker running a few projects a month.
A simple list format:
| Item | Trigger level | Qty to order | Supplier | Bulk or single |
|---|---|---|---|---|
| 20-gauge sterling wire | 1/4 spool left | 3 spools | Primary supplier | Bulk |
| Gold-filled jump rings | Under 50 | 1 gross | Secondary supplier | Bulk |
| 8mm matte onyx strand | Last strand | 2 strands | Local shop | Single |
Step 3: Pick a fixed reorder day
The inventory layer most guides skip
- The photo method: Photograph each labeled bin after restocking. Store the photos in one album. Before any order, scroll the album instead of digging through drawers.
- The spreadsheet method: One tab, one row per component, columns for quantity on hand, trigger level, and supplier. Update it on reorder day, not daily. A free spreadsheet app on your phone is enough.
A procurement checklist you can reuse
Before you hit “place order,” run this:
- Every item on the list has a trigger level and a quantity
- Repeat-use items are flagged for bulk, specialty items for single
- You’ve checked the photo album or spreadsheet for items you already own
- Orders are consolidated by supplier to minimize shipping
- Reorder day is on the calendar for next month or next season
Frequently Asked Questions
What is the best brand of wire for jewelry making?
The best wire depends on your project. For wire wrapping, sterling silver or gold-filled wire offers durability and a professional finish. Craft wire in copper or brass is budget-friendly for practice. Look for wire labeled with gauge and temper (dead soft, half hard) so you know how it behaves. Reputable jewelry making supplies retailers list these specs clearly, which helps you avoid trial and error.
Are jewelry making kits better for beginners than buying individual supplies?
Kits are usually the better starting point. A quality jewelry making supply kit includes matched findings, wire, and beads, so you skip the guesswork of compatibility. You also avoid buying 10 strands when you need 10 beads. Curated kits from Craft Living Artistry are designed to be complete, saving you from the frustration of missing pieces or mismatched gauges.
How can I find reliable jewelry supply vendors?
Start with vendors who publish clear product specs, offer returns, and specialize in jewelry making supplies rather than general crafts. Read customer reviews about wire quality and bead consistency. Subscription boxes and curated kits from a single trusted source also reduce the number of vendors you manage. For bulk orders, ask about wholesale account requirements, which often need a resale certificate or minimum purchase.
How do I organize my jewelry making supplies for better workflow?
Sort beads by color, size, or project type in clear stackable containers. Keep wire on spools separated by gauge, and store findings like jump rings and clasps in labeled compartments. A pegboard or drawer unit near your work surface cuts down on searching time. The goal is to see what you have at a glance so you can grab it and start creating without digging.



0 Comments