
Table of Contents
- Step 1: Purge and Sort Your Craft Supplies
- Step 2: Zone Your Craft Room by Workflow
- Step 3: Choose Craft Room Storage Ideas That Fit Your Space
- Step 4: Small Craft Room Organization Tips for Tight Spaces
- Step 5: The Best Craft Room Organization Tools and Labels
- Step 6: Set Up a Digital Inventory for Your Craft Stash
- Step 7: Maintain Your Craft Room Organization System
- Conclusion: Build a Craft Room That Works for You
- Frequently Asked Questions
Last Updated: September 28, 2026
Step 1: Purge and Sort Your Craft Supplies
Learning how to organize your craft room supplies starts with subtraction, not storage. Most craft rooms fail because people buy bins before they reduce volume, so they end up storing supplies they will never touch again.
The Keep, Donate, Toss Method
Sort each item against three questions: Have I used this in the past year? Is it still in usable condition? Does it support a project I am actually planning?
- Keep: tools and materials tied to a current or near-term project
- Donate: duplicate tools, unopened supplies, and kits you have outgrown
- Toss: dried-out adhesives, rusted blades, tangled scraps, and anything unusable
Handling Half-Finished Projects
Half-finished work is the hardest category, and most guides skip it. In practice, the rule that works is a deadline, not a feeling.
Photograph the project before you dismantle it. A single photo preserves the idea, so you can restart later without hoarding the physical pieces.
Step 2: Zone Your Craft Room by Workflow
Workflow-based zoning is the step most craft room storage ideas ignore. Instead of grouping supplies by type, group them by the activity that uses them, then place each zone where that activity happens.
Setting Up a Cutting and Assembly Station
A cutting and assembly station is the surface where you measure, cut, and join materials. Keep it clear of long-term storage so you always have working room.
Build it around three reach zones:
- Primary reach: scissors, rotary cutter, ruler, cutting mat, adhesive
- Secondary reach: spare blades, tape, marking tools, small clamps
- Storage zone: bulk materials, backup stock, and rarely used equipment
Step 3: Choose Craft Room Storage Ideas That Fit Your Space
The best storage solution is the one that matches your space, not the one that photographs well. Measure your room first, then choose between vertical, drawer-based, and modular systems.
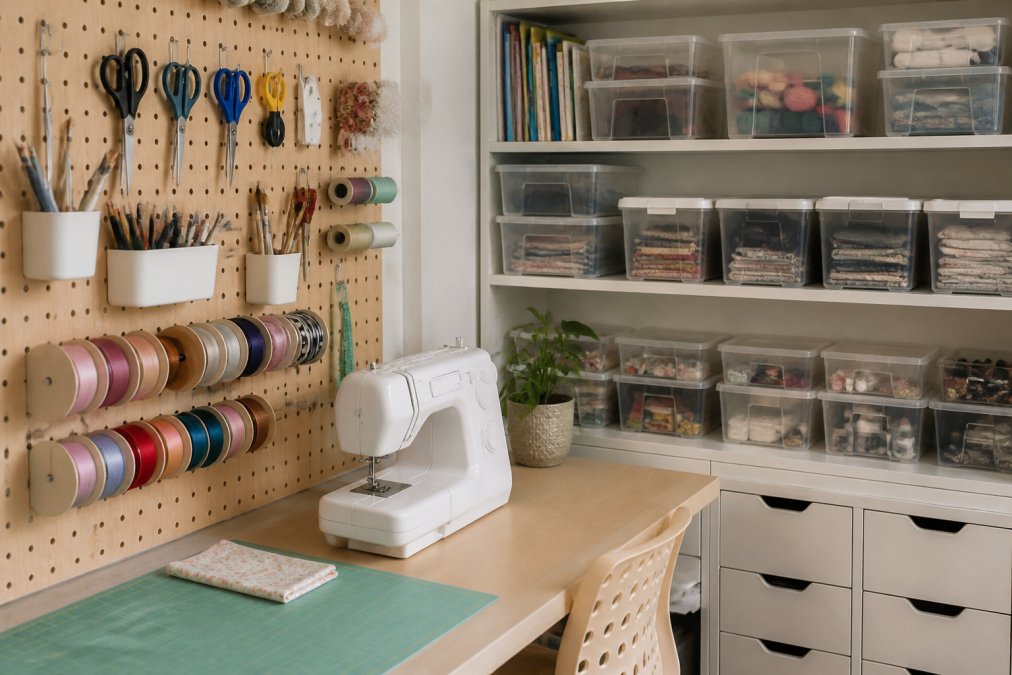
Vertical Storage and Wall Space
Vertical space is the most underused asset in a craft room. Wall-mounted pegboards, shelving units, and rail systems keep tools visible and free up every horizontal surface.
A few specifics that hold up in real rooms:
- A 4-foot-by-4-foot pegboard panel with a 1/4-inch hole pattern handles most hand tools; add peg hooks sized to the tool weight rather than one universal hook.
- Wall-mounted rails with S-hooks work better than pegboards for oddly shaped items like rulers, templates, and cutting mats.
- Over-the-door organizers are the cheapest vertical real estate in the room, shoe organizers hold ribbon spools, glue sticks, and small punches well.
Budget-Friendly Storage Hacks
You do not need to buy a matching bin system. Common household items do the same job:
- Mason jars and glass jars: beads, buttons, and small findings stay visible and stackable on a shelf.
- Shoeboxes and photo boxes: lightweight, stackable, and easy to label; good for fabric scraps and paper.
- Ice cube trays and muffin tins: ideal for sorting tiny components during a project, then sliding into a drawer.
- Cardboard shipping boxes cut down to drawer height: free drawer dividers that you can trim to fit.
- Plastic food containers with lids: paint water cups, brush holders, and small-part bins.
Furniture Repurposing
Before buying new storage furniture, look at what you already own:
- A dresser with shallow drawers makes an excellent bead and notion cabinet.
- A bookshelf laid on its side becomes a low bench with cubbies underneath.
- An old kitchen cart on casters rolls between stations and stores supplies on two levels.
- A filing cabinet holds rolled vinyl, wrapping paper, and large paper stock upright.
Small-Space Tactics
When floor area is tight, the goal is to make every surface work twice:
- Mount a folding table on hinges so it drops flat against the wall between sessions.
- Use the inside of closet doors for shallow shelving or hook rails.
- Stack clear bins on a rolling cart so the whole unit moves out of the way.
- Reserve the top shelf for seasonal or rarely used supplies, not daily tools.
A Note for Neurodivergent Crafters
Most storage advice assumes you will remember what is inside a closed cabinet. For many crafters with ADHD or autism, that assumption fails, ‘out of sight, out of mind’ is the single biggest reason supplies get re-bought and projects stall.
If that describes you, invert the usual advice:
- Favor open shelving and clear bins over opaque cabinets and lidded boxes.
- Keep your current project’s supplies in a single open tray on the work surface, not filed away.
- Use one bin per active project rather than one bin per material type, so starting a session takes one motion.
- Label by what you will do with the item (‘beads for earrings’) rather than by what it is (‘seed beads’).
Step 4: Small Craft Room Organization Tips for Tight Spaces
Small craft room organization tips come down to one principle: every item needs a defined home, and that home must be reachable without moving anything else.
Do not stack heavy bins above shoulder height in a small room. Overhead storage that requires a step stool for daily items leads to clutter on your work surface within weeks.
Step 5: The Best Craft Room Organization Tools and Labels
The best craft room organization tools are the ones that match your materials: clear containers for small parts, pegboards for hanging tools, drawer dividers for flat storage, and a reliable label maker.
Matching Tools to Materials
Different supplies fail under different storage conditions, so the tool should follow the material:
- Small parts (beads, buttons, findings): compartment boxes with adjustable dividers, or stackable clear jars.
- Flat stock (paper, fabric, vinyl): vertical file holders or a repurposed filing cabinet so sheets stay unbent and visible.
- Hanging tools (scissors, pliers, brushes): pegboard, magnetic strips, or rail-and-hook systems.
- Liquids and adhesives: upright trays with a lip, kept out of direct sun and away from heat.
- Yarn and cord: open bins or wall pegs so you can see color and quantity without unspooling.
Labeling Systems That Survive Real Use
Labeling is what keeps a system alive. Use a consistent format across every bin and shelf: category, contents, and date. A label that reads ‘Beads – seed, size 11 – opened 2026’ tells you more than ‘Beads.’
A simple labeling system:
- Category label on the bin front (Beads, Adhesives, Paint)
- Contents label on the lid or top edge
- Date label for anything that can expire or dry out
A few conventions that make labels easier to maintain:
- Label the front and the top of every container, so the label reads correctly whether the bin sits on a shelf or in a drawer.
- Use a consistent color per category, for example, one color for adhesives, another for cutting tools, so you can scan a shelf without reading every word.
- Print labels rather than hand-writing them where possible; printed labels stay legible and are faster to replace when contents change.
- Keep a small stack of blank labels and a marker in the room, so relabeling happens the moment contents change instead of ‘later.’
Label Makers and Low-Tech Alternatives
A dedicated label maker produces durable, adhesive labels that resist smudging and peeling. For crafters who prefer not to buy one, printable label sheets run through a standard home printer work well, and masking tape with a permanent marker is a fine stopgap for bins you are still sorting.
Step 6: Set Up a Digital Inventory for Your Craft Stash
A digital inventory is the angle most craft room guides skip entirely, and it is the one that prevents re-buying. A simple spreadsheet or inventory app tracks what you own, where it lives, and when you last used it.
- Photograph each bin once and attach the photo to its row
- Update the sheet when you finish a project, not monthly
- Flag items you have not touched in a year for your next purge
Step 7: Maintain Your Craft Room Organization System
Maintenance is where most organization systems collapse. A craft room stays organized when the reset takes minutes, not an afternoon.
Build three habits:
- End-of-session reset: return every tool to its zone before you leave the room
- Monthly spot check: refill labels, straighten dividers, remove stray items
- Seasonal purge: repeat Step 1 every few months as your projects change
The system that survives is the one with the fewest steps. If returning a tool takes more than one motion, the system will fail within a month.
Conclusion: Build a Craft Room That Works for You
The real challenge with craft room organization is not buying enough bins; it is building a system that survives your next project. Start with the purge, zone by workflow, and let the storage follow the way you actually work.
Frequently Asked Questions
What is the best way to store craft supplies?
The best method depends on how often you use each item. Store everyday tools like scissors and glue at arm’s reach on a pegboard or desktop caddy. Keep seasonal or occasional supplies in labeled clear bins on high shelves. Group items by category, such as paint storage together and sewing supplies together, so you always know where to look. Clear containers help you see what you have without opening every lid.
How do you organize a craft room on a budget?
Start with what you already own. Shoeboxes, mason jars, and cardboard dividers work well for drawer dividers and small items. Thrift stores often carry shelving units and baskets at low cost. Focus your spending on one or two items that solve your biggest problem, like a pegboard for wall space or a rolling cart for a small craft room. Budget-friendly organization is about using vertical space and repurposing containers before buying new ones.
How do you declutter craft supplies without regret?
Use the Keep, Donate, Toss method. Keep supplies you have used in the past year or have a specific project planned for. Donate duplicates, expired adhesives, and supplies for hobbies you have moved on from. Toss dried-out markers, rusted tools, and anything damaged. For half-finished projects, give yourself a deadline: if you have not touched it in six months, let it go. This approach to how to declutter craft supplies keeps your stash usable and your space clear.
How do you organize small craft supplies like beads and buttons?
Small items disappear easily, so containment matters most. Use drawer dividers with adjustable compartments, stackable clear containers, or a bead organizer with individual slots. Label each compartment by color, size, or type. For beads and jewelry-making supplies, a tiered tray or a wall-mounted spice rack keeps items visible and reachable. Avoid open bowls for tiny pieces unless you enjoy sorting them off the floor later.




0 Comments