
Table of Contents
- Why 3D Prints Warp: The Root Causes
- How to Fix Warped 3D Prints Using Heat
- Mechanical Pressure and Clamping Techniques
- 3D Printer Bed Adhesion Tips to Prevent Future Warping
- Using a Brim or Raft to Stop Warping Before It Starts
- Post-Processing Warped 3D Prints: Aesthetic and Structural Repair
- How to Fix Warped 3D Prints: Cooling and Enclosure Settings
- Frequently Asked Questions
Why 3D Prints Warp: The Root Causes
Warping is one of the most frustrating problems in 3D printing. This guide walks you through exactly how to fix warped 3D prints, from immediate heat-based repairs to long-term prevention strategies.
Warping is the deformation of a 3D printed part caused by uneven thermal contraction as plastic cools at different rates across the print, resulting in curling, corner lifting, or separation from the build surface.
Thermal Contraction and Layer Separation
Every thermoplastic shrinks as it cools. The problem arises when different parts of your print cool at different rates. The bottom layers, bonded to the build surface, resist movement. The upper layers, cooling freely in ambient air, want to contract. That tension pulls the part upward, causing layer separation, visible as horizontal cracks or gaps between layers.
According to Formlabs’ guide to 3D printing materials and warping, materials with higher thermal contraction rates, such as ABS, are significantly more prone to warping than lower-contraction materials like PLA.
Geometry, Corner Lifting, and Ambient Temperature
Part geometry plays a bigger role than most beginners expect. Long, flat parts with large surface areas are most vulnerable because more material contracts across a wider span. Sharp corners concentrate stress, making corner lifting common on rectangular prints.
Ambient temperature compounds the problem. A cold workshop or draft can cause the outer surface to cool faster than the interior, creating a temperature gradient that pulls the part out of shape. This is why enclosures make such a dramatic difference for warp-prone materials.
How to Fix Warped 3D Prints Using Heat
Heat-based reshaping is the most effective method for fixing a warped print after the fact. The core principle is simple: bring the plastic back above its glass transition temperature, reshape it, and hold it flat while it cools. This works reliably for PLA, PETG, and some ABS parts with minor to moderate deformation.
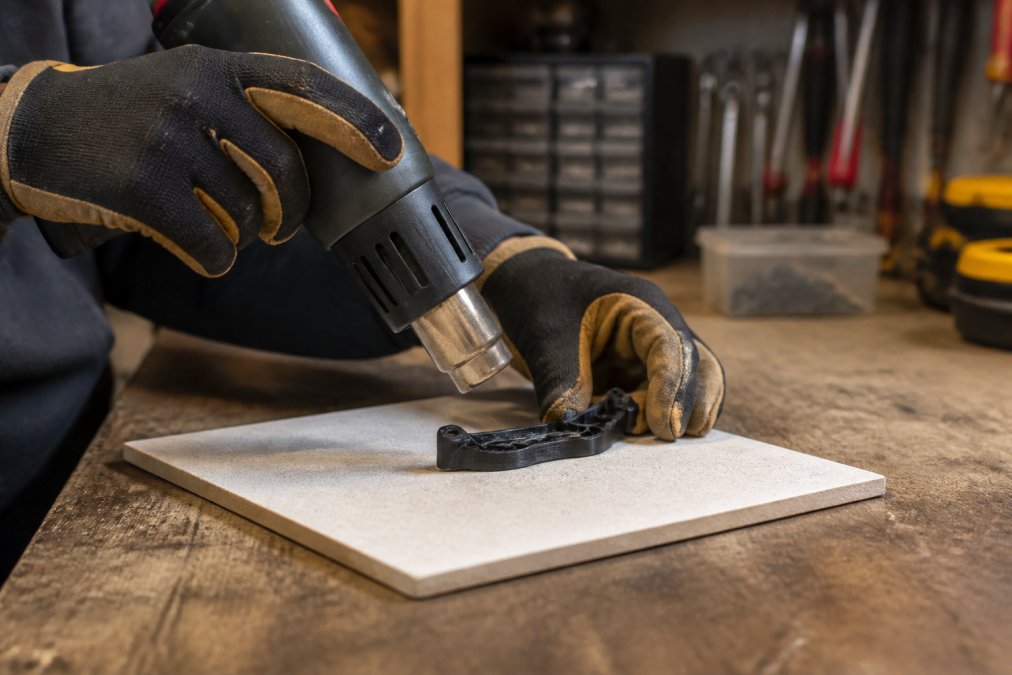
Heat Gun Method: Step-by-Step
A heat gun gives you precise, directional heat control and is the preferred method for targeted repairs.
What you’ll need:
- Heat gun with adjustable temperature settings
- Heat-resistant gloves
- A flat ceramic tile or glass surface
- Clamps or heavy flat weights
Steps:
- Place the warped part on a flat ceramic tile.
- Set your heat gun to a low-to-medium setting: around 60-70°C for PLA, 100-110°C for ABS.
- Move the heat gun in slow, sweeping passes 10-15 centimeters from the surface. Never hold it in one spot.
- When the plastic becomes visibly flexible and slightly glossy, stop applying heat.
- Immediately press the part flat against the ceramic surface using a second flat tile or weight.
- Hold firm pressure for at least 2-3 minutes while the part cools.
- Check flatness once fully cooled to room temperature.
Repeat as needed. Minor warps often correct in a single pass; severe deformation may require two or three cycles.
Hot Water Submersion for Minor Deformation
Hot water submersion is a gentler approach for PLA parts with slight warping. PLA’s glass transition temperature is low enough that hot tap water around 60°C can make it pliable without localized overheating risks.
- Fill a container with hot water at 60-70°C.
- Submerge the warped part completely for 30-60 seconds.
- Remove it with tongs and immediately press it flat between two smooth, flat surfaces.
- Hold under cold running water for 30 seconds to lock in the shape.
This method does not work well for ABS or PETG, which require higher temperatures than hot water can safely deliver.
Safety Protocols for Heat-Based Fixes
- Always wear heat-resistant gloves. Hot plastic sticks to skin and causes serious burns.
- Work in a ventilated space. Heating thermoplastics releases fumes. Open a window or use a fan to direct air away from your face.
- Never use an open flame. A lighter or torch creates uncontrolled heat that will melt or char the print.
- Keep flammable materials away from the work area. Heat guns can ignite paper, fabric, and other materials nearby.
- Allow parts to cool completely before handling. Plastic that looks solid may still be soft and will re-warp under hand pressure.
Never heat ABS in an enclosed space without ventilation. ABS releases styrene vapors when heated, which are harmful with prolonged exposure. The [OSHA guidelines on chemical hazards in manufacturing](http://www.osha.gov/chemical-hazards) classify styrene as a potential health hazard at elevated concentrations.
Mechanical Pressure and Clamping Techniques
Mechanical reshaping works best when combined with heat, but it can also correct very minor warps in PLA through pressure alone over an extended period.
For heat-assisted clamping:
- Apply heat to the warped area using the heat gun method until the part is pliable.
- Immediately sandwich the part between two flat, smooth boards.
- Apply clamps evenly across the boards, distributing pressure across the full surface area.
- Leave clamped for a minimum of 30 minutes.
- Release slowly and check flatness.
For pressure-only correction (minor warps, PLA only):
- Place the part concave-side down on a flat surface.
- Stack heavy, flat objects on top.
- Leave for 24-48 hours in a warm room around 25-30°C.
- Check and repeat if needed.
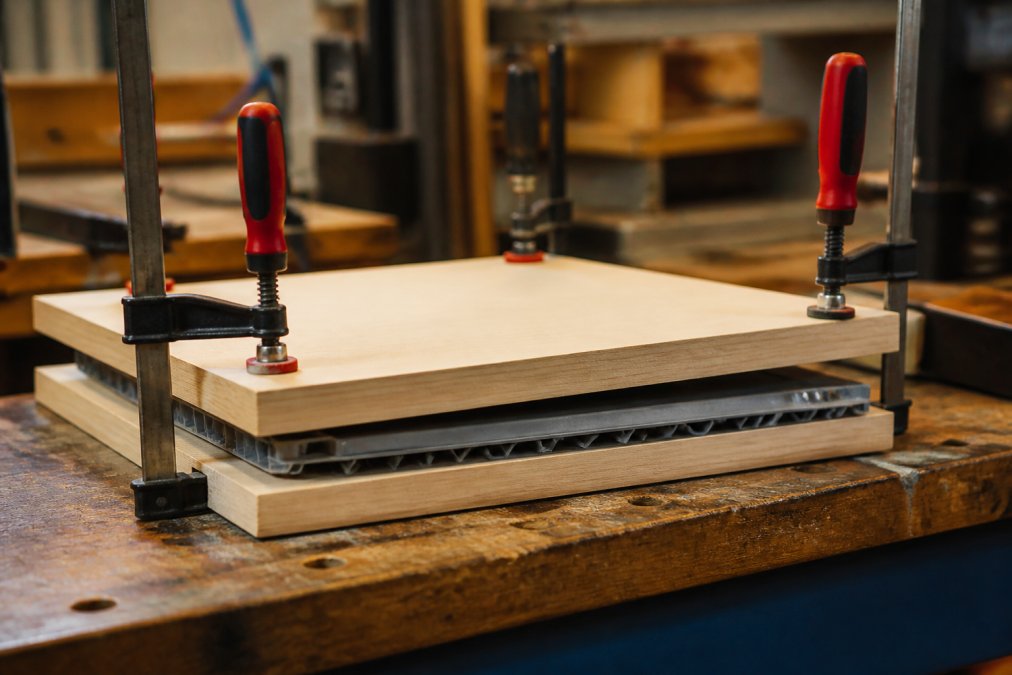
The biggest mistake with clamping is uneven pressure. If you clamp only at the edges, you can introduce a new bow in the center. Spread your clamps across the full length of the part.
For long, flat parts, use a piece of thick glass as your pressing surface instead of wood. Glass is perfectly flat and won’t introduce surface texture into your softened print.
3D Printer Bed Adhesion Tips to Prevent Future Warping
Bed adhesion is the single most effective lever you have for stopping warping before it starts.
Bed Leveling and First Layer Settings
A poorly leveled bed is a root cause of warp failures. If your first layer doesn’t bond properly to the build surface, there’s nothing anchoring the print as subsequent layers contract.
The first layer should be slightly squished into the bed surface with a thin, consistent line and no gaps. Key settings to check:
- First layer height: Set to 100-150% of your normal layer height for better adhesion
- First layer speed: Slow down to 20-30 mm/s to give the plastic time to bond
- Bed temperature: Match the filament manufacturer’s recommendation precisely
As documented in Prusa Research’s print settings knowledge base, even a 0.1mm deviation in bed leveling can cause adhesion failures that lead to warping on long prints.
Adhesive Treatments and Build Surface Options
The build surface you use matters as much as bed leveling. Different materials bond better to different surfaces.
| Filament | Recommended Surface | Adhesive Treatment |
|---|---|---|
| PLA | PEI sheet, glass | Glue stick optional |
| PETG | PEI sheet (textured) | Glue stick as release agent |
| ABS | Glass or PEI | ABS slurry or hairspray |
| TPU | PEI sheet | None needed |
Glue stick is underrated. A thin, even layer on a glass bed provides excellent adhesion for PLA and ABS while still allowing parts to release cleanly once cooled. For ABS specifically, an enclosure combined with a heated build plate running at 100-110°C dramatically reduces warping by keeping the ambient temperature elevated throughout the entire print process.
Using a Brim or Raft to Stop Warping Before It Starts
Using a brim or raft is one of the most reliable prevention tools available in any slicer.
A brim is a flat, single-layer extension that prints around the base of your model, increasing contact area between the print and build surface to counteract lifting forces. A brim width of 5-10mm is usually sufficient.
A raft is a multi-layer base printed beneath the entire model, providing even more adhesion and insulating the bottom layers from temperature fluctuations. Rafts take longer to print and can be harder to remove cleanly, but they’re ideal for large ABS prints or geometries with minimal contact area.
When to use each:
- Brim: tall, narrow models; parts with small footprints; PLA and PETG
- Raft: large flat ABS prints; models with complex base geometries; any print where corner lifting has been a repeated problem
A brim adds almost no print time but can be the difference between a successful print and a warped failure. Enable it by default for any print with a footprint larger than 50mm in any dimension.
Post-Processing Warped 3D Prints: Aesthetic and Structural Repair
Not every warped print needs to be reshaped. Sometimes the goal is to make it look right; other times, structural integrity is the priority.
Assessing Structural Integrity Before You Repair
Before you apply heat or force to a warped part, ask: does this part need to bear load or fit precisely into an assembly? If yes, reshaping alone may not be enough. Warping introduces residual stress that remains locked in the plastic even after flattening.
For structural parts, assess:
- Layer adhesion: Check for visible delamination in the warped area.
- Surface cracking: Fine cracks indicate stress fractures that will propagate under load.
- Dimensional accuracy: Measure the part after reshaping to ensure it fits required geometry.
If any of these issues are present, reprint rather than repair.
Material-Specific Recovery: PLA, PETG, and ABS
PLA is the most forgiving material for heat-based reshaping. Its low glass transition temperature allows quick pliability, and it holds its reshaped form well once cooled. Risk: overheating above 80°C causes unpredictable deformation.
PETG requires more heat to become pliable and tends to become sticky when hot. Always use a release layer such as silicone or PTFE film between the part and your flat surface when reshaping.
ABS is the most challenging. It requires high heat around 100-110°C and is prone to surface blemishes if heated unevenly. Acetone vapor smoothing after reshaping reflows the surface layer and hides minor cosmetic damage.
For aesthetic repairs on any material, filler primer and sanding address surface irregularities. Apply filler primer in thin coats, sand with 220-grit between coats, and finish with 400-grit for a smooth surface ready for paint.
How to Fix Warped 3D Prints: Cooling and Enclosure Settings
Aggressive cooling is excellent for PLA overhangs but causes warping and layer separation in ABS and PETG. The outer surface cools and contracts before the interior settles, creating internal stress.
Recommended cooling settings by material:
- PLA: Fan at 100% from layer 3 onward.
- PETG: Fan at 30-50%.
- ABS: Fan off entirely, or no more than 10-15% on bridging sections only.
An enclosure keeps the air surrounding your print at elevated temperature throughout the entire print, slowing the cooling rate of each layer and reducing thermal stress. For ABS, an enclosure is less optional and more functional, printing ABS without one in a typical workshop almost guarantees corner lifting on parts larger than 50mm.
We offer a curated selection of 3D printing filaments across PLA, PETG, and specialty materials, all chosen to work reliably with standard desktop printers. If warping seems tied to filament quality rather than settings, examine your filament source. Inconsistent diameter, absorbed moisture, and poor material composition all contribute to unpredictable thermal behavior.
| Warping Issue | Primary Cause | Best Fix | Prevention |
|---|---|---|---|
| Corner lifting, PLA | Fast cooling, no adhesion | Heat gun + clamp | Brim + slow first layer |
| Full base warp, ABS | No enclosure, cold ambient | Heat gun + clamping | Enclosure + heated bed at 110°C |
| Layer separation, PETG | Cooling fan too high | Heat + press flat | Fan at 30-50% |
| Minor bow, PLA | Stress during print | Hot water submersion | Raft or brim |
| Surface cracking, ABS | Rapid thermal change | Acetone vapor smooth | Enclosure + no fan |
A warped print doesn’t have to mean a wasted print. The techniques above cover the full spectrum from immediate rescue to long-term prevention. For deeper reading on material behavior and print optimization, the MakerBot’s guide to 3D printing troubleshooting covers additional edge cases worth reviewing.
Frequently Asked Questions
Q: Is it possible to reheat and reshape a warped PLA print?
A: Yes. PLA has a relatively low glass transition temperature (around 60°C), which means gentle, even heat from a heat gun or warm water bath can soften it enough to press flat. Work slowly, apply heat in short bursts, press the part against a flat surface, and hold it in place while it cools. Avoid overheating, which causes surface bubbling. Once cooled completely, the reshaped part will hold its new geometry, though heavily stressed areas may remain slightly weaker.
Q: Why are my 3D print corners curling up during the print?
A: Corner lifting happens because thermoplastics shrink as they cool. The outer corners of a print cool fastest, contract, and pull away from the heated build plate before the layers above have fully bonded. Large flat parts and materials with high thermal contraction, like ABS, are most prone to this. Fixing it usually means improving bed adhesion, adding a brim to anchor the corners, raising the heated build plate temperature, and reducing the cooling fan speed for the first several layers.
Q: How do bed adhesion issues contribute to print warping?
A: When the first layer doesn’t stick firmly to the build surface, thermal contraction during 3D printing has nothing holding the part down. The corners lift, layers separate, and the deformation compounds with every layer added on top. Good bed adhesion, achieved through proper bed leveling, a clean build surface, and adhesive treatments like glue stick or hairspray, gives the thermoplastic an anchor point that resists the pulling force of thermal contraction throughout the print.
Q: Can you fix ripples or curling in a finished 3D print?
A: Minor ripples and curling can often be corrected through post-processing warped 3D prints with heat and pressure. Use a heat gun on low heat or submerge the part briefly in warm (not boiling) water to soften the plastic, then press it flat against a smooth surface and clamp it until cool. For surface ripples that are cosmetic rather than structural, light sanding followed by a filler primer can smooth the finish. Severe warping that has caused layer separation is harder to reverse and may affect the part’s strength.
Warping is a solvable problem, but it requires addressing both the immediate deformation and the underlying conditions that caused it. If you’re working through repeated warp failures and suspect your filament is part of the issue, explore the 3D printing filament range at Craft Living Artistry, where every product is selected for consistent quality and reliable performance across standard desktop printers.
This article was written using GrandRanker


0 Comments