Last Updated: October 28, 2026
Quick Summary
Easy jewelry making projects for beginners are worth trying because a single afternoon and a basic toolkit can produce a wearable piece you made yourself. Start with a Tier 1 project such as a beaded stretch bracelet, which takes under 30 minutes and needs no special tools.
- Tier 1 projects take under 30 minutes and need no special tools.
- Round-nose pliers, chain-nose pliers and flush cutters are the three tools to buy first.
- Round-nose and chain-nose pliers each cost $8 to $15, and flush cutters cost $10 to $18.
- Open jump rings sideways, never straight apart, so the ring stays round.
- Press crimp beads firmly and test the piece gently before wearing it.
Table of Contents
- Easy Jewelry Making Projects for Beginners, Ranked by Skill and Time
- Essential Jewelry Making Tools for Beginners
- Jewelry Findings You Need: Clasps, Jump Rings and Crimp Beads
- Jewelry Making Techniques for Beginners, Step by Step
- Best Beginner Jewelry Making Kits in 2026: What to Look For
- Budget, Workspace Setup and Safety for New Jewelry Makers
- Fixing Common Beginner Mistakes and Choosing Your First Project This Week
- Frequently Asked Questions
Easy jewelry making projects for beginners are worth trying, and the reason is simple: a single afternoon and a basic toolkit can produce a wearable piece you made yourself. This guide walks through projects, tools, findings and techniques for a new maker.
Jewelry making is a hands-on craft built from a small set of repeatable skills. Stringing beads, opening and closing jump rings, and finishing a clasp cover most beginner work. Once those basics feel natural, more complex designs become approachable. Our recommendation is to start with a short list of simple projects, learn the core motions, and only then buy specialized tools.
Easy Jewelry Making Projects for Beginners, Ranked by Skill and Time
The fastest way to pick a first project is to match it to your confidence, your available time, and the tools you already own. For a full comparison of best beginner jewelry making kits, the roundup covers specific options. The tiers below do that. Each project lists what you need and roughly how long it takes.
Tier 1: Under 30 minutes, no special tools
Beaded stretch bracelet.
Stamped washer keychain.
Knotted cord bracelet.
Tier 2: 1 to 2 hours, one new skill each
Strung necklace with a lobster clasp.
Beaded drop earrings.
Memory wire bracelet.
Tier 3: 2 or more hours, builds on the basics
Macrame necklace or bracelet.
Basic wire-wrapped pendant.
Embroidered or bead-embroidered patch.
If you are unsure where to start, pick the Tier 1 project that uses supplies you already have. Finishing one small piece in under 30 minutes builds more momentum than reading three tutorials.
Start at the top of the list and move down as your hands get steadier. Each tier adds exactly one new skill, so you are never learning crimping, wire wrapping, and knotting in the same session.
Essential Jewelry Making Tools for Beginners
You do not need a large workshop to begin, but you do need to know which tools earn their place and which ones can wait. The list below is organized by what each tool actually does and which projects require it. Most beginners can start with three tools and add the rest as their projects demand them.
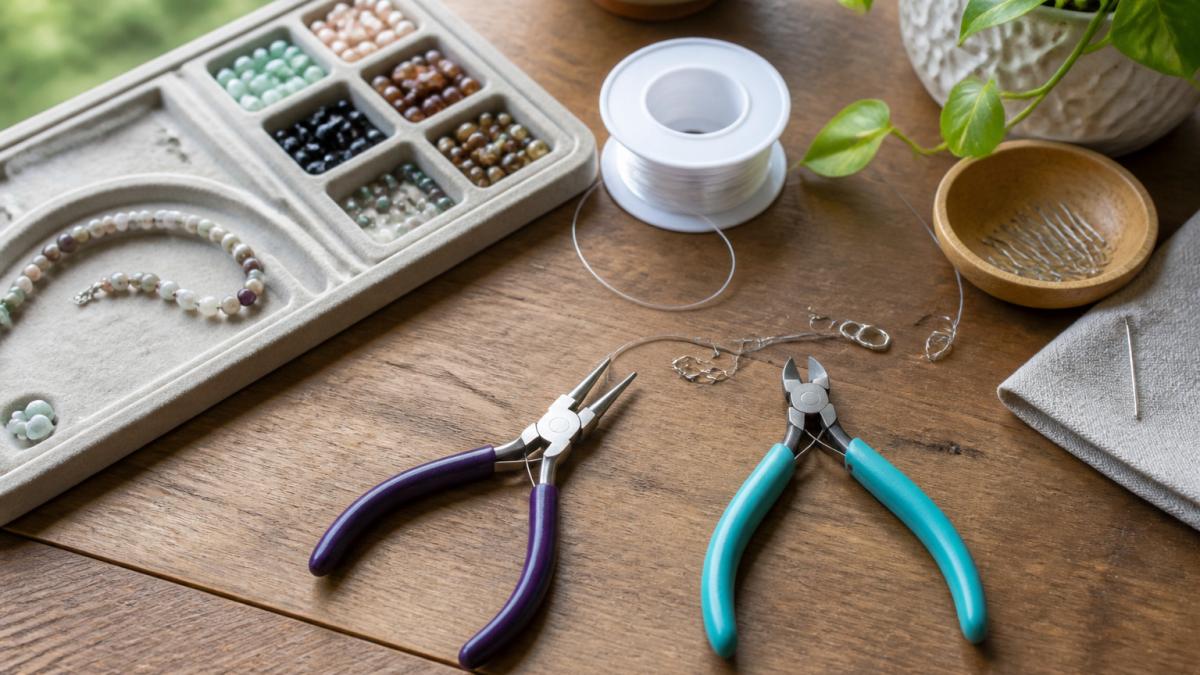
The three tools to buy first
Round-nose pliers. These have tapered, conical jaws and are used to form loops on head pins and eye pins. Expect to pay $8 to $15 for a pair with cushioned handles. Every earring project needs them.
Chain-nose pliers (also called flat-nose or needle-nose). These have flat inner jaws for gripping wire and opening jump rings. Budget $8 to $15. You will use them on nearly every project that involves findings.
Flush cutters. These trim wire and cord flush to the work so the end does not scratch the wearer. Budget $10 to $18. Do not substitute household scissors; they will dent and dull on wire.
Look for pliers with spring-loaded handles if you plan to make several pieces in one sitting, since they reduce hand fatigue. If you would rather buy everything at once, this all-in-one jewelry making starter kit includes tools and findings together.
Tools worth adding for specific projects
Crimping pliers. These have two grooves that fold a crimp bead into a neat crescent instead of flattening it. Budget $10 to $15. They are optional for a first necklace but make crimps noticeably more secure and consistent. A common beginner workaround is to flatten crimps with chain-nose pliers, which works but is less reliable.
Jump ring opener. A small ring with a slot that holds a jump ring steady while you twist it open. Budget $5 to $8. It is not required, but it saves wear on your fingers and helps you avoid distorting the ring.
Bead tray or mat. A shallow tray with a textured surface stops round beads from rolling. Budget $5 to $12. A folded towel works as a free substitute.
Bench block and chasing hammer. Needed only for stamping projects. Budget $15 to $25 for a small block and $10 to $20 for a hammer. Skip both until you actually plan to stamp metal.
Materials that cover most early projects
Beading wire. 0.019-inch diameter is a good all-purpose size for necklaces and bracelets with medium beads. A 30-foot spool runs $6 to $12.
Stretch elastic cord. 0.7mm or 0.8mm is standard for stretch bracelets. A 100-foot spool runs $5 to $10 and makes dozens of bracelets.
Crimp beads. Buy a small tube of 2mm crimps in a metal that matches your wire. Budget $4 to $8 for 100 pieces.
Jump rings. A 100-piece bag of 5mm or 6mm jump rings in stainless steel or brass runs $5 to $10. Stainless steel resists tarnish better for everyday wear.
What to skip at first
Specialty tools such as wire jigs, ring mandrels, and rotary tumblers are useful once you are making the same design repeatedly, but they add cost without adding skill for a beginner. Buy them only when a specific project in this guide calls for them.
Keep a small notebook or photo log of the patterns you test. It makes repeating a successful design far easier, and it helps you notice which tools you actually reach for before you buy more. To check your gear against a full list, see the jewelry making supplies list for beginners.
The table below sums up the core tools, what each one is for, and what the article says it costs.
| Tool | Used for | Budget |
|---|---|---|
| Round-nose pliers | Forming loops on head pins and eye pins | $8 to $15 |
| Chain-nose pliers | Gripping wire and opening jump rings | $8 to $15 |
| Flush cutters | Trimming wire flush to the work | $10 to $18 |
| Crimping pliers | Folding crimp beads into neat crescents | $10 to $15 |
| Jump ring opener | Holding rings steady while opening | $5 to $8 |
| Bead tray or mat | Stopping round beads from rolling | $5 to $12 |
| Bench block and chasing hammer | Stamping projects only | $15 to $25 and $10 to $20 |
Jewelry Findings You Need: Clasps, Jump Rings and Crimp Beads
Findings are the small metal parts that connect your beads to the wearer. The three you will use most are clasps, jump rings, and crimp beads.
Clasps hold a necklace or bracelet closed. Lobster clasps are common because they are secure and easy to open. Jump rings link components together, such as attaching a clasp to a chain. Stainless steel jump rings are a practical choice for everyday wear, and they are commonly sold in sizes from 3mm to 12mm, which covers most beginner needs. You can browse stainless steel open jump rings in those sizes.
Crimp beads secure the end of a beading wire. You flatten them with pliers or a crimping tool so the wire stays in place. A loose crimp is one of the most common beginner problems, so press firmly and test the piece gently before wearing it.
Jewelry Making Techniques for Beginners, Step by Step
Three techniques carry most beginner projects: stringing beads, attaching findings, and finishing ends.
Stringing beads: Measure your wire against your wrist or neck, add about two inches for finishing, and string beads in your planned pattern. Keep tension even so the piece lies flat.
Attaching findings: Thread a crimp bead and clasp onto the wire, loop the wire back through the crimp bead, and flatten it. Trim any excess wire close to the crimp.
Finishing ends: Check that every connection holds. Gently tug each end before you call the piece done.
Opening and Closing a Jump Ring Correctly
Hold the jump ring with two pliers and twist the ends apart sideways, not straight outward. A jump ring opening tool can hold the ring steady while you do this. Sideways movement keeps the ring round. To close it, bring the ends back together and press them flush. Never pull the ring straight apart, because that stretches the opening and weakens the connection. Once you have practiced this on a few spare rings, the motion becomes second nature.
Best Beginner Jewelry Making Kits in 2026: What to Look For
A good beginner kit should include the tools and findings you need for your first projects, clear instructions, and quality materials that match each other.
When comparing kits, check these points:
- Which tools are included, and whether pliers and cutters are sturdy enough for regular use
- Whether findings and beads come in a usable range of sizes
- Whether the kit covers the project types you want to try first
- Whether the included materials match in finish and quality
For exact current pricing and availability, check the Craft Living Artistry website, since prices depend on the kit and the quantity you choose.
Budget, Workspace Setup and Safety for New Jewelry Makers
Starting small can help limit spending. Buy materials for one or two projects at a time, and reuse tools across designs.
Set up a clean, well lit workspace with a mat or tray to catch loose beads. Keep small beads and findings away from children and pets, since they are easy to swallow. Wear safety glasses when trimming wire, because cut ends can fly.
Fixing Common Beginner Mistakes and Choosing Your First Project This Week
Wire that frays may need a fresh cut and a tighter crimp. Uneven bracelets can come from inconsistent bead spacing, so lay out your design before stringing. Jump rings that will not close flush may have been opened straight rather than sideways.
Choose one project from the beginner tier and make it this week. A stretch bracelet is the easiest place to start. Once it is done, move to a strung necklace, then to findings and clasps. Each finished piece builds the skills the next one needs.
Frequently Asked Questions
What are the best jewelry making projects for absolute beginners?
Start with projects that use only one or two techniques. A beaded stretch bracelet needs no tools beyond scissors and is often finished in under an hour. Stamped keychains and simple polymer clay earrings are also good first projects. Once you can open and close a jump ring cleanly, try a wire-wrapped pendant or a beaded necklace with a lobster clasp. Pick one project from the list, buy the supplies listed for it, and finish it before starting another.
What basic tools do I need to start making jewelry at home?
Most beginners need round-nose pliers, chain-nose pliers, flush cutters, a bead tray, and a pair of scissors. Add a bead reamer if you plan to string larger beads and a crimping tool if you use crimp beads. You do not need soldering equipment or a torch to start. Buy good-quality pliers that close smoothly, because cheap pliers can scratch wire and fail under pressure.
Is jewelry making an expensive hobby to start?
It does not have to be. Costs depend on the projects you choose, the bead quality and how many tools you need. Starting with bracelets and keychains keeps early spending low. Prices vary by quantity and retailer, so check Craft Living Artistry’s website for current pricing before you order.
Where can I find affordable jewelry making supplies?
Look for starter kits that bundle beads, cord, findings and basic tools so you avoid buying pieces one at a time. Craft Living Artistry curates kits, cords, beads and maker tools in one place. Free project instructions are also available from several online resources, so you can learn before you spend. Compare the number of pieces included in each kit against the project it is meant for.





0 Comments