
Quick Summary
Hand building pottery means shaping clay without a potter’s wheel, using three core methods: pinch pots, coils, and slabs. Beginners can learn all three at home with simple tools and a damp cloth to keep the clay moist.
- Pinch pots are the fastest first project and require no tools.
- Roll coils about the thickness of your finger and score and slip each layer before stacking.
- Roll slabs to an even thickness of about 1/4 inch for small boxes and trays.
- Dry pieces by feel: leather-hard for trimming, bone-dry before kiln firing.
- Start with a small pinch pot or coil bowl before trying slab boxes or taller vases.
Table of Contents
- Hand Building Pottery Techniques for Beginners: The Three Core Methods
- What You Need Before You Start: Clay, Tools, and a Workspace
- Pinch Pot Technique for Beginners: Your First Hollow Form
- Coil Pottery for Beginners: Building Walls One Rope at a Time
- Slab Building Pottery for Beginners: Flat Clay, Straight Edges
- How to Dry Pottery Evenly So Your Pieces Don’t Crack
- Choosing Your First Hand Building Project and Starter Kit
- Frequently Asked Questions
How to Hand Build Pottery: Beginner Techniques
Last Updated: October 27, 2026
Hand Building Pottery Techniques for Beginners: The Three Core Methods
Hand building pottery techniques beginners can learn at home are simple, forgiving, and need no potter’s wheel.
A pinch pot is the easiest place to start. You shape a ball of clay with your thumb and fingers.
Most beginners get stuck on the same thing: choosing a method before they understand their clay. Start with one technique, master the basics, then add the next.
- Pinch pots: The fastest first project, with no tools required
- Coils: Best for vases, bowls, and tall shapes
- Slabs: Best for boxes, trays, and geometric pieces
What You Need Before You Start: Clay, Tools, and a Workspace
You need three things before you touch clay: the right clay, a few basic tools, and a clean workspace. See our best pottery clay for beginners picks to choose the right clay. Earthenware, stoneware, and porcelain behave differently, so check what your clay body is labeled for before you buy. Compare clay types explained to see which suits hand building. A beginner-friendly starter clay is usually the most forgiving choice.
Keep your tools simple at first:
- A small plastic bag or damp cloth to keep clay moist
- A wooden or metal rib for smoothing
- A needle tool for scoring and cutting
A dedicated work surface makes cleanup easier. Clay dust is hard on lungs, so wipe surfaces with a damp sponge rather than sweeping dry.
Pinch Pot Technique for Beginners: Your First Hollow Form
A pinch pot is a hollow form made by pressing and turning a ball of clay. To start, roll the clay into a smooth ball about the size of a golf ball.
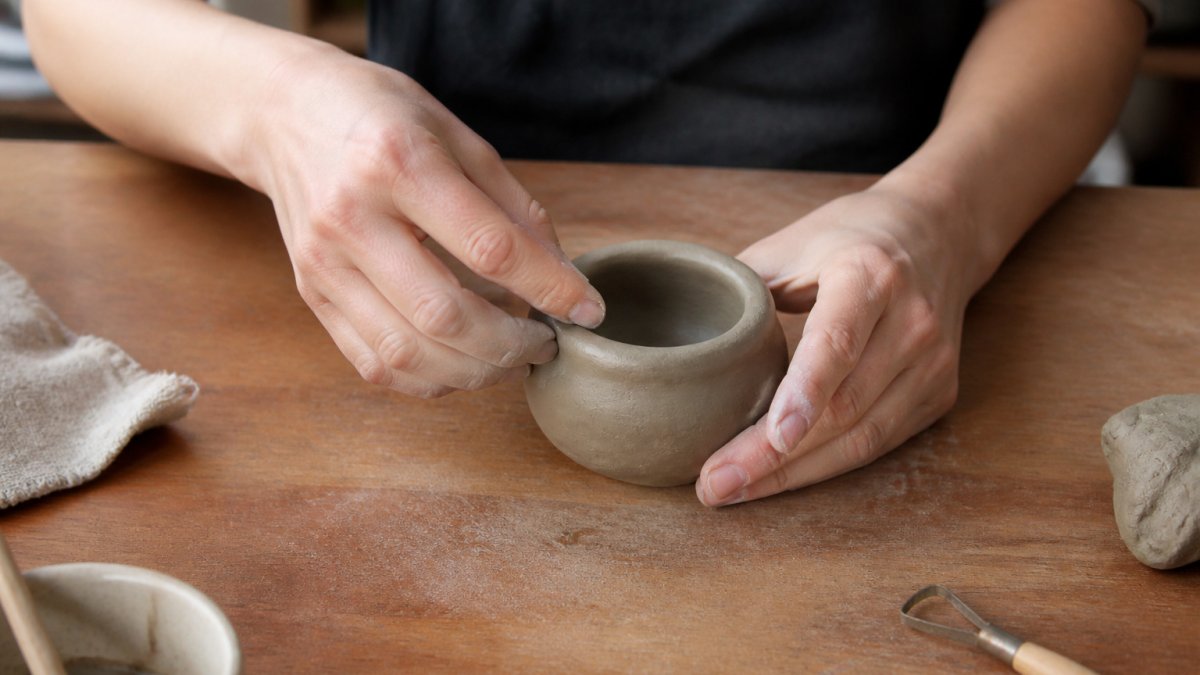
Work slowly and keep the walls an even thickness. Thin, uneven walls are the most common beginner problem and can lead to cracks later.
Watch out: Pushing too hard at the base can crack the bottom. Press gently and keep the base thick.
Coil Pottery for Beginners: Building Walls One Rope at a Time
Coil building means rolling clay into long ropes and stacking them in rings. Roll each coil evenly on a flat surface, about the thickness of your finger.
Smooth the seams on the inside and outside as you build. This joins the coils into one wall and helps the piece hold its shape.
Build slowly. Let the lower walls firm up a little before adding height, or the form can slump.
Slab Building Pottery for Beginners: Flat Clay, Straight Edges
Slab building starts with flat sheets of clay, called slabs. Roll clay between two guide sticks, often called thickness strips or dowels, to get an even thickness, then cut pieces with a needle tool or a template. Slabs make straight-sided boxes, trays, tiles, and geometric forms that pinch and coil cannot easily produce.
Roll an even slab
Even thickness is the whole game with slabs. Place two guide sticks of the same height on either side of your clay and roll with a rolling pin until the pin rides on both sticks.
Let the slab firm up slightly before you cut and assemble. Soft slabs bend, stretch, and warp; leather-hard slabs hold their shape and cut cleanly.
Join edges that hold
Slab joints fail when they are butt-jointed without support. Score both surfaces, add slip, press firmly, and then reinforce the seam. For boxes, a small coil or strip of clay pressed into the inside corner adds real strength. Smooth the outside seam with a rib while the clay is still leather-hard.
Cut your base slightly larger than the walls and set the walls on top of the base rather than butting them against its edge. This gives the joint more contact area and a stronger bond.
Prevent warping and cracking
Slabs are the most failure-prone beginner method because flat clay wants to warp as it dries. A few habits prevent most problems:
- Assemble at leather-hard, not soft. Soft slabs slump and distort under their own weight.
- Support large slabs. Dry flat slabs between two boards or on a bed of newspaper so they cannot curl.
- Keep thickness consistent. A slab that is thick on one end and thin on the other dries unevenly and cracks.
Common slab projects for beginners
Start with a simple slab tray or a small box with straight sides. These teach cutting, joining, and edge cleanup without complex curves. Once you can build a box that dries without warping, move on to mugs with slab bodies and added handles, one of the best ways to practice joining uneven sections.
Slab success comes down to even thickness, leather-hard assembly, and reinforced seams. Roll consistently, join with score-and-slip plus a reinforcing strip, and dry flat and slow.
How to Dry Pottery Evenly So Your Pieces Don’t Crack
Drying is where most beginner pieces fail, and the reason is mechanical: clay shrinks as water leaves it, and thin sections lose water faster than thick ones. Learn how to dry pottery clay without cracks step by step. When a rim dries before the base, the shrinking rim pulls against the still-soft base and tears. The fix is not just “go slow”, it is controlling the rate so every part of the piece reaches each stage at roughly the same time.
Know the four stages by touch and look, not by the clock
Elapsed time is a poor guide because room humidity, clay body, and wall thickness all change the rate. Learn the stages instead:
- Soft / plastic: Clay is cool, damp, and easily deformed. You can still join pieces and reshape. Do not uncover at this stage.
- Leather-hard: The surface feels cool and firm but slightly damp; a fingernail leaves a faint mark, and the piece holds its shape under light pressure. This is when you trim, smooth, stamp, attach handles, and refine rims. Most practitioners find leather-hard arrives in roughly 12-48 hours for small pieces under plastic, but judge by feel.
- Bone-dry: The piece is uniformly pale, feels light, and is cool-to-room temperature with no damp chill. A fingernail does not dent it. Only bone-dry work should go into a kiln, firing damp clay traps steam and can explode the piece.
Mark your calendar but trust your fingers. A piece that feels cool and slightly heavy is still holding water, no matter what the schedule says.
A staged drying schedule by form and thickness
Use this as a starting framework, then adjust for your room. The goal is a gradual, even loss of moisture.
- Days 1-3, Equalize under plastic. Cover the piece loosely with a plastic bag or drape, leaving a small gap for minimal airflow. This lets moisture redistribute from thick bases into thin rims. For handles and attachments, wrap those areas a little more loosely so they do not dry faster than the body.
- Days 4-7, Slow reveal. Open the plastic a bit more each day, crack the bag, then remove it for a few hours, then longer. Keep the piece out of drafts, direct sun, and heat vents.
- Days 7-14, Bone-dry finish. Leave uncovered in a stable room. Thin-walled pieces (under about 1/4 inch) may reach bone-dry in a week; thicker bases and solid forms can take two weeks or more.
Thickness is the biggest variable. A thin slab tray may be bone-dry in days, while a thick coil base can hold moisture for weeks. When in doubt, give it more time.
Joining and drying uneven sections
Handles, rims, spouts, and bases are the classic crack points because they dry at different rates from the wall they attach to. Score and slip joints well, then wrap the whole piece, including the attachment, loosely in plastic for the first few days so the joint and body shrink together. If a handle starts to dry faster than the body, a light mist of water on the handle and a re-cover can slow it down.
Troubleshooting cracks, warping, and detached parts
- Hairline cracks at joints: Usually a sign the joint dried before the body. Re-wet gently, press clay into the crack while still leather-hard, and re-cover.
- Warping slabs: Often from assembling too-soft slabs or drying unevenly on one face. Flip slabs occasionally and dry them between two boards if they are large.
- Detached handles: Caused by poor scoring or uneven drying. Remove, re-score both surfaces, add fresh slip, and reattach while the body is still leather-hard.
Forced heat, hair dryers, heat guns, radiators, dries the surface faster than the interior and is a leading cause of cracks and warping. If you must speed things up, use gentle airflow from a fan across the room, never hot air on the piece.
Clay body and room conditions
Earthenware, stoneware, and porcelain shrink at different rates, and porcelain is the least forgiving of uneven drying. High humidity slows drying; dry winter air speeds it and can crack pieces overnight. A simple tent, a plastic storage bin or a cardboard box with a plastic sheet, slows drying in dry rooms. Keep your workspace between roughly 60°F and 75°F and away from drafts for the most predictable results.
Dry by stage, not by schedule: cover for the first few days, reveal gradually, and let thickness and feel tell you when a piece is bone-dry. Slow and even beats fast every time.
The article breaks drying into four stages, each marked by how the clay feels and looks rather than by the clock.
| Stage | What it looks and feels like | What to do |
|---|---|---|
| Soft / plastic | Cool, damp, easily deformed | Join and reshape; do not uncover |
| Leather-hard | Firm, slightly damp, faint fingernail mark | Trim, smooth, attach handles, refine rims |
| Bone-dry | Pale, light, no damp chill, fingernail does not dent | Ready for the kiln |
| Kiln-ready | Bone-dry with no moisture at joints or thick bases | Tap the base; a dull thud is a good sign |
Choosing Your First Hand Building Project and Starter Kit
Start with a small pinch pot or a simple coil bowl. Our complete guide to starting a pottery hobby covers what to try first.
A starter kit saves time because it bundles the basic tools and clay you need. Browse the beginner pottery clay tools essential kit to see what to buy.
Pick one project, follow the steps, and let the piece dry slowly. Your second attempt will go much more smoothly than your first.
Frequently Asked Questions
How do I use air drying clay?
Air-dry clay is ready to shape as soon as you open the package, so work quickly before it stiffens. Knead it briefly to remove air pockets, then build your form on a flat, non-stick surface. Keep a damp sponge nearby to smooth seams and soften cracks. Let the piece dry at room temperature for 24 to 72 hours, turning it occasionally so it dries evenly. Air-dry clay is not kiln-fired, so it is best for decorative pieces rather than functional pottery.
Can you use air-dry clay for pottery?
You can use air-dry clay for pottery-style decorative pieces, but it behaves differently from kiln-fired pottery clay. Air-dry clay does not get fired, so finished pieces stay fragile and are not dishwasher or microwave safe. Pottery clay, by contrast, is fired in a kiln and becomes durable and water resistant. If your goal is functional mugs or bowls, choose a stoneware or earthenware clay body designed for kiln firing and plan for access to a kiln or a firing service.
How do you keep hand-built pottery from cracking as it dries?
Cracking usually happens when one part of a piece dries faster than another, so slow and even drying is the key. Keep walls a consistent thickness, join pieces with scoring and slip, and avoid leaving thin areas exposed. Loosely cover the piece with plastic for the first several days, then uncover it gradually as it firms up. Keep the piece away from drafts, heaters, and direct sunlight. Work from damp to leather-hard before any finishing or trimming.
What clay and tools do beginners need for hand-building pottery?
Beginners need a kiln-fired stoneware or earthenware clay, a canvas or wooden board to work on, a rolling pin, a needle tool, a ribbon tool, a sponge, a small bowl of water, and a plastic bag or sheet for covering work. Start with one clay body so you can learn how it behaves. A wire tool for cutting and a fine-grit sponge for smoothing are useful additions. Craft Living Artistry offers pottery tools and supplies; check the website for current prices and availability.




0 Comments