
Table of Contents
- Essential Pottery Tools for Beginners
- Beginner Pottery Tool Kit: What to Buy First
- Handbuilding Pottery Tools: Hand-Shaping Essentials
- Wheel Throwing Tools: What You Need for the Potter’s Wheel
- Pottery Clay for Beginners: Choosing the Right Material
- Tool Selection by Pottery Method and Project
- Care, Cleaning, and Storage of Pottery Tools
- Tool Substitutes and DIY Alternatives
- Frequently Asked Questions
Last Updated: October 17, 2026
Essential Pottery Tools for Beginners
Beginner pottery clay tools are the foundation of any home studio, whether you’re hand-building your first pinch pot or centering clay on a wheel. Starting without the right tools is like cooking without utensils: possible, but frustrating.
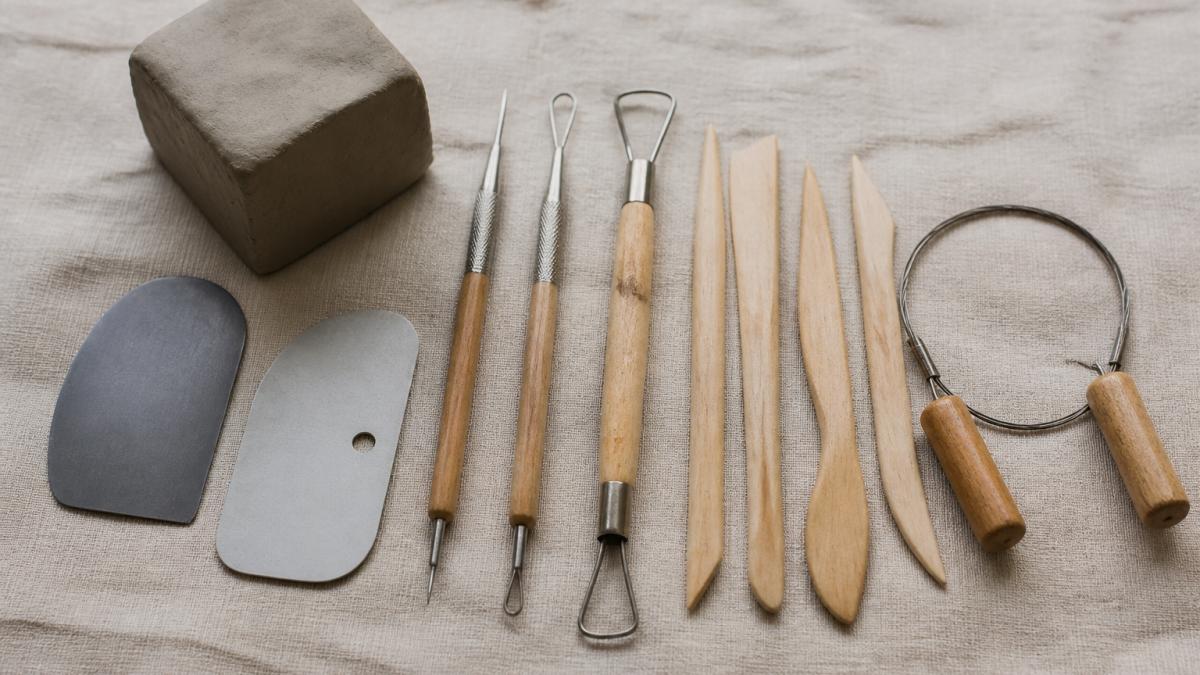
The good news: you don’t need hundreds of tools. A focused beginner pottery tool kit typically includes 8-12 essential pieces that handle most handbuilding and wheel-throwing tasks (Advanced Beginner Pottery | Craft Enrichment).
Tool Names and Basic Functions
Understanding what each tool does helps you make smarter purchasing decisions. Here are the core tools every beginner needs:
Needle Tools are thin, pointed implements for scoring clay before joining pieces, marking details, and trimming excess. They typically have a wooden handle with a metal point.
Ribs come in rubber, metal, or wood and smooth, shape, and compress clay.
Loop Tools (also called ribbon tools) have a wire loop at the end and remove clay efficiently.
Fettling Knives are small, sharp blades designed for trimming and finishing.
Sponges absorb water and smooth edges.
Throwing Sticks (for wheel work) help center clay and create interior walls. They’re typically wooden dowels, 6-12 inches long.
These tools address the three main pottery tasks: joining pieces, shaping forms, and finishing surfaces.
Beginner Pottery Tool Kit: What to Buy First
When you’re starting out, the choice between a pre-assembled kit and individual tools matters. Each approach has real trade-offs.
Starter Kit vs. Individual Tools
Pre-assembled kits bundle 8-20 tools and typically cost less per tool than buying individually.
The downside: kits often include tools you don’t need, and you pay for quantity over quality. Some kit tools are thinner or duller than individual counterparts.
Buying individual tools lets you prioritize quality and choose only what matches your method. If you’re committed to handbuilding, you might skip wheel-throwing tools entirely.
Craft Living Artistry recommends starting with a small, focused kit (8-12 pieces) rather than a massive 61-piece set. You’ll use maybe 60% of a large kit regularly; the rest collects dust.
Budget Considerations
Beginner pottery clay tools range from budget-friendly starter sets to professional-grade individual tools. Entry-level kits work fine for exploration and learning.
The real question isn’t “What’s cheapest?” but “What’s the best value for your commitment level?” If you’re testing whether pottery is for you, start modest.
Ceramic-specific tools outperform DIY substitutes. A proper fettling knife costs more than a kitchen knife, but its angle and blade design prevent clay from dragging and tearing. That precision matters as your skills advance.
Handbuilding Pottery Tools: Hand-Shaping Essentials
Handbuilding, creating forms without a wheel, relies on a different tool set than wheel throwing. If you’re learning pinch pots, coil building, or slab work, these tools are your foundation.
Scoring, Trimming, and Detail Work
Scoring means scratching clay surfaces before joining two pieces, creating texture for slip (liquid clay) to grip. A needle tool or pointed wooden tool creates these marks.
Detail work, adding texture, carving patterns, or refining edges, requires fine control. Wooden modeling tools and small loop tools let you shape without metal marks. Many handbuilders keep several needle tools in different gauges.
Trimming happens throughout the process: removing excess clay from slab edges, cleaning up coil joins, or refining the rim. A sharp fettling knife is non-negotiable.
Shaping and Smoothing
Rubber ribs are the workhorse of handbuilding: they compress clay, smooth surfaces, and shape walls without leaving tool marks. Metal ribs are more aggressive, for serious compression or texture.
A banding wheel lets you rotate your piece while working, making it easier to smooth all sides evenly and see proportions from different angles. It’s optional for beginners but invaluable as forms get larger.
A slab roller simplifies slab building by rolling consistent, even sheets of clay. Beginners can achieve similar results with a wooden roller and canvas, but a dedicated roller saves time and produces uniform thickness.
Removing and Cutting Clay
Loop tools and ribbon tools remove clay efficiently without distortion. A loop tool cuts cleanly through clay walls when hollowing forms, while a ribbon tool (slightly different shape) works well for scraping and texturing.
Cut-off wires separate finished pieces from clay blocks and trim excess material. A twisted wire on a handle prevents the wire from digging in and distorting your work.
A wooden mallet (included in many handbuilding tool lists) helps compress clay gently when joining pieces or flattening slabs. It’s a simple tool but surprisingly useful for controlled shaping.
Wheel Throwing Tools: What You Need for the Potter’s Wheel
Wheel throwing requires a different set of tools focused on centering, opening, and trimming. If you’re planning to throw on a wheel, these tools matter.
Centering and Opening
Throwing sticks help center clay and open the interior. A basic wooden dowel works, but purpose-made throwing sticks have the right weight and balance.
A sponge on a stick (or a simple natural sponge) absorbs water as you throw, keeping your hands from getting too wet. This seems minor, but water control directly affects centering stability.
Wire tools cut trimmed clay from the bat (the wheel head). Some potters use a simple twisted wire; others prefer a loop tool adapted for this purpose. Either way, a clean cut prevents clay from dragging.
Trimming and Finishing
Trimming happens after the piece dries slightly (leather-hard stage). A fettling knife trims the foot, refines the rim, and cleans edges.
Ribs smooth the exterior during throwing and refine the surface during trimming. Metal ribs compress the clay more aggressively than rubber, creating a smoother finished surface.
A chamois cloth (soft leather) polishes the rim and smooths the surface, creating a professional finish. It’s a small detail that makes a visible difference.
Pottery Clay for Beginners: Choosing the Right Material
Beginner pottery clay tools only matter if you have clay to work with. Understanding clay types helps you select material that matches your method and environment.
Earthenware fires at lower temperatures (cone 04-06) and is forgiving for beginners. It’s red or terracotta-colored and plastic enough for handbuilding.
Stoneware fires at higher temperatures (cone 6-10) and is more durable. It’s grayer or tan-colored and requires more wedging (mixing) but produces stronger finished pieces.
Porcelain is white, non-porous, and fires to a glass-like finish. It’s less forgiving than earthenware, cracks easily and requires precise technique.
Tool Selection by Pottery Method and Project
Choosing tools based on your intended method prevents buying unnecessary pieces. Different approaches require different priorities.
Slab Building
Slab building creates flat-sided forms: boxes, tiles, platters. Essential tools include a sponge (for smoothing joins), a needle tool (for scoring), a fettling knife (for trimming), and a loop tool (for removing excess).
A slab roller accelerates the process, but a wooden roller and canvas work fine. A banding wheel isn’t essential for slab work but helps when decorating or smoothing large surfaces.
Canvas or burlap prevents slabs from sticking to your work surface. It’s not a “tool” in the traditional sense, but it’s essential to your setup.
Coil Building
Coil building stacks rolled clay coils to create forms. You need a needle tool for scoring joins, a rubber rib for smoothing coils together, a loop tool for cleaning excess clay, and a sponge for final smoothing.
A wooden mallet helps compress coils firmly without distorting them. Some builders use their hands; others prefer the controlled force a mallet provides.
A banding wheel becomes valuable here, rotating your form as you add coils keeps your work symmetrical and lets you smooth all sides evenly.
Sculpting and Modeling
Sculpting emphasizes fine detail and expressive form. Wooden modeling tools dominate this method. You’ll also use needle tools for carving details, loop tools for hollowing, and ribs for smoothing.
A specialized carving kit provides the variety needed for intricate work. Many sculptors also use dental tools and modified kitchen utensils for specific effects.
A sponge and spray bottle keep clay at the right moisture level during long sculpting sessions.
Care, Cleaning, and Storage of Pottery Tools
How you maintain your tools determines how long they last and how well they perform. Proper care prevents rust, damage, and deterioration.
Preventing Rust and Damage
Metal tools rust if exposed to moisture. Dry all metal tools immediately after use, don’t leave them in water or clay. A soft cloth or old towel works fine.
Wooden tools can warp or crack if they dry too quickly. Store them away from direct heat and sunlight. If a wooden tool gets stuck in dried clay, soak it gently rather than forcing it out.
Rubber ribs last longer if stored flat or hung, not crumpled in a drawer. Sunlight degrades rubber over time, so store them in a cool, dark place.
Organization and Transport
A canvas tool case protects individual tools during transport and keeps them organized. For a full kit, a divided toolbox or fishing tackle box works well and costs less than a specialized case.
Label your tools or organize them by type so you can find what you need quickly. A simple system, needle tools together, ribs in one section, loop tools in another, saves time and prevents losing pieces.
Keep your kit in one place. Scattered tools get lost, damaged, or forgotten. A dedicated shelf or cabinet in your studio prevents frustration.
Tool Substitutes and DIY Alternatives
Starting pottery doesn’t require buying everything new. Many household items work surprisingly well as pottery tools, especially while you’re learning.
A fork or old butter knife can score clay surfaces. A wooden spoon handle smooths clay gently.
Natural sponges (the kind used for bathing) work as well as ceramic-specific sponges.
A simple wooden dowel becomes a throwing stick.
The limitation: DIY tools can’t match the precision and durability of proper pottery tools.
Craft Living Artistry carries thoughtfully curated beginner pottery clay tools that skip the gimmicks and focus on what actually works.
Frequently Asked Questions
What are the basic pottery tools that a beginner needs?
Start with needle tools for scoring and detail work, wooden modeling tools for shaping, ribs for smoothing, loop tools for removing clay, a cut-off wire for separating pieces, and a fettling knife for trimming. These seven tools cover handbuilding, sculpting, and finishing. Many beginners find multi-tool kits cost-effective for learning multiple techniques before investing in individual specialty tools.
What is a good beginner pottery tool kit?
A good beginner pottery tool kit includes essential hand tools, ribs, loop tools, and modeling implements in one package. Look for kits that combine versatility with affordability, offering tools for both handbuilding and basic wheel work. Starter kits eliminate decision paralysis and provide everything needed to explore different pottery methods before specializing. Check that included tools are durable enough for regular practice without breaking or warping.
Do beginners need a pottery wheel to work with clay?
No. Many beginners start with handbuilding methods like slab building and coil building, which require only hand tools and basic shaping implements. Wheel throwing requires additional investment in a pottery wheel and specialized tools like throwing sticks and calipers. Handbuilding is more accessible, requires less equipment, and teaches fundamental clay skills before moving to wheel work. You can develop strong skills for months using only hand tools.
What tools do you need to trim a pottery piece?
Fettling knives and trimming tools are essential for cleanup and finishing. A needle tool helps score seams before joining. Loop tools remove excess clay efficiently. For wheel-thrown pieces, a wooden modeling tool or trimming tool shapes the base. Sponges smooth rough edges after trimming. Proper trimming tools prevent damage to finished work and create professional-looking results without requiring excessive force or multiple passes.
How do you clean and store pottery tools?
Clean tools immediately after use by rinsing with water and wiping dry to prevent clay buildup. Metal tools should be dried completely to prevent rust. Store in a cool, dry place in a canvas case or tool roll for protection during transport. Keep tools organized by type so you can find what you need quickly. Metal tools benefit from occasional light oiling to prevent corrosion. Proper storage extends tool life and keeps your workspace organized.
Starting pottery is an accessible, rewarding craft that doesn’t require expensive equipment. The right beginner pottery clay tools, a needle tool, ribs, loop tools, fettling knife, and a few supporting pieces, handle the vast majority of projects. Craft Living Artistry makes finding these tools straightforward by curating focused kits and individual pieces designed for real potters at every level. Browse our pottery tools collection and build the studio setup that matches your creative vision.




0 Comments