
Table of Contents
- Why Bubbles Form in Resin Jewelry (and Why They Matter)
- How to Mix Epoxy Resin Without Bubbles
- Best Resin for Jewelry Making: What to Look For
- How to Use a Heat Gun on Resin Safely
- Resin Jewelry Curing Time: What to Expect
- Preventing Bubbles Around Flowers, Glitter, and Inclusions
- Troubleshooting: Diagnosing Bubbles by Location and Stage
- Conclusion
- Frequently Asked Questions
Last Updated: October 12, 2026
Why Bubbles Form in Resin Jewelry (and Why They Matter)
Air bubbles are the number one reason a promising piece of resin jewelry ends up in the trash. Beginners often tell us the same story: the pour looked perfect, then it cured cloudy with tiny craters inside.
Bubbles form for a few predictable reasons:
- Fast mixing whips air into the resin like a whisk into cream
- Cold resin is thick, so trapped air can’t float to the surface
- Pouring from too high drags air down into the mold
A bubble-free finish isn’t about one magic tool. It’s about controlling every stage, from measuring to pouring to curing, miss one and the others can’t save you.
How to Mix Epoxy Resin Without Bubbles
Learning how to mix epoxy resin without bubbles comes down to two habits: measuring by weight and stirring slowly. Most bubble problems start in the mixing cup, not the mold.
Measure by Weight, Not by Eye
Eyeballing resin and hardener is the fastest way to ruin a batch. A kitchen scale gives you an exact mixing ratio every time.
Here’s why it matters:
- Off-ratio resin may stay soft, tacky, or cloudy
- Uneven mix creates streaks that look like bubbles but never rise
- A scale removes guesswork, and guesswork is where beginners struggle
Weigh each part in the same cup and note the numbers.
Slow Stirring and Scraping the Sides
Stir for two to three minutes at a slow, steady pace. Fast stirring adds air you’ll spend the next hour removing.
Use a flat stir stick or mixing wand, and follow these rules:
- Stir in one direction, not back and forth
- Scrape the sides and bottom of the cup as you go
- Fold the mixture rather than whipping it
Unmixed resin hides along the cup walls, so scraping pulls it back in and nothing cures sticky.
Let your mixed resin sit for three to five minutes before pouring. Surface bubbles will rise and pop on their own, cutting your heat-gun work in half.
Best Resin for Jewelry Making: What to Look For
The best resin for jewelry making is a low-viscosity epoxy designed for thin pours. Thin resin releases trapped air faster than thick resin, which matters for small molds with fine details.
Look for these traits:
- Low viscosity so bubbles rise quickly
- Long working time so you’re not racing the clock
- UV resistance to stop yellowing in sunlight
Skip anything labeled for deep pours only, since deep-pour resin is thicker and holds air longer.
Different resin types suit different projects. UV resin cures in minutes under a lamp, great for quick charms, while two-part epoxy gives more working time and a harder finish for rings and pendants.
How to Use a Heat Gun on Resin Safely
A heat gun removes surface bubbles by warming the resin so trapped air rises and pops. The key is low heat, steady motion, and distance. Too close, and you’ll scorch the resin or warp the mold.
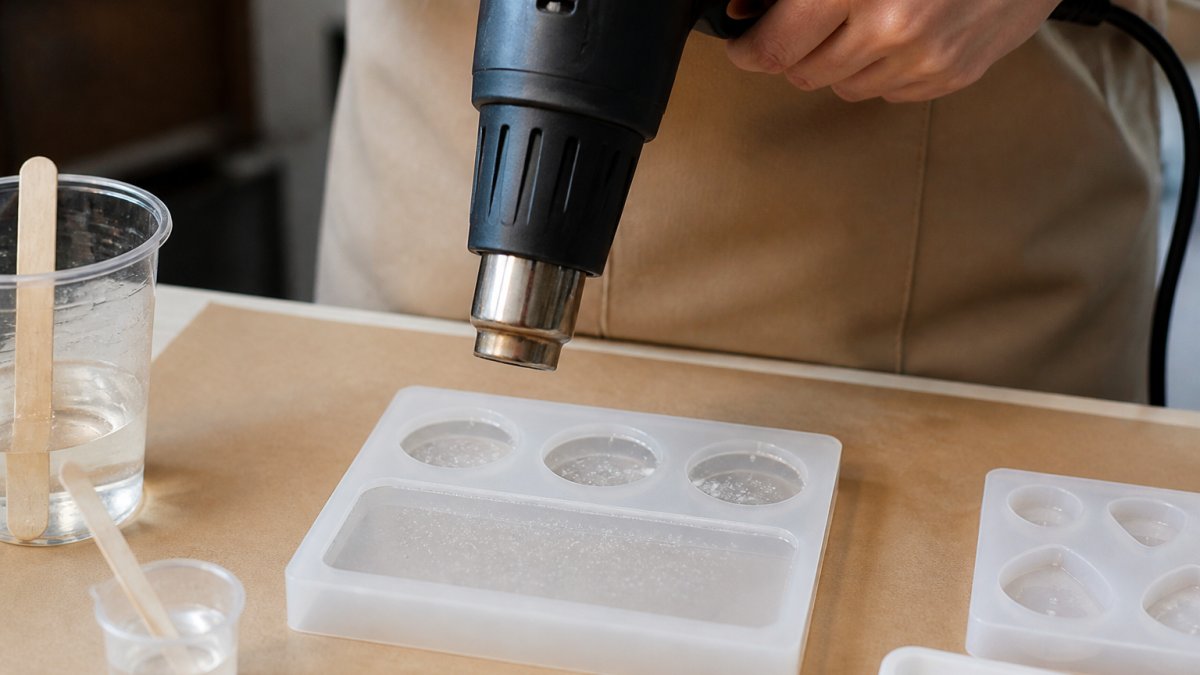
Follow these steps:
- Set the heat gun to its lowest setting
- Hold it 6 to 8 inches above the resin
- Sweep in slow, even passes, never holding still
- Stop as soon as the surface turns glassy
Work in a ventilated space and keep the nozzle moving. A still heat gun creates hot spots that leave ripples or burn marks.
Safety Rules Most Guides Skip
Heat tools are where beginners damage pieces, molds, or themselves. A few rules prevent nearly all of it:
- Never point a heat gun or torch at your skin or clothing. The nozzle stays hot for minutes after you switch it off.
- Keep a fire-safe surface under the mold. Silicone mats and bare wood can scorch; use a metal tray or ceramic tile.
- Clear the area of alcohol, solvents, paper towels, and resin drips. These ignite fast under a concentrated heat source.
Torch vs. Heat Gun: Which to Use
A heat gun is the safer pick for beginners. It spreads gentle heat over a wider area, so it’s harder to damage the piece.
A small torch works faster on surface bubbles but demands a quick, sweeping hand, and holding it too long scorches the resin. For most jewelry makers, a heat gun is the better first tool.
If you use a torch, keep these limits in mind:
- Use a refillable butane torch with a fine, adjustable flame, not a plumbing torch
- Pass the flame 8 to 12 inches above the surface in one continuous sweep
- Never hold the flame still, and never let it touch the resin
Non-Flame Alternatives
Not everyone can or should use an open flame. These options remove surface bubbles without one:
- Heat gun on low, the closest match to torch results with far less risk
- Hair dryer on the cool or low-warm setting, weaker, but safe for very thin pours and heat-sensitive molds
- A quick pass with a long-neck lighter, only for tiny surface bubbles on small pieces, held well above the resin
Never use a heat gun or torch on resin that’s already gelling. Once the surface starts to set, heat creates a skin that traps bubbles underneath, and you can’t fix it without a full re-pour. The same applies to inclusions: heating a piece with dried flowers or glitter can scorch or ignite them.
When Heat Won’t Help
Heat only reaches surface bubbles. If bubbles sit against the mold walls, inside fine details, or around an inclusion, warming the top won’t touch them. Those need a base coat, slower pouring, or a pressure pot. Treat heat as the last step, not the fix for every bubble.
Resin Jewelry Curing Time: What to Expect
Resin jewelry curing time depends on the resin, the room temperature, and the pour thickness. Most two-part epoxies need 24 hours to feel firm and up to 72 hours for a full cure.
Here’s a rough timeline:
| Stage | Typical Time | What’s Happening |
|---|---|---|
| Working time | 20-40 minutes | Resin stays pourable |
| Gel phase | 2-4 hours | Surface stops moving |
| Firm set | 24 hours | Piece holds shape |
| Full cure | 48-72 hours | Maximum hardness |
Those numbers are starting points, not rules. Every brand publishes its own working time and cure schedule, and your room changes both, so check the technical data sheet before planning a batch.
Why Viscosity, Temperature, and Humidity Change Everything
Curing isn’t just waiting. It’s a chemical reaction, and the conditions around your piece decide how fast it runs and how bubbles behave.
Viscosity is how thick the resin is.
Temperature affects viscosity and cure speed at the same time, and the two pull in opposite directions:
- Cold resin is thick, so air struggles to escape
- Warm resin is thin, so bubbles rise faster, but it also cures faster, shortening the window for bubbles to leave
- Very warm resin can cure unevenly, trap heat in thick sections, and leave ripples or soft spots
A common working range is roughly 70°F to 75°F for the resin and the room.
Humidity matters more than most guides admit. Damp air can leave a cloudy film called amine blush, a waxy layer on some epoxies.
How to Control the Cure for Fewer Bubbles
You can’t change the chemistry, but you can set the conditions:
- Warm the resin bottles in a bowl of warm water for a few minutes before mixing, not hot water, and dry them before opening
- Warm the workspace to around 75°F before you start
- Mix and pour in the same room you’ll cure in, so the resin doesn’t hit a temperature shock
Reading Your Resin’s Data Sheet
Every reputable epoxy ships with a technical data sheet, and it answers the questions this article can only estimate:
- Mix ratio by weight or volume, and whether the two differ
- Working time at a stated temperature, usually 77°F
- Gel time and full cure time at that same temperature
If bubbles keep appearing no matter how carefully you mix, compare your room conditions to the data sheet. A resin rated for 77°F behaves very differently in a 60°F garage.
Cure time isn’t a fixed number. Viscosity decides how easily air escapes, temperature decides how fast the window closes, and humidity decides whether the surface stays clear. Set all three before you pour, and bubbles have far less chance to form.
Preventing Bubbles Around Flowers, Glitter, and Inclusions
Inclusions are where bubble prevention gets tricky. Flowers, glitter, and embedded objects all trap air against the resin, and that air has nowhere to go once the piece cures.
Here’s how to handle each one:
- Dried flowers: Seal them first with a thin coat of resin, let it cure, then embed. This locks in air before the main pour.
- Glitter: Mix it into a small batch of resin first, then pour. Dry glitter sprinkled into a mold traps air between flakes.
- Embedded objects: Coat them fully before placing them. Bare surfaces create air pockets against the resin.
A thin base coat is the single best trick here. Brush resin into every detail, let it settle, then pour the rest slowly, close to the mold surface so the stream doesn’t drag air down.
Troubleshooting: Diagnosing Bubbles by Location and Stage
Where your bubbles sit tells you which step went wrong. Use this table to trace the problem back to its source.
| Bubble Location | Likely Cause | Fix |
|---|---|---|
| Surface bubbles | Fast mixing or high pour | Stir slowly, pour close to mold |
| Bubbles at mold edges | No base coat | Brush resin into details first |
| Bubbles around inclusions | Unsealed objects | Seal flowers and glitter first |
| Bubbles throughout | Cold resin or thick mix | Warm workspace, use low-viscosity resin |
| Bubbles under cured skin | Heat applied too late | Remove surface bubbles before gelling |
If bubbles keep showing up no matter what you try, your resin may be too thick for the job. Switch to a lower-viscosity formula made for jewelry.
For makers who pour often, a pressure pot or vacuum chamber removes bubbles at the source.
Match your fix to the bubble’s location. Surface bubbles need heat. Bubbles around inclusions need sealing. Bubbles throughout mean your resin, temperature, or mixing method is the real problem.
Conclusion
Getting a crystal-clear, bubble-free finish takes patience more than expensive gear. Measure by weight, stir slowly, warm your workspace, and pour close to the mold.
When you’re ready to stock up, Craft Living Artistry makes it easy. We curate jewelry-making essentials, mixing tools, and kits in one place, so you can start your next piece without hunting down supplies.
Get started with Craft Living Artistry and pour your clearest resin jewelry yet.
Frequently Asked Questions
How do you keep bubbles out of resin jewelry?
Mix slowly for two to three minutes, scraping the sides and bottom of your cup. Pour in a thin stream close to the mold surface rather than from a height. After pouring, pass a heat gun or torch over the surface to pop surface bubbles. Let the mixed resin rest for five to ten minutes before pouring so trapped air can rise. Working in a room around 70-75°F keeps viscosity low, which helps bubbles release faster.
Can you use a heat gun to remove bubbles from resin?
Yes. Hold the heat gun 4-6 inches from the resin surface and sweep it back and forth for a few seconds at a time. Keep the nozzle moving so you do not overheat one spot, which can warp the mold or scorch the resin. A small torch works the same way for surface bubbles. For bubbles trapped deep in the pour, heat will not reach them, so prevention during mixing matters more.
How long should resin sit after mixing before pouring?
Let the mixed resin rest for five to ten minutes before pouring. This gives trapped air time to rise to the surface, where you can pop it with a heat gun or torch. If your resin has a short working time, rest it for only two to three minutes so it does not start to thicken. Check the manufacturer’s working time on the label before deciding.
What is the best resin for making bubble-free jewelry?
Look for a low-viscosity epoxy resin made for casting thin layers. Lower viscosity lets bubbles rise and escape more easily than thick resin. A resin with a longer working time gives you more minutes to mix slowly and let air settle. For jewelry, choose a resin rated for small pours and check the cure time on the label, since some resins need 24-72 hours to fully harden.




0 Comments