
Table of Contents
- Essential Tools for Mixing and Measuring Resin
- Resin Jewelry Safety Equipment You Should Not Skip
- Molds, Casting Tools, and Demolding Supplies
- How to Avoid Bubbles in Resin Jewelry: Tools That Help
- Epoxy Resin vs UV Resin for Jewelry: Tool Differences
- Finishing and Polishing Tools for Resin Jewelry
- Budget vs Professional Tier: What to Buy First
- Tool Storage, Organization, and Maintenance
- Frequently Asked Questions
Last Updated: September 23, 2026
Essential Tools for Mixing and Measuring Resin
If you’re asking what tools do I need for resin jewelry, the honest answer starts smaller than most shopping lists suggest: accurate measuring tools, something to stir with, and a clean workspace. Everything else can wait until your first few pours teach you what you actually reach for.
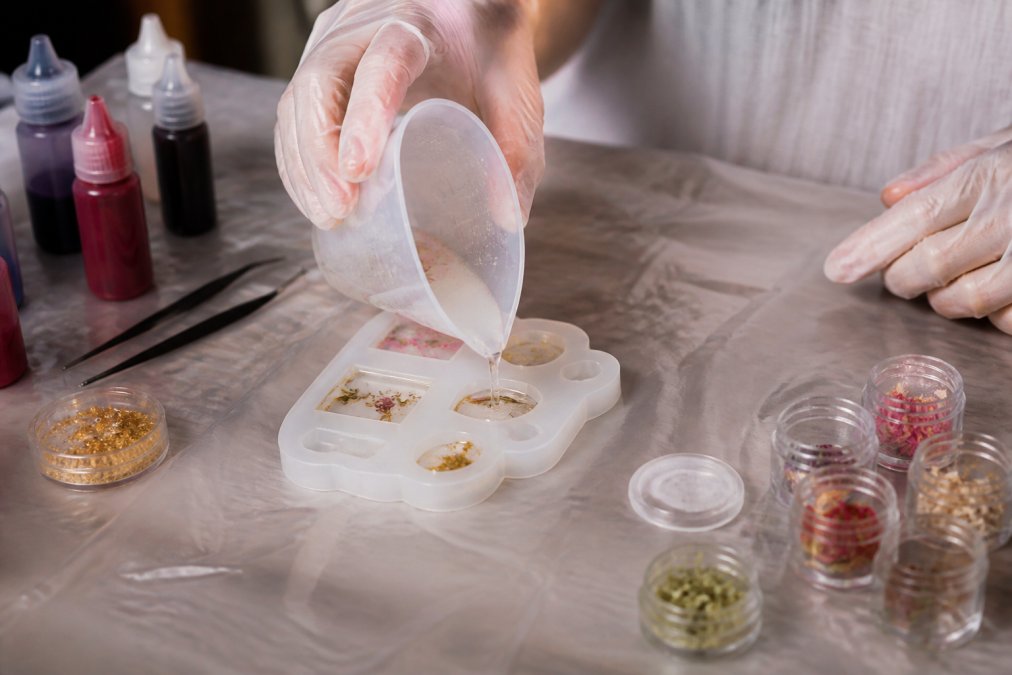
Silicone Cups vs. Disposable Plastic
Reusable silicone measuring cups have largely replaced disposable plastic for beginners: cured resin peels straight off, so one cup serves dozens of pours. Disposable plastic still has a place when mixing pigments or mica powder into small batches, tossing the cup beats scrubbing it.
Stir Sticks, Pipettes, and Precision Scales
A precision scale removes guesswork from the part A and part B ratio. Many brands specify measurement by weight, and a scale reading to 0.1 grams keeps small batches consistent. Stir sticks handle bulk mixing; pipettes move resin into narrow bezels and tiny molds without flooding the edges.
| Tool | Job It Does | Buy First? |
|---|---|---|
| Silicone measuring cups | Measure and pour resin | Yes |
| Precision scale | Weigh part A and part B accurately | Yes |
| Stir sticks | Blend resin and hardener | Yes |
| Pipettes | Transfer resin into small molds | Yes |
Resin Jewelry Safety Equipment You Should Not Skip
Safety gear is the one category where cutting corners has real consequences. Uncured resin is a skin sensitizer, so repeated contact can trigger an allergic reaction that worsens with each exposure. A respirator mask, nitrile gloves, and safety glasses are not optional.
Respirators, Gloves, and Eye Protection
Nitrile gloves beat latex because resin doesn’t permeate them as quickly; change them the moment resin touches the surface. A respirator rated for organic vapors matters most with epoxy in an enclosed room, since the hardener releases fumes during the exothermic reaction.
Ventilation and Workspace Setup
Ventilation is the tool most beginners forget. An open window helps, but a small fan pulling air away from your face works better. Cover your table with drop cloths or silicone mats, and wear an apron you don’t mind ruining, cured resin does not come out of fabric.
Mixing resin in a closed bedroom or garage without airflow concentrates fumes in the space you’re breathing. Set up near an open window with a fan directing air away from you before you open either bottle.
Molds, Casting Tools, and Demolding Supplies
Silicone molds form the shape of your piece, and mold surface quality determines how much finishing work you’ll do later. Cheap molds with rough interiors transfer that texture to every casting.
How to Avoid Bubbles in Resin Jewelry: Tools That Help
Bubbles come from three sources: mixing too fast, pouring too thick, and cold resin. Tools address the first two. A butane torch or heat gun passed quickly over the surface pops bubbles that rise after pouring, and warming your bottles in a water bath thins the viscosity so bubbles escape faster.
Heat Tools and Bubble Removal Techniques
A butane torch gives a focused flame for small pieces; a heat gun covers wider molds but risks moving resin if held too close. Keep the flame moving and stay several inches away.
Pass the torch over your resin within the first few minutes of pouring, while it’s still fluid. Once the exothermic reaction starts and the surface begins to gel, bubbles are locked in permanently.
Epoxy Resin vs UV Resin for Jewelry: Tool Differences
The epoxy resin vs UV resin for jewelry decision changes your tool list more than any other choice. Epoxy cures over hours through a chemical reaction and needs no special light. UV resin cures in minutes under a UV lamp, faster, but limited in how thick you can pour.
What Changes When You Switch to UV Resin
A UV curing lamp is mandatory for UV resin and useless for epoxy. Wavelength matters, not brand: most UV jewelry resins cure under light in the 365 nm to 405 nm range, so a lamp outside that window leaves a piece tacky no matter how long you leave it under.
What Changes When You Stay With Epoxy
Epoxy’s long working time is why it dominates layered and inclusion-heavy work: pour a base layer, place dried flowers or foil flakes, then pour a second layer without racing a curing clock. That flexibility costs tools, a precision scale, two measuring cups, stir sticks, and a bubble-removal heat source stay in rotation.
The Hybrid Approach
Before committing to one resin type, buy a small bottle of each and cure a test piece of the same thickness. The tool list you actually need will be obvious within one afternoon.
Finishing and Polishing Tools for Resin Jewelry
Freshly demolded pieces have dull edges and a matte surface. Sandpaper in progressively finer grits removes flashing and levels the back of a piece; start coarse, work up through finer grits, then switch to polishing paper or compound.
| Stage | Tool | What It Fixes |
|---|---|---|
| Rough shaping | Coarse sandpaper | Flashing and uneven edges |
| Smoothing | Fine sandpaper | Scratches from coarse grit |
| Final shine | Polishing paper or compound | Dull, cloudy surface |
| Assembly | Jewelry pliers set | Attaching findings and wire |
Budget vs Professional Tier: What to Buy First
Most guides hand you one flat shopping list. That’s the wrong shape for a beginner: a resin jewelry kit has three tiers, and buying out of order wastes money. Here’s how to sort tools by what they actually do.
Tier 1: The Non-Negotiables (Buy Before Your First Pour)
Safety gear and mixing tools affect every pour, so they come first regardless of budget: a respirator rated for organic vapors, nitrile gloves, safety glasses, silicone measuring cups, a precision scale reading to 0.1 grams, and stir sticks. With UV resin, swap the scale and cups for a UV lamp matched to your resin’s wavelength.
Tier 2: The Refinements (Buy After Your First Few Pieces)
Molds, pigments, mica powders, a heat gun or butane torch, pipettes, and a demolding tool belong here. Wait because until you’ve poured a few pieces, you don’t know which mold shapes you reach for or whether you prefer domed or flat finishes, multipacks bought too early leave half unused.
Tier 3: The Professional Investments (Buy When You’re Selling)
A wax pen for detail work, an engraving ball vice, metalworking punches, a pressure pot for bubble-free casting, and a dedicated curing station serve jewelers integrating resin with metal settings or producing in batches. These make sense once you’re selling or working with bezels regularly, not while learning ratios.
The Ergonomics Gap Nobody Talks About
Here’s the angle most tool guides skip: how you use your tools matters as much as which ones you buy. Resin jewelry involves long sessions of small, repetitive motion, stirring, sanding, torching, placing tiny inclusions, a recipe for hand, wrist, and shoulder strain.
A Simple Buy Order
Buy in tiers, not in one cart. Safety and mixing tools are non-negotiable; molds and finishing tools wait until you know your style; professional gear waits until you’re selling. And treat ergonomics and glove discipline as tools too, they protect the hands that make the work.
Tool Storage, Organization, and Maintenance
Resin tools need a home that keeps dust off them between sessions. Dust settles into open molds and shows up as specks in your finished piece. Store molds flat in a sealed container, and keep pipettes and stir sticks in a covered bin.
The tools that matter most are the ones you use every single pour: safety gear, a scale, and silicone cups. Everything else is a refinement you can add as your projects get more ambitious.
Frequently Asked Questions
Is resin a cheap hobby to start?
Starting resin jewelry can be affordable if you prioritize essentials. Basic resin jewelry tools like silicone mixing cups, stir sticks, and a few molds cost less than a single professional-grade tool. UV resin kits often include a lamp and resin for under $50. Epoxy resin requires more upfront investment in safety gear and measuring tools, but you can build your kit gradually. Craft Living Artistry offers thoughtfully curated kits to help bring creative ideas to life.
Do I need a respirator for making resin jewelry?
Yes, a respirator is strongly recommended when working with epoxy resin, especially indoors. Uncured epoxy releases fumes that can irritate your lungs and cause sensitivity over time. A NIOSH-approved respirator with organic vapor cartridges offers the best protection. For UV resin, which has lower odor, good ventilation may suffice, but a respirator adds a layer of safety. Always work in a well-ventilated area and wear nitrile gloves and safety glasses.
What is the difference between UV resin and epoxy resin tools?
UV resin cures in minutes under a UV lamp, so you need a UV light or lamp and typically work in small batches. Epoxy resin requires precise measuring by volume or weight, so you need mixing cups, a precision scale, and stir sticks. Epoxy also needs a butane torch or heat gun for bubble removal and a curing mat for longer curing times. Both types use similar molds and safety gear, but the curing and mixing tools differ significantly.
How do I clean my resin jewelry tools after use?
Clean tools immediately after use with isopropyl alcohol (91% or higher) and paper towels. For silicone cups and molds, let any residual resin cure completely, then flex the silicone to peel it off. Avoid using acetone on plastic tools as it can melt them. Store clean tools in a dedicated container to keep them dust-free. Proper cleaning extends tool life and prevents contamination in future projects.
Resin jewelry rewards preparation more than expensive equipment. Get your ventilation, gloves, and measuring tools right, and the rest of the process becomes far more forgiving. Craft Living Artistry stocks curated starter kits, silicone molds, jewelry pliers, and the mixing tools covered here, all in one place, so you can spend your time pouring instead of hunting down supplies. Browse the collection and build your first resin jewelry setup with confidence.


0 Comments