
Table of Contents
- Essential Pottery Tools for Beginners: What You Actually Need
- Hand-Building vs Wheel-Throwing Tools: Two Different Toolkits
- Tool Material Comparison: Metal vs Wood vs Rubber vs Polymer
- How to Maintain Pottery Tools So They Last for Years
- Ergonomics and Grip: Why Cheap Tools Cost You More
- Budget-Friendly DIY Alternatives and Smart Substitutions
- Ribs: Credit Cards, Hotel Key Cards, and Kitchen Spatulas
- Needle Tools: Sewing Needles, T-pins, and Bamboo Skewers
- Wire Cutters: Fishing Line, Guitar String, and Dental Floss
- Sponges: Kitchen Sponges and Sea Sponges
- Modeling Tools: Popsicle Sticks, Chopsticks, and Old Toothbrushes
- What DIY Substitutions Cannot Do
- Pre-Made Kits vs Individual Tools: How to Decide
- Conclusion: Build Your Toolkit One Piece at a Time
- Frequently Asked Questions
Last Updated: September 13, 2026
Essential Pottery Tools for Beginners: What You Actually Need
Learning how to choose pottery tools for beginners starts with one honest truth: you need far fewer than the internet suggests. The essential pottery tools for beginners are a wire cutter, a needle tool, a wooden rib, a sponge, and one or two loop or ribbon tools, enough for centering, throwing, shaping, and trimming. Everything else is optional until a project demands it.
Craft Living Artistry curates pottery tools, kits, and maker supplies for exactly this stage of the craft, so you can start with a complete setup. Below: what to buy first, what to skip, and how material affects longevity.
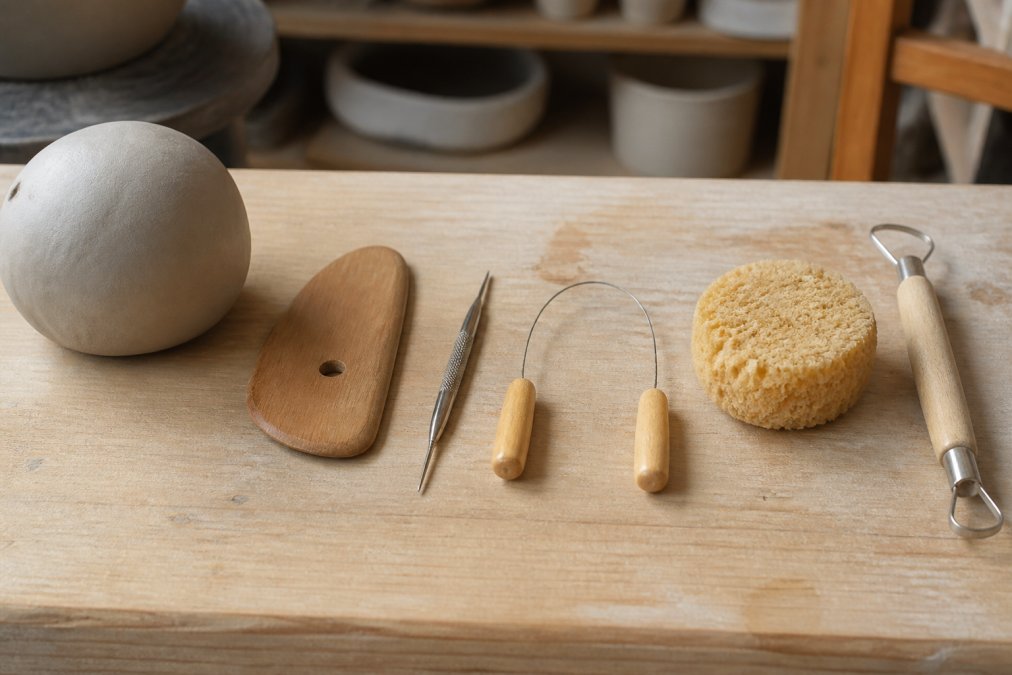
The Non-Negotiable Starter Kit
Five tools cover almost every beginner task:
- Wire cutter for slicing clay blocks and separating pots from the wheel head
- Needle tool for scoring, testing wall thickness, and piercing air bubbles
- Wooden rib for smoothing and compressing walls during throwing
- Sponge for moisture control and cleanup
- Loop or ribbon tool for trimming foot rings and carving
A common mistake is buying fifteen tools and using four. Start with these five, then add based on what your hands reach for.
Tools You Can Wait On
Texture mats, calipers, chamois, and specialized carving blades sit unused for months. Buy them when a project calls for them. Your first month should be about clay consistency and centering, not tool inventory.
Hand-Building vs Wheel-Throwing Tools: Two Different Toolkits
Hand-building and wheel-throwing demand different tools, and beginners often buy for the wrong one. Wheel work leans on ribs, sponges, and trimming loops. Hand-building leans on modeling tools, ribs, and texture implements. If you have not picked a direction, buy the overlap first: needle tool, wire cutter, rib, and sponge serve both.
Wheel-Throwing Essentials
For the wheel, prioritize a firm rib for compressing walls, a sponge you can hold comfortably for a full session, and a wire cutter with a taut, even wire. Centering and throwing punish flimsy tools, so durability matters most.
Hand-Building Essentials
Hand-building rewards a wooden modeling tool for sculpting and joining, a soft rib for smoothing slab seams, and a needle tool for scoring before slip. Scoring and slip technique matter more than tool count.
| Method | Core Tools | Tool Count for Beginners |
|---|---|---|
| Wheel-throwing | Rib, sponge, wire cutter, trimming loop | 4-5 |
| Hand-building | Modeling tool, rib, needle tool, texture tool | 4-5 |
| Both (overlap) | Needle tool, wire cutter, rib, sponge | 4 |
Tool Material Comparison: Metal vs Wood vs Rubber vs Polymer
Material choice determines grip, durability, and how a tool feels after an hour of work. Metal holds a precise edge but can rust; wooden modeling tools feel warm and forgiving but wear with heavy use; rubber and polymer ribs flex against clay for smoother walls. Stainless steel resists corrosion better than carbon steel, which matters if you rinse tools and leave them damp.
For a deeper look at how clay body and tool choice interact, the American Ceramic Society’s resources on ceramic materials are a solid reference point.
Metal Tools
Best for trimming, carving, and scoring. Precision-ground stainless steel tips hold their shape, but add weight and rust risk if you skip drying.
Wood, Rubber, and Polymer Tools
Wooden handles reduce hand fatigue during long sessions. Polymer ribs, like the flexible color-coded options from Mudtools, resist clay buildup and come in soft, medium, and firm flex so you can match the rib to the vessel shape. Rubber kidneys smooth leather-hard surfaces without gouging.
Color-coded polymer ribs are not a gimmick. Soft ribs flex around curved bowls, firm ribs compress straight walls.
How to Maintain Pottery Tools So They Last for Years
Tool maintenance is the step most beginners skip, and it is why cheap kits rust within a season. Dry every metal component after each session, store tools in a dry bag, and inspect loop and needle tips for bending before they snap. Maintenance is also repair.
Daily Cleaning Routine
- Wipe clay off metal tools with a damp sponge, then dry immediately
- Rinse sponges and squeeze them out so they do not sour
- Shake clay dust out of wooden handles and rib grooves
- Store everything dry, never sealed while damp
Sharpening a Dull Needle Tool
A needle tool does not need to be razor-sharp to score and test wall thickness, but it needs a clean point. When the tip rounds over, you have two options:
- Re-point it on a fine sharpening stone or diamond file. Hold the needle at a shallow angle and draw it across the stone in one direction, rotating a quarter turn every few strokes so you grind a cone rather than a flat facet. Ten to fifteen passes is usually enough.
- Replace the needle. Many needle tools have a wooden or polymer handle with a set screw or ferrule holding the steel. Loosen it, pull the old needle, and seat a new one. Sewing needles, tapestry needles, and dedicated replacement needles all work if the diameter matches the collet.
Beginners often sharpen too aggressively and snap the tip. Light pressure, many passes.
Re-Wiring a Wire Cutter
Wire cutters fail in one of two ways: the wire stretches and sags, or it snaps. Both are fixable.
- Sagging wire: loosen one thumb screw, pull the wire taut with pliers, and retighten. A wire that bows more than about a quarter inch under light finger pressure is too loose and will cut wavy slabs.
- Snapped wire: most cutters use a replaceable wire held by two screws or a toggle. Buy a spool of replacement wire in the correct gauge, 0.020 to 0.024 inch is common for clay, cut a length about two inches longer than the frame, thread it through both ends, and tighten. Twist the excess into a small loop so it does not whip your wrist.
- Improvised wire: nylon fishing line in the 20 to 30 pound test range and plain steel guitar string both work as emergency replacements. Guitar string cuts cleaner; fishing line is gentler on soft clay but stretches.
Loop and Ribbon Tool Repair
Loop tools come in two designs: fixed-blade and interchangeable. When a fixed-blade loop loses its edge or bends, the tool is done, replace it. On interchangeable tools, loosen the handle, pull the worn loop, and seat a new one. Keep replacement loops on hand; they cost far less than a new tool and take seconds to swap.
Ribbon tools with a flat cutting edge can be touched up with a fine file, but do not over-file, the ribbon is thin and loses rigidity fast.
Rust Prevention and Storage
Rust is the silent kit killer. Store metal tools damp once and you will see pitting within weeks, which dulls edges and transfers rust stains to your clay body.
- Dry metal tools with a cloth, not just a sponge, before they go back in the bag
- A light coat of mineral oil or tool oil on carbon steel slows rust; stainless steel needs less attention but still benefits
- Do not store tools in a sealed plastic bag while damp, trapped moisture is worse than open air
- A canvas roll, a shallow bin with a cracked lid, or a magnetic strip all work; the key is airflow
Rust is the silent kit killer. Store metal tools damp once and you will see pitting within weeks, which dulls edges and transfers rust stains to your clay body.
When to Repair vs Replace
A simple rule: repair anything with a replaceable component (wire, needle, loop blade, sponge). Replace anything structural, a cracked wooden handle, a snapped rib, a needle collet that no longer grips. Repair keeps daily-use tools in service; replacement is for tools that have genuinely worn out.
Occupational Safety and Health Administration guidance on workplace ergonomics offers useful background on why grip and posture matter for repetitive hand work, which ties directly into keeping tools in good enough condition that they do not force a tighter grip.
Ergonomics and Grip: Why Cheap Tools Cost You More
Ergonomics is the angle most beginner guides ignore, and it decides whether you still enjoy pottery in month three. Pottery is repetitive hand work: centering, pulling, trimming. Tools with balanced weight and soft-touch handles reduce the force your fingers apply, lowering fatigue over long sessions.
The real difference between a bargain kit and a mid-range one is handle shape. Flat, thin handles force a tighter pinch grip; rounded, weighted handles let your hand relax. If you are coming from a hobby with no repetitive strain, expect your grip to fatigue faster than you think in the first few weeks.
Budget-Friendly DIY Alternatives and Smart Substitutions
You can build a functional kit without buying every branded tool. The trick is knowing which household items genuinely substitute for a purpose-built tool and which will fight you. Below: a breakdown by category, with the mechanism that makes each substitution work and where it stops working.
Ribs: Credit Cards, Hotel Key Cards, and Kitchen Spatulas
A rib compresses and smooths clay against a spinning or stationary surface. Anything with a smooth, slightly flexible edge can do that.
- Expired credit cards and hotel key cards are the classic beginner rib: thin, flexible, with a straight edge for compressing walls and a rounded corner for smoothing. They work on leather-hard and soft clay alike.
- Silicone kitchen spatulas (flat, flexible) mimic a soft polymer rib and are excellent for smoothing slab seams.
- Wooden spoons work as a firm rib for straight walls, but the curve is fixed and the porous surface grabs clay.
The ceiling: cards and spatulas do not hold a consistent curve, so they are poor for shaping bowls and cylinders. Once you are throwing forms rather than just centering, a real rib pays for itself.
Needle Tools: Sewing Needles, T-pins, and Bamboo Skewers
A needle tool scores, tests wall thickness, and pierces air bubbles. Any thin, rigid point works.
- Sewing needles mounted in a cork, dowel, or pencil eraser make a serviceable scoring tool. Push the needle in eye-first so the point is exposed.
- T-pins are short but rigid, good for piercing bubbles and testing thickness on small pieces.
- Bamboo skewers are too blunt for fine scoring but fine for poking air holes in a wedged block.
The ceiling: improvised needles bend, and a bent needle drags instead of scoring. Once you are joining handles or attaching spouts, a real needle tool with a fixed steel shaft is worth the few dollars.
Wire Cutters: Fishing Line, Guitar String, and Dental Floss
A wire cutter slices a block of clay or separates a pot from the wheel head. The mechanism is simple: a thin, taut, low-friction line.
- Nylon fishing line in the 20 to 30 pound test range works on soft clay. It stretches, so keep tension by wrapping the ends around two dowels or your fingers.
- Plain steel guitar string (unwound) is stiffer, cuts cleaner, and is the closest household substitute to real cutter wire.
- Unwaxed dental floss works in a pinch on very soft clay but snaps easily and leaves fibers.
The ceiling: improvised lines have no frame, so your cut is only as straight as your hands. For consistent slab work, a framed wire cutter is not optional.
Sponges: Kitchen Sponges and Sea Sponges
Any absorbent sponge works. The variable is pore size. A fine-pored sea sponge holds water and releases it slowly, which is what you want for wheel work. A coarse kitchen sponge releases water too fast and can scratch soft clay. Cut a large sponge down to a size your hand can hold for a full throwing session.
Modeling Tools: Popsicle Sticks, Chopsticks, and Old Toothbrushes
- Popsicle sticks are decent for pressing slab seams and adding texture.
- Chopsticks work as a modeling tool for sculpting and joining, though they are round and lack a flat edge.
- Old toothbrushes are excellent for cleaning clay dust out of textured surfaces and applying slip in tight areas.
What DIY Substitutions Cannot Do
Homemade tools are great for testing whether you enjoy the craft before you invest. They are poor at three things:
- Holding a consistent shape, a card rib flexes differently every time you pick it up
- Surviving repeated use, improvised needles bend, improvised wires snap
- Matching a specific clay body, porcelain and stoneware behave differently, and purpose-built tools are designed with that in mind
Use DIY substitutions to start, then upgrade the tools you use daily. The tools you reach for every session are worth buying; the ones you use once a month can stay improvised.
A good rule of thumb: if you use a tool more than twice a week, buy the real version. If you use it once a month, a household substitute is fine.
Pre-Made Kits vs Individual Tools: How to Decide
A pre-made kit wins for most beginners because it removes guesswork and guarantees the essentials arrive together. Individual buying wins once you know your method and want specific materials. The deciding factor is whether you have picked wheel-throwing or hand-building yet.
Craft Living Artistry curates kits so beginners get a complete, ready-to-use setup in one order rather than piecing together a toolkit across three retailers. If you want to compare a curated kit against single-piece buying, the Smithsonian’s overview of ceramic arts traditions is a good reminder of how simple the core toolset has always been.
| Approach | Best For | Trade-off |
|---|---|---|
| Pre-made kit | Absolute beginners, gift-givers | Fewer specialized tools |
| Individual tools | Potters with a chosen method | More research and sourcing |
| Hybrid | Testing the craft cheaply | Mixed tool quality |
Conclusion: Build Your Toolkit One Piece at a Time
The challenge with pottery tools is resisting the urge to buy everything at once. Start with the five essentials, learn what your hands reach for, and add tools as projects demand them. Craft Living Artistry makes that easier with thoughtfully curated kits, a focused selection of maker tools, and everything needed for crafting in one convenient place, whether you are throwing your first bowl or building a home studio. Get started with Craft Living Artistry and build a toolkit that grows with your skills.
Frequently Asked Questions
What are the essential pottery tools every beginner needs?
Start with eight core tools: a wire clay cutter for slicing clay blocks, a needle tool for scoring and measuring, a wooden rib for shaping, a metal kidney for smoothing, a sponge for moisture control, a loop tool for trimming, a wooden modeling tool for sculpting, and a cutoff wire. These cover wheel-throwing and hand-building basics. Kits bundle these together, often for less than buying individually.
What is the difference between wood and metal pottery tools?
Wooden tools like modeling sticks and ribs are gentle on clay, won’t scratch surfaces, and feel warm in hand. They work well for shaping and sculpting. Metal tools, including needle tools, loop tools, and kidney ribs, offer precision and durability for trimming, carving, and scoring. Stainless steel resists rust better than carbon steel. Many potters keep both: wood for forming, metal for cutting and refining.
How do I maintain my pottery tools to make them last?
Rinse tools in warm water immediately after use to prevent clay from hardening in crevices. Dry them thoroughly with a cloth, especially metal components, to avoid rust. Store tools in a dry pouch or box, not a damp bag. For wooden tools, occasionally rub with linseed oil to prevent cracking. Polymer ribs should be cleaned with mild soap and stored flat to maintain flexibility. Replace worn loop tools and rusted needles promptly.
Do I need specialized tools for hand-building versus wheel-throwing?
Yes, the toolkits differ. Wheel-throwing relies on ribs for shaping, sponges for moisture, needle tools for measuring, and wire cutters for removing pots. Hand-building uses modeling tools, rolling pins, texture mats, and scoring tools like a fork or needle. Some tools overlap, such as the wire cutter and sponge. If you plan to do both, buy a combined starter kit or add hand-building tools after mastering wheel basics.



0 Comments