
Table of Contents
- What Causes Filament Jams in 3D Printers
- Best Filament Storage Practices to Prevent Jams
- 3D Printer Retraction Settings Guide
- How to Clear a 3D Printer Nozzle Clog
- Maintenance Steps to Stop Filament Jams Before They Start
- Material-Specific Jam Prevention for PLA, PETG, and TPU
- Visual Guide: Identifying Jams, Clogs, and Heat Creep
- Frequently Asked Questions
Last Updated: September 2, 2026
What Causes Filament Jams in 3D Printers
Filament jams occur when material gets stuck between the extruder and nozzle, stopping extrusion mid-print. Most jams fall into three categories: moisture-related failures, thermal issues, and mechanical problems with the filament path.
Moisture absorption and hygroscopic materials
Hygroscopic filaments like nylon and PETG absorb moisture from the air, causing swelling and brittleness. When heated, this moisture turns to steam, creating pressure that jams the nozzle or snaps filament inside the extruder. Even PLA and ABS, though less hygroscopic, degrade in humid conditions within days (peer-reviewed research). Craft Living Artistry recommends storing all filaments in airtight containers with desiccant packets.
Moisture damage shows as inconsistent extrusion, strong starts followed by sputtering after 30 minutes, often with clicking sounds from the extruder drive gear.
Heat creep and thermal expansion
Heat creep occurs when heat from the hot end travels into the cold zone, creating partially melted filament that jams the extruder. This is especially common in direct-drive systems where the motor adds additional heat. Thermal expansion happens when filament heats during printing; if nozzle diameter is too small or temperature too high, the expanded filament can’t flow freely, creating back-pressure that jams the system.
PETG is particularly sensitive to heat creep because it softens at lower temperatures than other materials.
Filament tangles and spool tension issues
Tangled or tightly wound filament creates resistance as it unwinds, forcing the extruder to work harder and increasing system pressure until jamming occurs. Loose spools are equally problematic, filament piles up on one side, creating loops that catch on the spool holder and transmit sudden resistance to the extruder.
Best Filament Storage Practices to Prevent Jams
Storing filament in airtight containers with desiccant
Use sealed plastic containers, vacuum-sealed bags, or dry boxes designed for filament. Add silica gel packets inside; these are reusable, heat at 250°F for 30 minutes to dry when saturated (the FDA). Label containers with filament type, color, and opening date. Most filaments stay usable for 6-12 months in proper storage, though PETG and nylon degrade faster.
Keep only the current spool out of storage; return others to sealed containers immediately after use. Craft Living Artistry offers storage solutions that can help keep your filament dry.
Controlling ambient temperature and humidity
Keep your printing space between 40-50% relative humidity and 68-75°F (nist.gov). High humidity accelerates moisture absorption; temperature swings cause filament to expand and contract, creating inconsistent extrusion. A small dehumidifier running 2-3 hours before printing removes excess moisture. Cold environments make filament brittle, let filament acclimate to room temperature for 30 minutes before printing.
3D Printer Retraction Settings Guide
Retraction pulls filament back slightly during non-extrusion moves to prevent oozing. Incorrect settings cause jams by creating excessive back-pressure.
Finding the right retraction distance for your printer type
Direct-drive extruders need less retraction (3-5mm) because the motor sits directly on the extruder. Bowden-tube printers need 4-8mm because filament travels farther to the nozzle. Too little retraction causes oozing; too much jams the system when pushing forward again.
Test by printing a simple tower. If you see stringing, increase retraction by 0.5mm. If you hear clicking sounds, reduce by 0.5mm. Most printers find their sweet spot between 4-6mm.
Adjusting retraction speed and temperature
Fast retraction (60-100 mm/s) can jam filament by pulling too aggressively. Start with 40 mm/s; if clicking or incomplete extrusion occurs, slow down by 10 mm/s. If oozing persists, increase speed slightly instead of distance.
Higher print temperatures make filament flow more freely, so it retracts and extrudes smoothly. If you’re near the lower end of your material’s temperature range and experiencing jams, raise temperature by 5°C.
How to Clear a 3D Printer Nozzle Clog
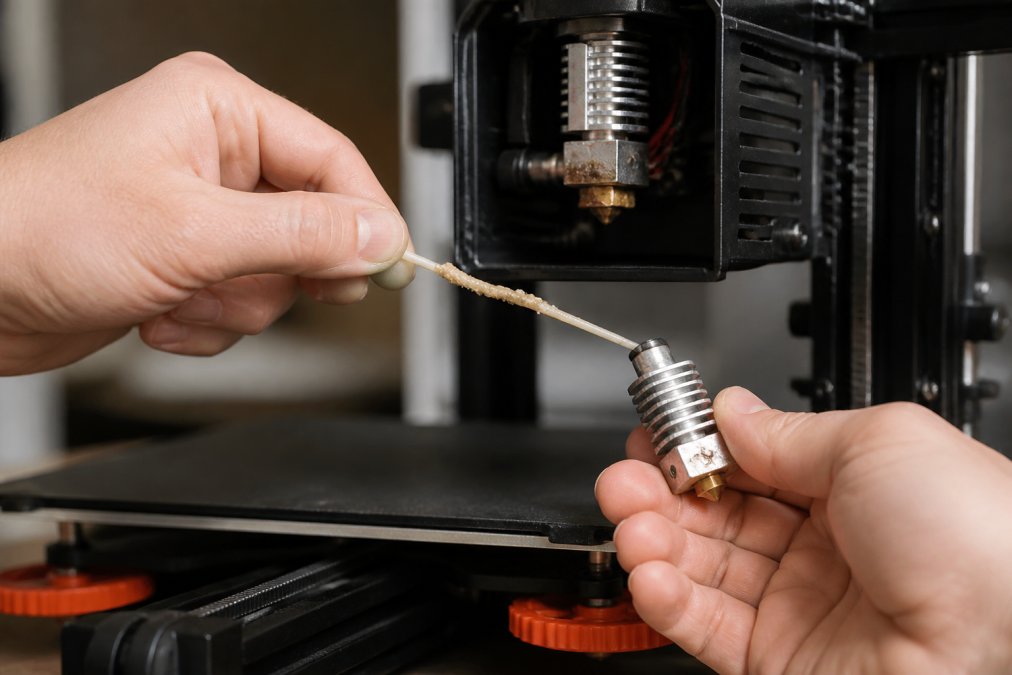
Heat the nozzle to 200°C (slightly below normal print temperature). Insert fresh filament and extrude 10mm slowly. Stop extrusion and cool to 50°C without removing filament. Grip firmly and pull straight down, cooled filament should come out with clogged material attached.
If the cold pull fails, remove the nozzle and soak in acetone for 30 minutes to dissolve plastic residue, then gently clear with a thin wire.
Cold pull technique for stuck filament
Heat to print temperature, extrude slightly, then cool to room temperature. Pull straight down, filament should come free with a snap. Repeat 2-3 times for stubborn clogs. If filament breaks, use tweezers to remove the piece before retrying.
Cleaning the hot end and replacing PTFE tubing
PTFE tubing becomes scored or contaminated over time, creating friction that leads to jams. Replace with fresh tubing, cutting a new section and inserting until it bottoms out. Remove the nozzle and use a brass brush to scrub interior buildup. For heavy residue, soak the hot end in acetone overnight, then brush and rinse.
Maintenance Steps to Stop Filament Jams Before They Start
A 15-minute maintenance routine every 20 hours of printing prevents most issues.
Inspecting the extruder drive gear for wear
Inspect the drive gear monthly for shiny spots or flattened teeth. A worn gear loses grip, causing filament to slip and eventually jam. Clean the gear regularly with a soft brush to remove plastic dust. If you hear clicking sounds, check for wear immediately.
Using filament clips and managing spool tension
Filament clips hold the loose end firmly, creating consistent tension as the printer pulls material. Mount the spool holder so filament unwinds smoothly without twisting. The path from spool to extruder should be as straight as possible. For stored spools, wrap the free end around the spool and secure with a clip to prevent tangling.
Material-Specific Jam Prevention for PLA, PETG, and TPU
PLA: Moisture sensitivity and temperature control
PLA becomes brittle when wet, even a single day in humid air causes jams. Store in sealed containers with desiccant and print within 2 hours of opening. PLA prints best at 200-210°C; if experiencing jams, ensure temperature doesn’t exceed 215°C, which causes thermal instability.
PETG: Managing heat creep and print temperature
PETG softens at lower temperatures than ABS, making it prone to heat creep. Keep hot end temperature as low as possible while maintaining good flow, typically 230-240°C. Ensure your cooling fan is working properly, PETG needs active cooling between layers to prevent nozzle overheating.
TPU: Flexible filament handling and tension adjustment
TPU requires lower extrusion speeds (20-30 mm/s instead of 40-60 mm/s). Fast extrusion creates back-pressure that jams TPU. Spool tension is critical, too much causes slipping; too little causes tangles. Direct-drive extruders typically handle TPU better than Bowden systems.
Visual Guide: Identifying Jams, Clogs, and Heat Creep
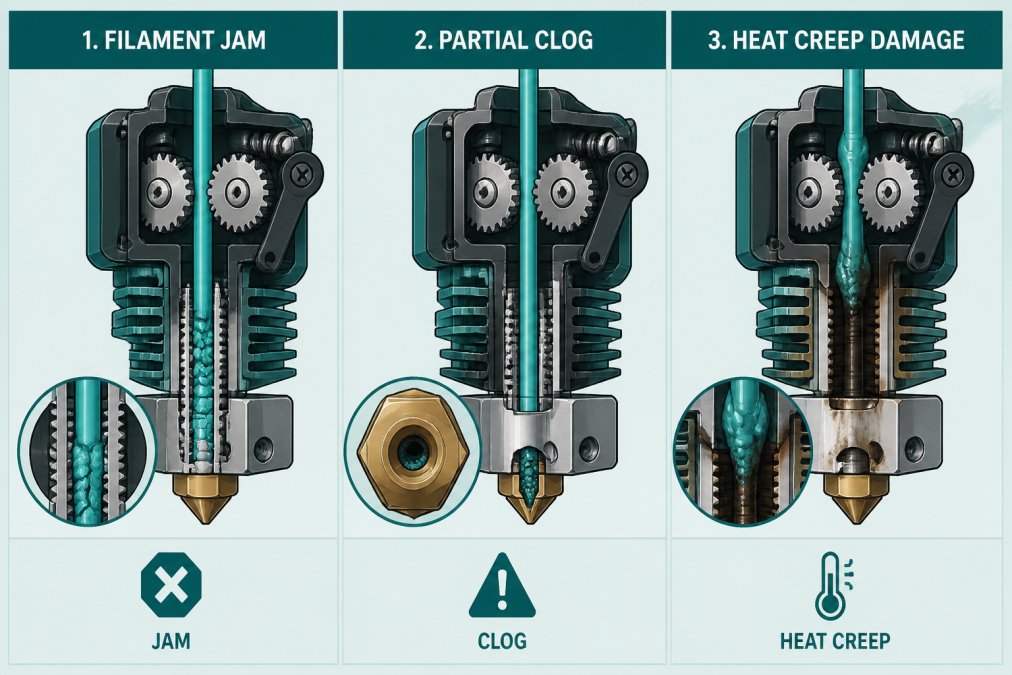
What a true filament jam looks like
A complete jam means filament is stuck and won’t move forward or backward. You’ll hear the drive gear clicking repeatedly as it tries to push immobile material. The print stops mid-layer, and manual extrusion produces nothing. Visually, a gap appears between the drive gear and filament, with the gear spinning but filament stationary.
Distinguishing between a clog and under-extrusion
A clog is a partial blockage producing inconsistent extrusion, thin lines, missing sections, or sudden stops followed by overflow. The print continues but looks defective. Under-extrusion produces less material than programmed, resulting in gaps, weak structure, and fragile models. Clogs show visible oozing and stringing; under-extrusion shows sparse infill.
Recognizing heat creep symptoms early
Heat creep often causes prints to fail after 30-45 minutes, always at the same point. If the extruder body above the hot end feels hot to the touch, heat creep is likely, the motor and extruder should stay cool. Filament emerging from the extruder soft or partially melted indicates heat is creeping farther than intended.
Preventing filament jams starts with understanding their causes: moisture, heat, tension, and material properties. Most jams are preventable through proper storage, correct settings, and regular maintenance. Store filament in sealed containers with desiccant, dial in retraction settings for your printer type, and inspect your extruder monthly. Craft Living Artistry provides quality 3D printing filaments and storage solutions designed to keep materials in optimal condition. Start with the storage and maintenance practices outlined here to eliminate the majority of jam-related failures before they happen.
Frequently Asked Questions
Why does my 3D printer filament keep jamming?
Filament jams occur from multiple causes: moisture absorption in hygroscopic materials like PLA and PETG, heat creep in the hot end, tangles on the spool, incorrect retraction settings, or a worn extruder drive gear grinding the filament. Identifying which cause applies to your printer helps you fix the issue quickly. Store filament in airtight containers with desiccant, maintain proper retraction settings, and inspect your extruder regularly to prevent jams.
How does moisture affect 3D printing filament and cause jams?
Hygroscopic filaments like PLA, PETG, and nylon absorb moisture from the air. When wet filament reaches the hot end, the moisture turns to steam, creating pressure that causes under-extrusion, bubbles, and clogs. Prevent this by storing filament in airtight containers with desiccant packets, keeping humidity below 50%, and using a dry box or sealed bag when not printing. Dried filament prints smoothly without jam risk.
What is the best way to adjust 3D printer retraction settings to prevent jams?
Start with your printer manufacturer’s recommended retraction distance (typically 4-6mm for direct drive, 8-12mm for Bowden tube). Increase retraction speed gradually to 40-60 mm/s, then test. Too much retraction pulls filament into the hot end, causing heat creep and jams; too little leaves ooze that can jam. Adjust print temperature down slightly if you experience jams during retractions, lower temps reduce heat creep risk.
How do I know if my filament is jammed versus clogged?
A jam occurs when filament gets stuck in the extruder or hot end and won’t move when you push it by hand. A clog is a blockage inside the nozzle where filament can’t flow out. Jam symptoms: extruder grinding, no filament movement, clicking sounds. Clog symptoms: the nozzle oozes slowly, under-extrusion, or nothing comes out despite extruder turning. Heat creep looks like filament grinding near the extruder assembly. Each requires different fixes: jams need extraction, clogs need a cold pull or nozzle replacement.
This article was written using GrandRanker




0 Comments