
Table of Contents
- What’s Actually Inside Beginner Pottery Kits
- Essential Pottery Tools for Beginners: What You Actually Need
- Cost of Individual Pottery Tools vs. Buying a Kit
- The Hidden Cost of Kits: What Retailers Don’t Tell You
- How to Set Up a Home Pottery Studio on a Budget
- Material Quality and Durability: What Separates Good Tools from Cheap Ones
- Skill-Level Progression: When to Upgrade from a Starter Kit
- Frequently Asked Questions
Last Updated: September 20, 2026
What’s Actually Inside Beginner Pottery Kits
Beginner pottery kits are bundled sets of core clay-working tools, usually sold by online craft retailers, that give new potters everything needed to start hand-building or throwing. Most sets include a wire clay cutter, needle tool, rib tool, loop tool, sponge, and several wood modeling tools.
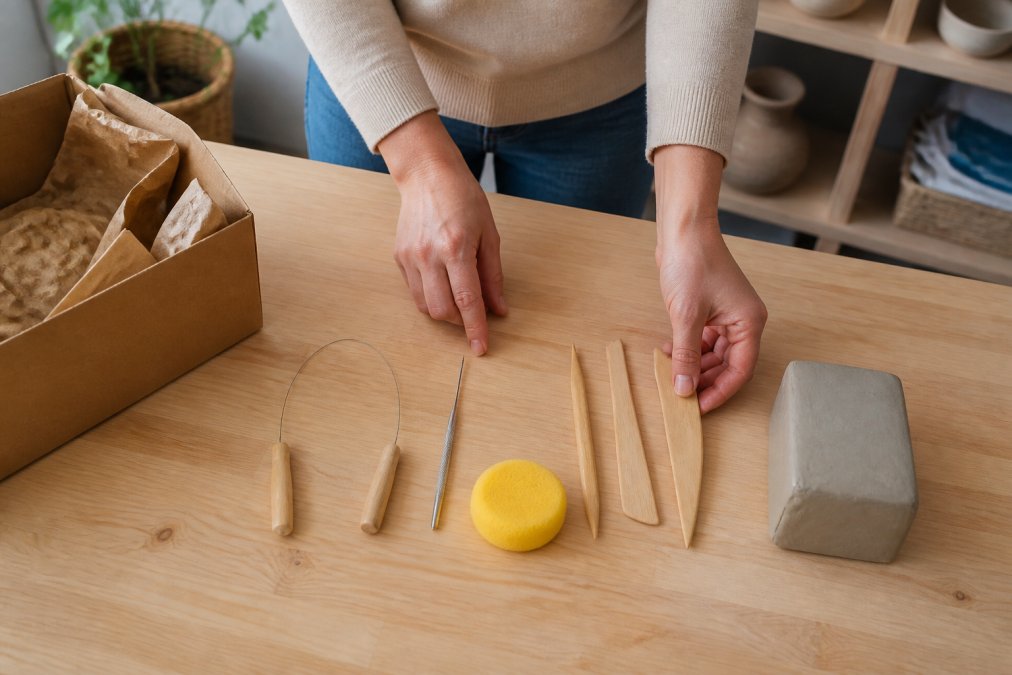
This guide breaks down whether those bundles are worth the money or whether you should buy tools separately. The short answer: it depends on what you plan to make and how long you expect to stay with the craft. A kit makes sense for the first few months. After that, individual purchases usually win on both quality and cost.
A typical kit covers the basics.
- Wire clay cutter for slicing clay blocks and removing pots from the wheel
- Needle tool for scoring, testing thickness, and trimming
- Rib tool for smoothing and shaping during throwing
- Loop tool for hollowing and trimming
- Sponge for water control and cleanup
- Wood modeling tools for hand-building and detailing
A kit’s real value is convenience, not savings. You pay a small premium to skip the research phase, and that trade is reasonable for a first purchase.
Essential Pottery Tools for Beginners: What You Actually Need
The essential pottery tools for beginners come down to six or seven items. Everything else is optional until you know which direction your work is heading.
Cost of Individual Pottery Tools vs. Buying a Kit
Buying individual pottery tools costs more upfront than a kit, but the per-tool quality is usually higher and you avoid paying for items you never touch. The trick is to stop comparing sticker prices and start comparing the cost of the tools you will actually reach for.
Here’s how the two paths compare in practice:
| Approach | Upfront Outlay | Tool Quality | Waste Risk | Best For |
|---|---|---|---|---|
| Budget kit | Lowest | Variable | High, unused pieces | Testing the hobby |
| Mid-range kit | Moderate | Consistent | Moderate | Committed beginners |
| Individual tools | Highest | Best per item | Low | Known workflow |
Run the real-value calculation before you buy
A kit’s advertised piece count is not its value. Value is the number of tools you will use weekly divided by the price you paid. A common pattern among new potters is that a 25- to 40-piece kit yields eight to twelve tools that get regular use; the rest are duplicates, novelty shapes, or items sized for a different craft.
Do this before checkout:
- List the six to eight tools you know you need for the technique you’re starting with (hand-building or throwing).
- Price those tools individually at a mid-range quality level.
- Compare that total to the kit price.
- Subtract the kit items you can already predict you won’t use, duplicate ribs, oversized wooden paddles, decorative stamps, tiny sponges.
Where the math actually flips
The crossover point is usually around the third or fourth tool upgrade. Once you’ve replaced a bent needle tool, a chattering plastic rib, and a trimming loop that won’t hold an edge, you’ve spent roughly what a mid-range kit cost, but you now own three tools that will outlast the entire original set.
Don’t forget the non-tool line items
Both paths share costs that kits rarely bundle: clay, a banding wheel or wheel access, buckets, a waterproof work surface, and glaze. Those items usually exceed the price of the tools themselves, so a $10 difference between a kit and a la carte tools is noise next to the rest of the startup budget. Judge the tool decision on quality and fit, not on shaving the smallest line item.
Compare kits and individual tools on cost per tool you’ll actually use weekly, not on sticker price or piece count. That single reframe resolves most of the kit-versus-a-la-carte debate.
The Hidden Cost of Kits: What Retailers Don’t Tell You
The hidden cost of kits is the replacement cycle. Budget sets often use thin steel and soft plastic that wear out within months of regular use, so you end up rebuying the same tools individually, at which point the original “savings” are gone and you’ve paid twice for the same function.
The filler-item problem
Most beginner kits pad their piece count with items that don’t earn their place in a real workflow. Common fillers include:
- Duplicate rib tools in slightly different sizes
- Decorative stamps and texture rollers aimed at a different craft
- Miniature sponges too small for wheel work
- Wooden modeling tools with soft, splinter-prone tips
- Plastic calipers that flex under light pressure
Why cheap tools fail, the material mechanism
The failure mode is almost always the same, and it’s predictable once you know what to look for:
- Plated wire vs. stainless steel. Needle tools and wire cutters made from plated steel lose their coating at the first scratch, then rust. Solid stainless steel resists both.
- Untreated carbon steel loops. They hold an edge well but corrode quickly in a humid studio unless dried and oiled after every session.
- Soft plastic ribs. They grab and chatter against clay instead of gliding, which shows up as drag marks on rims and rims that tear during shaping.
- Unfinished wooden handles. They absorb water, swell, crack, and can splinter into your hand.
- Loose ferrules. A trimming loop whose metal collar isn’t seated will wobble, skip, and leave ridges you then have to smooth out.
Three costs that never appear on the product page
- Replacement tools. A bent needle tool or rusted loop gets replaced, and the “savings” disappear.
- Storage you didn’t plan for. A 40-piece set needs somewhere to live or it becomes clutter, and clutter in a clay studio means dust, lost tools, and wasted time.
- Shipping and returns. If half the set is unusable, returning a partial kit is rarely simple, and return shipping on a heavy bundle can erase the discount.
How to audit a kit before you buy
You can’t handle a kit through a screen, but you can read the listing like an editor:
- Look for the words “stainless steel” on needle tools and wire cutters. If the listing says only “metal,” assume plated.
- Check whether ribs are described as rubber, polymer, or animal rib. “Plastic” alone usually means the soft, chattering kind.
- Count the tools that match the technique you’re starting with. If fewer than half do, you’re buying filler.
- Read the one- and two-star reviews specifically for words like “rust,” “bent,” “cracked,” and “splinter.” Those are the failure modes that matter.
- Confirm the return window and whether opened kits are eligible.
Kits sold at very low price points often include tools with unfinished wooden handles and untreated steel. These can splinter or rust within weeks in a humid studio, and the replacement cost quickly exceeds what a mid-range kit would have cost.
The real hidden cost isn’t the kit price, it’s the replacement cycle plus the storage and return friction that piece-count marketing hides. Audit the listing for material specifics before you buy, not after.
How to Set Up a Home Pottery Studio on a Budget
Setting up a home pottery studio on a budget means prioritizing the surface, the storage, and the wheel before you buy a single decorative tool.
Then layer in equipment:
- A banding wheel for hand-building and glazing
- A wire rack for drying greenware
- Sealed bins for clay storage and reclaim
- A dedicated shelf for tools, away from dust
- A small fan or open window for ventilation
Material Quality and Durability: What Separates Good Tools from Cheap Ones
Material quality separates tools that last a decade from tools that last a season. The difference is almost always in three places: the metal, the handle, and the finish.
Skill-Level Progression: When to Upgrade from a Starter Kit
Upgrade from a starter kit when you can name the two or three tools you reach for every session and the rest sit untouched. That’s the signal that your workflow has formed.
Stage your purchases like this:
- Months 1-3: Use the kit. Learn hand-building and centering.
- Months 3-6: Replace the tools you use most with better versions.
- Months 6-12: Add specialized tools for trimming, carving, and texture.
- Year 2 onward: Buy precision tools only for the work you actually sell or exhibit.
Frequently Asked Questions
What is the best pottery tool kit for beginners?
The best beginner pottery kits include a wire clay cutter, needle tool, rib tool, loop tool, sponge, and a few wooden modeling tools. Look for kits with stainless steel components and ergonomic handles, since these hold up better than cheap alternatives. A kit with 8-12 essential tools covers most hand-building and wheel-throwing needs without including items you’ll never use. Avoid sets with 30+ pieces, as many of those tools are duplicates or too flimsy for regular studio work.
Are cheap pottery tools worth buying for a first-time student?
Cheap pottery tools can work for your first few weeks, but they often wear out quickly. Budget sets from online retailers may have tools that rust, bend, or lose their edge after minimal use. If you’re just testing whether you enjoy pottery, a low-cost kit is a reasonable starting point. Once you know you’ll stick with it, replacing the two or three tools you use most with better-quality versions makes a noticeable difference in your results and comfort.
How much should I expect to spend on essential pottery tools for beginners?
Pricing depends on the brand, material quality, and number of tools included. A basic starter kit with the essentials typically costs less than buying each tool individually, but the trade-off is often lower durability. For a home studio setup, plan for a modest initial investment in a core kit, then add specialized tools as your skills grow. Check Craft Living Artistry’s website for current pricing on curated pottery tool sets.
Can I set up a home pottery studio on a budget without buying a kit?
Yes. Many potters start with repurposed household items like wooden spoons, plastic lids for ribs, and old credit cards for smoothing. You can buy individual tools as needed, which spreads out the cost. A wire clay cutter, sponge, and needle tool are the first three items to buy separately if you skip a kit. For everything else, add tools one at a time as specific projects require them, which keeps your initial spending lower.




0 Comments