
Table of Contents
- MatterHackers vs CraftDirect Filament Quality: The Quick Comparison
- Dimensional Accuracy and Filament Diameter Tolerance
- Material Purity, Spool Winding, and Moisture Absorption
- Is 3D Printing Expensive for Beginners? What Filament Quality Costs
- Best 3D Printer Filament Brands: Where These Two Fit
- How to Troubleshoot 3D Printing Filament Issues
- Which Filament Quality Wins for Your Printer and Projects
- Frequently Asked Questions
Last Updated: September 10, 2026
MatterHackers vs CraftDirect Filament Quality: The Quick Comparison
Filament quality is the single biggest variable separating a clean print from a failed one, and the MatterHackers vs CraftDirect filament quality debate comes down to how consistently each supplier holds its manufacturing tolerances. This guide from Craft Living Artistry breaks down diameter variance, moisture control, and spool winding so you can pick the right roll for your printer.
Here’s what most comparisons get wrong: they rank suppliers on price and color selection, then treat diameter tolerance as an afterthought. In practice, it’s the reverse. A cheap spool that varies by 0.05 mm will clog your nozzle and warp your corners no matter how good your slicer profile is.
The two suppliers serve different buyers. MatterHackers built its reputation on a broad catalog and in-house filament lines aimed at everyone from first-time buyers to print farms. CraftDirect operates more like a general craft retailer, bundling filament alongside other maker supplies rather than specializing in it. That distinction shapes everything from quality control standards to how the spool arrives at your door.
Below, we’ll walk through the specs that actually matter, where each option wins, and how to troubleshoot the problems you’ll hit either way.
Dimensional Accuracy and Filament Diameter Tolerance
Dimensional accuracy is the degree to which a filament’s actual diameter matches its stated diameter, and it’s the spec that decides whether your extrusion stays predictable. Most desktop FDM printers are tuned for 1.75 mm filament, and a variance of even 0.03 mm changes how much material flows through the nozzle.
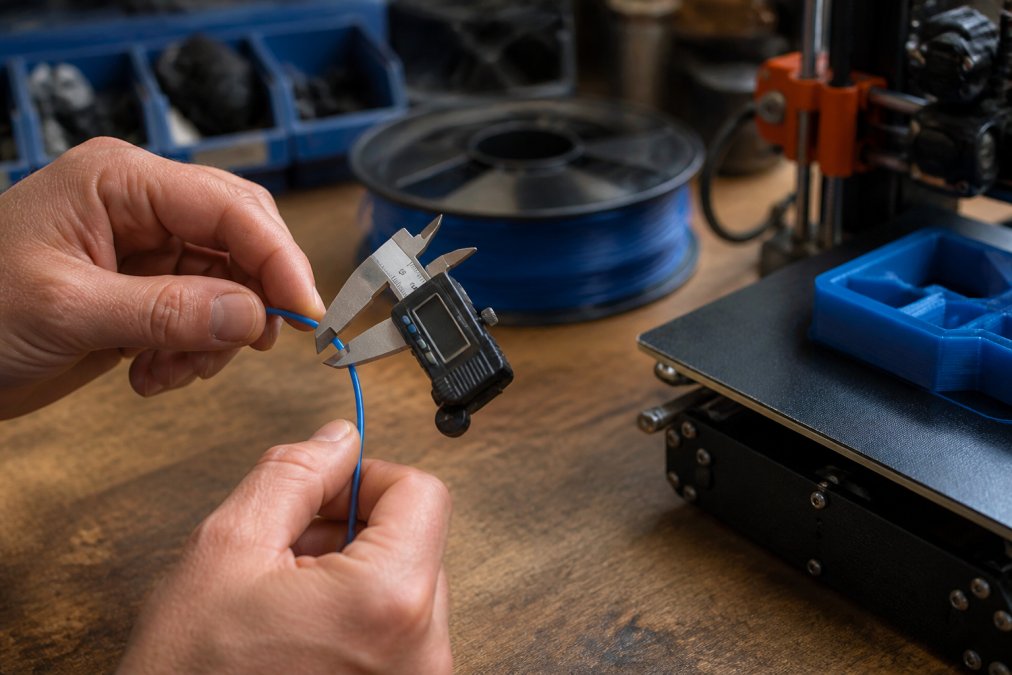
The math is unforgiving. A 1.75 mm strand that swells to 1.82 mm carries roughly 8 percent more cross-sectional area than nominal, so a slicer calibrated for 1.75 mm over-extrudes by that margin (peer-reviewed research). On a 0.4 mm nozzle that shows up as blobs on the top surface and dimensional creep on the outside walls. A strand that thins to 1.68 mm under-extrudes, leaving gaps between perimeters and weak layer bonding. Neither failure announces itself as a diameter problem, most users chase temperature and flow settings for hours before they think to measure the spool.
MatterHackers publishes tolerance figures for its house-brand lines and generally holds tighter diameter variance than generic marketplace sellers. Its premium lines are marketed around tighter tolerances, while its budget lines are looser, the spec sheet is the tell, not the brand name. CraftDirect’s filament tends to be sourced from third-party manufacturers, which means tolerance can shift between batches and even between colors within the same product line. A common pattern is that a single CraftDirect SKU prints cleanly for one buyer and inconsistently for another, because they received rolls from different production runs. Neither supplier is inherently unusable, but the tighter the tolerance, the less flow rate calibration you’ll do.
How to actually test a spool before you trust it. This is the step most comparisons skip, and it’s the one that separates a data-driven decision from a forum opinion:
- Cut the first meter free and measure diameter at five points spaced roughly 20 cm apart with digital calipers. Record each reading, not just the average.
- Note the spread, the difference between your highest and lowest reading. A spread under 0.02 mm is excellent. A spread of 0.03 to 0.05 mm is workable but needs flow calibration. A spread above 0.05 mm will cause visible artifacts on detailed models.
- Repeat the measurement at the middle and the last meter of the roll. Diameter often drifts toward the spool core, and a roll that measures clean at the start can fail two hours into a long print.
- Recalibrate flow rate if the spread exceeds 0.03 mm, and re-check after every spool change.
Tracking failure rate is the objective test competitors avoid. Rather than relying on how a spool feels, run the same small calibration model, a 20 mm calibration cube plus a temperature tower, on each spool at identical slicer settings, and log the outcome. Over five to ten spools per supplier, patterns emerge that a single print never reveals: which supplier’s rolls consistently need flow adjustment, which ones clog, and which ones print identically to the profile you already tuned. That log is worth more than any single review, and it’s the kind of side-by-side data the current comparison landscape almost never provides.
Measure a new spool at the start, middle, and end of the roll. Diameter often drifts toward the spool core, and catching that early saves you a mid-print failure on a long job.
Don’t trust a single caliper reading. Pinch the calipers gently, squeezing hard compresses soft filaments like PLA and gives you a falsely small number. Take three readings at each point and average them.
Material Purity, Spool Winding, and Moisture Absorption
Material purity and moisture absorption determine how a filament behaves weeks after you open it, not just on day one. Polylactic acid (PLA) absorbs moisture from the air, and wet filament produces stringing, popping, and weak layer adhesion that no slicer setting can fix. This is the area where the two suppliers diverge most in ways that don’t show up until you’re deep into a project, and it’s the area almost no comparison covers with real numbers.
How fast filament actually absorbs moisture. PLA is hygroscopic, meaning it pulls water vapor out of the air. In an environment around 50 percent relative humidity, an opened spool of PLA can pick up enough moisture to cause popping and stringing within one to two weeks of exposure (peer-reviewed research). In humid summer conditions above 70 percent relative humidity, that window shrinks to a few days. PETG absorbs more aggressively and faster than PLA. Nylon is the worst offender of the common materials and can become unprintable within 24 to 48 hours of open-air exposure in a humid room (PubMed). The practical takeaway: the clock starts the moment you break the vacuum seal, and it runs faster in humid climates and slower in dry ones.
Packaging differences change the clock. MatterHackers ships most filament vacuum-sealed with desiccant, which slows moisture absorption during storage and gives you a clean starting point. CraftDirect’s packaging varies by product line, so check whether the listing specifies sealed packaging before you commit to a bulk order, an unsealed roll that sat in a warehouse has already started absorbing moisture before it reaches you. If you buy in bulk, sealed packaging is the difference between filament that’s still dry in six months and filament that needs drying before its first print.
A storage test you can run yourself. Weigh a fresh, sealed spool on a kitchen scale before opening it, then weigh it again after a week in your normal storage setup and again after a month. A spool that gains more than a gram or two has absorbed meaningful moisture. This is the kind of long-term data that no ranking article provides, and it tells you more about your specific environment than any generic advice can. Store opened spools in an airtight container with fresh desiccant, and replace the desiccant when the indicator changes color, spent desiccant absorbs nothing.
Drying parameters that work. Dry PLA at 40 to 45°C for four to six hours before a critical print. PETG needs roughly 60 to 65°C for four to six hours. Nylon needs 70 to 80°C for eight to twelve hours. A dedicated filament dryer holds these temperatures more accurately than a kitchen oven, which often overshoots and can soften or fuse a spool. Retest diameter after drying, since heat can shift it slightly.
Spool winding quality matters just as much. A loosely wound spool can tangle mid-print and snap the filament, ruining hours of work. The mechanism is worth understanding: when filament is wound with uneven tension, a strand can slip under an adjacent loop. As the spool unwinds, that trapped loop tightens into a knot that the extruder can’t pull through. The print stalls, the nozzle sits hot against the part, and you get a scorched defect or a clogged hot end. Cross-wound spools from budget lines are the usual culprit. Both suppliers generally wind cleanly on their main lines, but a single bad roll can cost a 12-hour print. If you feel resistance or hear the filament catching during a print, pause and inspect the spool rather than hoping it clears.
Storing spools in open air for weeks is the most common cause of stringing complaints. The filament looks fine, but absorbed moisture turns to steam in the hot end and ruins surface finish. A spool that printed perfectly last month can print badly today with no other change.
Moisture is a clock, not a switch. Sealed packaging buys you time, desiccant slows the clock, and drying resets it. Track your spools by weight and date so you know which ones are still trustworthy before you start a long print.
Is 3D Printing Expensive for Beginners? What Filament Quality Costs
3D printing is not expensive to start, but filament quality is where beginners either save money or waste it. A budget spool that jams costs you the spool plus the failed print plus your time, which usually exceeds the savings.
For anyone asking is 3d printing expensive for beginners, the honest answer is that the printer is the fixed cost and filament is the variable one. Buying mid-tier filament with published tolerances beats chasing the cheapest roll. Craft Living Artistry curates 3D printing filaments alongside its other maker supplies, so beginners can pair a reliable spool with the tools they need in one order.
Pricing for Craft Living Artistry’s filament depends on material, diameter, and quantity, so check the site for current pricing rather than working from an old figure.
| Priority | What to Check | Why It Matters |
|---|---|---|
| Tightest tolerance | Published diameter variance | Fewer flow calibration headaches |
| Dry packaging | Vacuum seal plus desiccant | Less stringing and popping |
| Clean winding | Cross-wound, even tension | No mid-print tangles |
| Material purity | Supplier sourcing notes | Predictable layer adhesion |
Best 3D Printer Filament Brands: Where These Two Fit
The best 3D printer filament brands earn that label through consistency, not color range. MatterHackers sits in the upper-mid tier: broad selection, published specs, and reliable house lines. CraftDirect fits the general-craft tier, where filament is one product among many and quality tracks the specific supplier behind each SKU.
A practical way to sort brands is by what they optimize for. Some chase industrial grade consistency for print farms. Others chase hobbyist grade affordability for casual projects. MatterHackers leans toward the former on its premium lines and the latter on its budget ones. CraftDirect tends toward hobbyist grade across the board.
For a beginner, that means MatterHackers is the safer default if you want published specs. For a crafter already buying beads, tools, and kits from one place, a curated supplier that stocks filament alongside those supplies saves shipping and guesswork.
How to Troubleshoot 3D Printing Filament Issues
Most filament problems trace back to four causes: moisture, diameter variance, temperature, and winding. Learning how to troubleshoot 3D printing filament issues means isolating which one you’re hitting before you change settings.
Work through this in order:
- Stringing or popping → dry the filament, then retest.
- Nozzle clogging → measure diameter; a swollen or oversized section is the usual cause.
- Warping or poor bed adhesion → raise print bed temperature and check for drafts.
- Weak layer adhesion → raise extrusion temperature in 5°C steps.
- Mid-print tangles → inspect spool winding and respool if needed.
Run flow rate calibration after any diameter change. A spool that measures 1.72 mm needs a different flow multiplier than one at 1.78 mm, and ignoring that shows up as over-extrusion blobs or under-extruded gaps.
Dry the filament first, measure diameter second, and adjust temperature last. Fixing settings before ruling out moisture and variance wastes time on problems that were never in the slicer.
Which Filament Quality Wins for Your Printer and Projects
MatterHackers wins on published specs and consistency, which makes it the better pick for print farms and anyone running tight tolerances. CraftDirect wins on convenience for crafters who want filament bundled with other supplies. Neither is a bad choice, but they suit different buyers.
The deciding factor is your printer. A high-end FDM printer with a well-tuned profile rewards tight-tolerance filament and exposes loose-tolerance rolls immediately. A casual hobbyist printer is more forgiving, which is why budget filament often works fine for simple models and fails on detailed ones.
For crafters who move between jewelry, pottery, and 3D printing, buying filament from a curated maker supplier keeps quality consistent across categories. Craft Living Artistry stocks filaments and maker tools together.
Frequently Asked Questions
Are MatterHackers filaments high quality?
MatterHackers carries both its own house-brand filament and well-known third-party brands, and its house line holds tight diameter tolerances and consistent extrusion, which is why it shows up often in discussions of the best 3D printer filament brands. That said, quality still varies by material and batch. Check the stated filament diameter tolerance and print temperature range on the spool before you commit, and test a small print first if the roll is new to you.
What factors determine 3D printing filament quality?
Five things matter most: filament diameter tolerance (a consistent 1.75 mm keeps flow rate steady), material purity (fewer contaminants means less nozzle clogging), spool winding (loose or crossed wraps cause tangles and mid-print failures), moisture absorption (wet filament strings and pops), and thermal stability across the extrusion temperature range. Dimensional accuracy and layer adhesion are the outcomes you actually see on the finished part.
How does CraftDirect filament compare to premium brands?
CraftDirect sits in the budget-friendly tier. It can work well for decorative prints, prototypes, and practice models where surface finish matters less than cost. Premium brands tend to hold tighter manufacturing tolerances and run more consistent quality control standards from batch to batch, which shows up in better layer adhesion and fewer print failures on long or structural jobs. Match the tier to the job rather than assuming one wins everywhere.
Is it worth paying more for professional-grade filament?
For structural parts, functional prototypes, or anything that needs repeatable tensile strength, yes. Tighter tolerances and better material purity reduce print failure rate and save you the cost of wasted filament and reprints. For decorative pieces, kids’ projects, and rough drafts, a cheaper roll is usually fine. If you are just starting out and wondering whether 3D printing is expensive for beginners, begin with a mid-tier PLA and upgrade once you know what your printer actually needs.
Filament quality is the variable most beginners overlook, and it’s the one that decides whether your prints succeed or fail. If you want filament that ships dry, measures true, and pairs with the rest of your maker supplies, Craft Living Artistry curates 3D printing filaments alongside jewelry-making essentials, pottery tools, and kids’ craft kits, all in one convenient place. Get started with Craft Living Artistry and print with a spool you can trust.





0 Comments