
Table of Contents
- Why Clay Body Choice Matters for Slab Work
- Comparing Stoneware, Earthenware, and Porcelain Slabs
- The Best Clay for Handbuilding: Plasticity and Grog
- How to Roll Clay Slabs Without a Roller
- Pottery Slab Construction Techniques for Strong Forms
- Drying and Shrinkage: Preventing Cracks and Warping
- Conclusion
- Frequently Asked Questions
Last Updated: September 15, 2026
Why Clay Body Choice Matters for Slab Work
Choosing the right clay body is the single most important decision when you buy high quality pottery clay slabs. Slab work fails differently than wheel throwing: a slab must hold its shape while flat, bend without tearing, and survive uneven drying across a large surface. A clay that performs beautifully on the wheel can slump, crack, or warp the moment you roll it out.
Three properties decide whether a clay suits slab construction:
- Plasticity, how well the clay stretches without cracking
- Grog content, fine particles that add structure and reduce shrinkage
- Shrinkage rate, how much the clay contracts from wet to fired state
Get these three right and slabs behave predictably. Get them wrong and no amount of careful handling saves the piece.
Comparing Stoneware, Earthenware, and Porcelain Slabs
Stoneware is the most forgiving all-around choice for slab work, but the right body depends on what you are building, how you fire, and how large your slabs run. The table below compares the three main families on the variables that actually decide whether a slab survives drying and firing.
| Clay Body | Typical Cone Range | Wet-to-Fired Shrinkage | Absorption After Firing | Slab Behavior | Best For |
|---|---|---|---|---|---|
| Earthenware | 04-06 | ~5-8% | 5-15% (porous) | Soft, plastic, sags on tall forms | Decorative tiles, low-fire sculpture |
| Mid-range stoneware | 5-6 | ~10-12% | 1-3% | Holds shape, tolerates uneven drying | Functional ware, large slabs, dinnerware |
| High-fire stoneware | 9-10 | ~12-14% | 0-2% | Dense, strong, less forgiving of fast drying | Vessels, ovenware, architectural work |
| Porcelain | 6-10 | ~14-18% | 0-1% | Warps and tears easily; needs grog or fiber | Fine detail, translucent work |
Firing Ranges and Vitrification
Vitrification is the point at which clay particles fuse into a dense, non-porous mass. Earthenware never fully vitrifies, which is why earthenware pieces stay porous and remain vulnerable to thermal shock and glaze crazing (Vitrification). Mid-range stoneware vitrifies around cone 5-6, and high-fire stoneware and porcelain typically need cone 9-10 to reach full density.
For slab builders, cone 5-6 stoneware is often the practical target. It produces durable, food-safe surfaces without pushing a kiln to its upper limits, and the lower shrinkage compared to cone 10 reduces the dimensional error you have to build into large slabs.
Slab-Specific Clay Formulation
This is where most buying guides stop short. A clay body that is excellent on the wheel is not automatically excellent in slab form, because slab work stresses the clay in ways the wheel does not: a large flat sheet must resist gravity while wet, survive uneven moisture loss across its surface, and bend at seams without tearing.
Three additives do most of the work:
- Grog, pre-fired clay ground to a specific mesh size. Fine grog (roughly 30-80 mesh) adds structure with minimal texture; coarse grog (up to 20 mesh) adds tooth and drying channels but shows through the surface. Most slab bodies run 10-20% grog by weight.
- Sand or kyanite, silica sand and kyanite serve a similar structural role and can reduce shrinkage further. Kyanite is prized in large sculptural slabs because its needle-like crystals reinforce the body through the full firing range.
- Nylon or paper fiber, small percentages of nylon fiber or paper pulp (often 0.5-2%) act like a web inside the clay, holding greenware together during drying and giving leather-hard slabs enough tensile strength to be lifted and bent. Fiber-reinforced bodies are the standard choice for very large or thin slabs.
If you are buying clay specifically for slab construction, look for a body labeled as a handbuilding or slab body, or ask the supplier for the grog percentage and mesh. A smooth, high-plasticity wheel body with no grog will feel wonderful in the hand and then slump the moment you roll it out.
When testing a new clay body, roll a slab, drape it over a rolling pin, and let it dry completely. If it holds the curve without cracking, it will handle most hand-building work.
Matching the Body to Your Kiln and Glaze
Your firing setup narrows the choice further. If you fire electric to cone 6, mid-range stoneware is the default. If you fire reduction to cone 10, high-fire stoneware and porcelain open up, but expect higher shrinkage and tighter drying tolerances. Earthenware is the right call only if you are firing low, glazing heavily, and not asking the piece to hold food or water.
The Best Clay for Handbuilding: Plasticity and Grog
The best clay for handbuilding combines moderate plasticity with a grog content around 10 to 20 percent. Grog acts like rebar in concrete, giving a slab internal structure that resists slumping and cracking during drying (ceramicartsnetwork.org).
Too little grog and large slabs sag under their own weight. Too much and the clay feels short, refusing to bend at seams without tearing.
A common mistake is buying smooth, high-plasticity clay because it feels pleasant in the hand. That same smoothness makes it collapse in slab form. For hand-building, prioritize structure over feel.
When testing a new clay body, roll a slab, drape it over a rolling pin, and let it dry completely. If it holds the curve without cracking, it will handle most hand-building work.
How to Roll Clay Slabs Without a Roller
You can roll even, consistent clay slabs without a slab roller using two wooden guide strips and a rolling pin. The guides control thickness, which is the variable that matters most for even drying.
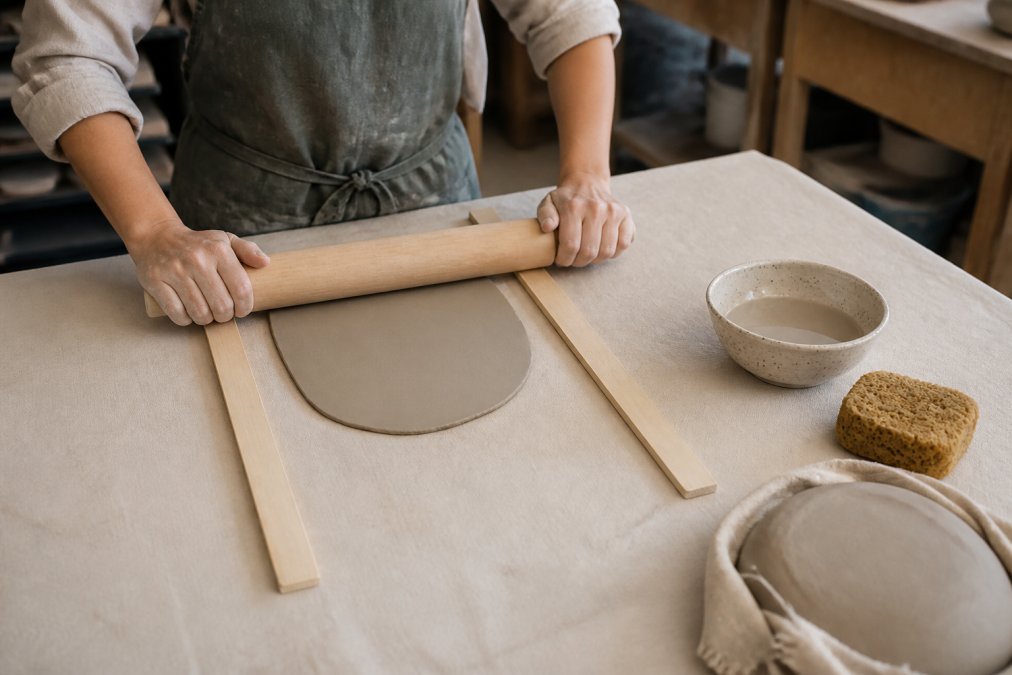
Here is the process:
- Wedge the clay thoroughly to remove air pockets.
- Place two wooden guide strips on either side of the clay, both the same thickness.
- Roll from the center outward, rotating the clay a quarter turn between passes.
- Flip the slab periodically so both faces dry evenly.
- Check thickness with a needle tool or calipers before lifting.
Keep the slab on canvas to prevent sticking. Work quickly, and avoid overworking the surface, which compresses the clay unevenly and encourages warping.
Pottery Slab Construction Techniques for Strong Forms
Strong slab forms depend on three construction habits: joining at the right moisture content, reinforcing seams, and supporting the form until it stiffens. Pottery slab construction techniques that skip any of these produce pieces that look fine wet and split in the kiln.
Score both surfaces, apply slip, and press the seam firmly. Add a coil of clay along interior corners for reinforcement. Where two slabs meet at a right angle, a small triangular fillet inside the joint distributes stress far better than a bare butt joint.
Supporting the form matters just as much. Drape slabs over molds, stuff hollow forms with newspaper, and let pieces stiffen before moving them.
Joining leather-hard slabs to wet ones is the most common cause of seam failure. Match moisture content between pieces, or the joint will crack as the wetter section shrinks.
Drying and Shrinkage: Preventing Cracks and Warping
Most slab failures happen during drying, not firing. Clay shrinks as water leaves, and a slab that dries faster at the edges than the center will crack, warp, or curl. Controlling the drying rate solves nearly every one of these problems, but “dry it slowly” is not a protocol. Here is what a real slab drying protocol looks like.
Why Slabs Fail During Drying
A freshly rolled slab is saturated with water. As that water evaporates from the surface, the clay particles pull closer together and the slab shrinks. If the surface dries faster than the interior, the outer skin shrinks first and the interior is still swollen, the result is a warp, a curl, or a crack that opens along the weakest line. Large slabs make this worse because the distance between the wet center and the dry edge is greater, and the slab has less structural support than a thrown wall.
A Controlled Slab Drying Protocol
- Roll to even thickness. Thickness variation is the single biggest cause of uneven drying. Use guide strips or a slab roller and check with calipers. A 1/4-inch slab and a 3/8-inch slab dry on different schedules; a slab that varies between them dries unevenly within itself (Drying Ceramics Without Cracks).
- Rest the slab under plastic. Immediately after rolling, cover the slab loosely with a sheet of plastic, not sealed, just draped. This slows surface evaporation and lets moisture equalize through the slab.
Shrinkage Math You Should Build In
Troubleshooting Common Slab Drying Defects
Slow, even drying prevents more slab failures than any other single habit. If a piece cracks, drying speed and thickness variation are the first two things to check, in that order.
Conclusion
Frequently Asked Questions
What is the best type of clay for handbuilding slabs?
Stoneware is the best clay for handbuilding slabs because of its high plasticity and grog content, which add strength and reduce warping. It fires at cone 6 to cone 10, making it durable for functional ware. Earthenware is easier to shape but more porous, while porcelain is difficult to handbuild without cracking. For beginners, a mid-range stoneware with fine grog offers the best balance of workability and durability.
Can you buy pre-rolled clay slabs online?
Yes, you can buy high quality pottery clay slabs online from ceramic suppliers. Pre-rolled slabs are convenient for consistent thickness.
What thickness should pottery clay slabs be for functional ware?
For functional ware like plates and platters, roll slabs to 1/4 inch to 3/8 inch (0.6 to 1 cm) thick. Thinner slabs (under 1/4 inch) risk cracking during firing and are too fragile for daily use. Thicker slabs (over 1/2 inch) can trap moisture and cause explosions in the kiln. Always compress the slab with a rib or paddle after rolling to align clay particles and increase strength. Consistent thickness prevents warping and thermal shock.
How do you keep clay slabs from cracking during construction?
To prevent cracking, keep slabs covered with plastic between steps to retain moisture, and avoid joining wet slabs to dry ones. Score and slip all seams, then press firmly. Dry finished pieces slowly under a plastic tent for several days. Uneven drying causes shrinkage stress, which leads to cracks. Also, wedge clay thoroughly before rolling to remove air pockets. For large slabs, use a grog-rich clay body to reduce shrinkage rate and improve durability.




0 Comments