
Table of Contents
- What You’ll Need Before You Start Organizing
- Step 1: Sort Your Beads by Type, Color, and Size
- Step 2: Choose the Best Bead Storage Containers for Your Collection
- Step 3: Master Organizing Seed Beads by Color
- Step 4: Set Up a Labeling and Inventory System
- Step 5: Bead Organization Ideas for Small Spaces
- Step 6: Store Findings and Metal Components Separately
- Step 7: Protect Your Beads with Climate-Conscious Storage
- Frequently Asked Questions
Last Updated: September 16, 2026
What You’ll Need Before You Start Organizing
Learning how to organize jewelry making beads starts with a simple truth: the container is never the problem. The system is.
- A large, shallow tray or baking sheet with a lip (your sorting surface, the lip stops a spill from becoming a floor-wide rescue mission)
- Small paper cups, muffin liners, or zip-top bags for temporary sorting
- A permanent marker and painter’s tape for quick, removable labels
- A notebook or notes app for your running inventory
- A damp cloth, because seed beads roll, and static is real
Step 1: Sort Your Beads by Type, Color, and Size
Sorting beads by color and size makes every later decision easier, so do it before you buy a single container. Work in three passes: separate by material and type (glass, stone, wood, acrylic, and metal behave differently), then by size within each type, then by color family within each size group.
Separating Seed Beads from Larger Beads
Seed beads deserve their own workflow. They’re small, they roll, and they outnumber everything else in most collections. Pull every seed bead out of the general sort and treat it as a separate project, covered in Step 3. Larger beads, focal pieces, and charms can share a broader sorting logic because you can see and handle them.
Step 2: Choose the Best Bead Storage Containers for Your Collection
The best bead storage containers are clear, compartmentalized, and sized to your actual collection, not a photo you saw online. If you can’t see it, you won’t use it.
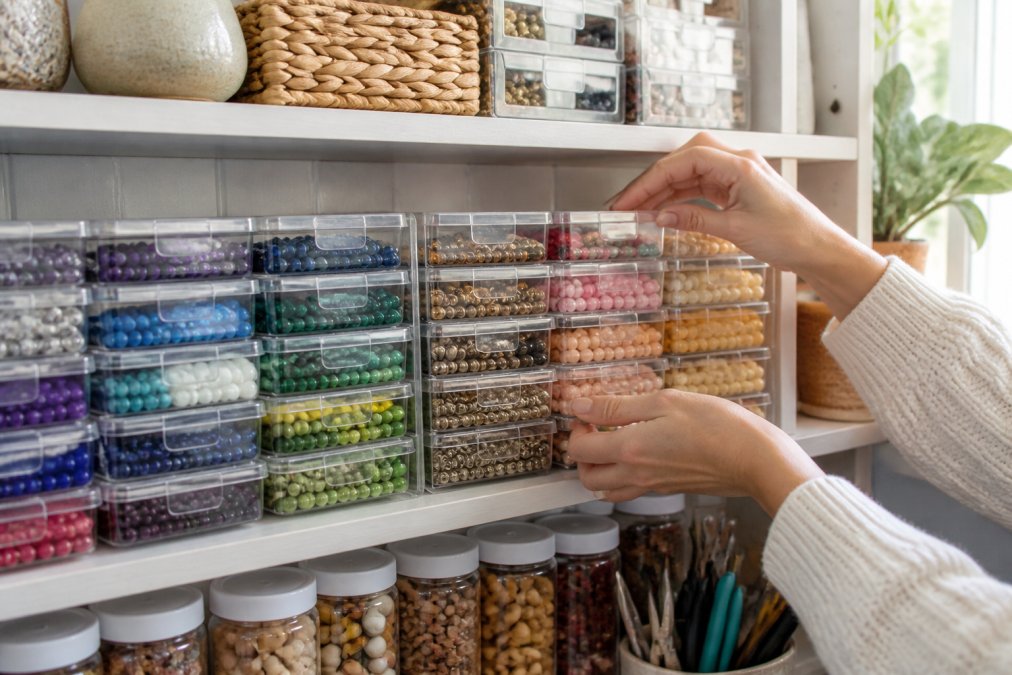
Match the container to the bead type:
| Container Type | Best For | Watch Out For |
|---|---|---|
| Stackable containers | Mixed medium beads | Weight crushing lower tiers |
| Clear plastic bins | Bulk and overflow | Beads rolling loose inside |
| Bead tubes | Seed beads and small parts | Unlabeled tubes look identical |
| Drawer units | Frequent-access beads | Dust in open drawers |
| Wall organizers | Small spaces | Overloading lightweight hooks |
| Compartment boxes | Findings and metal parts | Fixed dividers that don’t fit odd shapes |
Stackable Containers and Clear Plastic Bins
Stackable containers win for medium-sized collections you want to grow. Buy one brand and stick with it, because stackability depends on matching footprints. Choose a positive latch or snap lid over a friction-fit top, friction lids pop open when a stack tips, and a tipped stack of seed beads is a lost afternoon.
Budget-Friendly Containers You Already Own
You don’t need a dedicated bead system to get organized. Several household items work as well as purpose-built storage, and they cost nothing:
- Pill organizers, the seven-day, snap-lid type is ideal for findings, crimp tubes, and small stone beads. Each compartment seals independently, so a dropped organizer doesn’t mix everything together.
- Spice racks, a tiered rack holds bead tubes upright and angled, turning a deep drawer into a visible, reachable display. It’s one of the cheapest ways to get gradient color sorting without buying a bead-specific rack.
- Egg cartons, fine for a temporary sort of larger beads, though they won’t survive long-term handling.
- Shoeboxes and photo storage boxes, sturdy, stackable, and free. Line them with non-slip shelf liner so loose beads don’t slide into one corner.
- Mason jars, good for bulk beads you pour from, poor for anything you pick out one at a time.
Photograph each container’s label and contents together before you close it up. When you reorganize six months later, that photo is your map, and it takes ten seconds per bin.
Matching Container Size to Collection Size
Container choice should scale with how many beads you actually own, not how many you plan to own someday.
- Under a few hundred beads: one compartment box and a handful of tubes is enough. Don’t over-buy.
- A few hundred to a few thousand: a stackable system plus a drawer unit covers most needs, with clear bins for overflow.
- Thousands of beads, especially seed beads: you need a tube-based system with a dedicated rack or drawer per color family, plus labeled bulk bins for backup stock.
Step 3: Master Organizing Seed Beads by Color
Organizing seed beads by color is where most collections succeed or collapse: they’re tiny, they come in dozens of near-identical shades, and they’re almost impossible to tell apart once mixed.
Step 4: Set Up a Labeling and Inventory System
Labeling turns a pile of containers into a system. Without it, you’ll buy duplicates you already own and lose the one color you need.
Digital Inventory Tracking for Growing Collections
Digital inventory tracking is the gap most bead storage guides ignore, and the biggest upgrade for anyone whose collection has outgrown memory. A simple spreadsheet is enough.
The location column is the whole point. Knowing you own a bead matters far less than knowing which drawer it’s in.
Step 5: Bead Organization Ideas for Small Spaces
Bead organization ideas for small spaces come down to one principle: use vertical space before you buy another horizontal surface. A closet-sized craft room can hold a serious collection if you build upward.
Wall Organizers and Drawer Unit Configurations
Mount wall organizers at arm’s reach from your main work surface, if you have to stand up and walk, you’ll stop using it. Keep the heaviest items low and the lightest up high.
A few concrete configurations that fit tight rooms:
- Under-table rolling cart: a three-tier cart on casters stores active project supplies and rolls out of the way when you’re not working. Measure your table’s clearance first, most carts need about 24 inches of height to fit beneath a standard desk.
- Over-the-door shoe organizer: the clear-pocket type holds bead tubes, tools, and findings in plain view and uses a door you already have. It’s one of the highest-capacity options per square foot.
- Closet shelf conversion: a single closet shelf plus a hanging rod can hold stacked bins below and a pegboard above, doubling usable storage in a footprint most people waste.
- Folding work surface: if your craft space shares a room, a wall-mounted drop-leaf or folding table you can stow means your storage stays put while your work surface disappears.
Making Your Setup Work for Limited Mobility or Vision
Storage that’s hard to reach is storage you won’t use, especially with limited mobility, low vision, or hand strength issues. A few adjustments make a real difference:
- Keep the most-used items between waist and shoulder height. Bending to a floor bin or reaching to a top shelf is the first thing to cut. Reserve those zones for backup stock you touch rarely.
- Choose high-contrast labels. Dark text on a light label, or a bold color band on a tube edge, is far easier to read than a handwritten label in a similar shade to the bead.
- Use larger-grip containers. Snap-lid boxes with a tab or handle are easier to open than tight friction lids, and a container you can open one-handed keeps a project moving.
- Tilt your storage toward you. A tiered spice rack or angled tube holder lets you see and grab a bead without lifting a whole tray.
- Sit-down reach matters. If you work seated, arrange active supplies within a comfortable arm’s sweep and keep everything else on a rolling cart you can pull close.
In a small space, the goal isn’t more storage, it’s storage placed where your hands already are. Reach and visibility beat capacity every time.
Step 6: Store Findings and Metal Components Separately
Findings and metal components need their own storage, away from beads. Jump rings, clasps, crimp tubes, ear wires, and wire all tangle, and a tangle of metal is far harder to undo than a tangle of thread.
Never store loose jump rings or crimp tubes in the same open bin as seed beads. Once metal migrates into a seed bead container, you’ll be picking it out with tweezers for an hour, and you’ll still miss some.
Step 7: Protect Your Beads with Climate-Conscious Storage
Climate-controlled storage is the last step and the one that protects your investment. Beads and findings degrade slowly, and the damage is usually invisible until a piece fails.
Frequently Asked Questions
Should I organize beads by color or by size?
Most crafters sort by color first, then by size within each color group. Color-first sorting speeds up design decisions because you can see all your options at a glance. Size-first works better if you follow patterns that specify exact bead dimensions, such as 8/0 versus 11/0 seed beads. A hybrid approach works well: separate seed beads, larger beads, and findings into categories, then sort each category by color and store in labeled containers.
What is the best way to store seed beads versus larger beads?
Seed beads are tiny and spill easily, so store them in bead tubes or compartmentalized containers with tight-sealing lids. Clear plastic bins with individual sections keep colors separated and visible. Larger beads, like 8mm rounds or focal pieces, work well in stackable containers with removable dividers or in drawer units where you can group them by project or color family. Keep seed beads away from larger beads to prevent mixing and wasted sorting time.
How can I organize beads in a small craft space?
Use vertical space with wall-mounted organizers, pegboards, or hanging caddies. Stackable containers and drawer units maximize shelf area without taking up floor space. Clear plastic bins let you see contents without opening every container. For very tight spaces, a rolling cart with tiered trays keeps supplies mobile and tucked away when not in use. Label everything so you can find what you need without pulling out multiple containers.
Do I need digital inventory tracking for my bead collection?
Digital tracking helps once your collection grows beyond a few containers or when you sell jewelry and need to reorder specific supplies. A simple spreadsheet listing bead type, color, size, and quantity works well. Apps designed for craft inventory can also store photos, which helps when you shop for matching beads. For small collections, a printed label system and a written list taped inside a cabinet door may be enough.
Most crafters hit the same wall: the collection grows faster than the system holding it. Craft Living Artistry makes that easier by putting curated bead selections, findings, cords, and maker tools in one convenient place, so you’re not rebuilding your storage logic around mismatched parts from five different sellers. Explore the Craft Living Artistry collection and get everything you need to keep your beads sorted, visible, and ready to use.




0 Comments